
Accessing Axxess Desktop
Axxess Desktop can be accessed from the portal. Open one of the following URLs and login with your Login name and password created from your welcome email
- East Coast – https:// portalphl.axxessnetworks.com
- West Coast –https://portalla.axxessnetworks.com
At the top of your screen youʼll see the Apps dropdown, click Axxess Desktop.

Granting Permission to the Microphone
When first launching Axxess Desktop, the browser will prompt you to grant access to the microphone. This prompt will look different based on the browser being used as the prompt is generated by the browser, not the Portal.


Axxess Desktop View

Calling Within Axxess Desktop
Click the Dialpad icon on the left of your screen to launch the dialer.

Dialing can be performed by either clicking on the screen number pad or dialing numbers from your keyboard.
When dialing is complete, press the green phone icon on your screen, or click Enter on your keyboard, to begin the call.

Receiving a Call
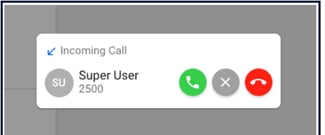
When receiving a call, the computer will play a ringtone and the webphone will display the following call options:
- Answer – this will answer the call
- Reject – this will reject the call from all ringing devices that are a part of a simultaneous ring (if applicable). A 480 SIP Response is sent to cease the ringing.
- Ignore – this will ignore the call received within the Axxess Desktop interface but still continue ringing other devices that are a part of a simultaneous ring (if applicable).
Call Handling
When a call is active the following functions will be available
- Mute – disables the microphone
- Hold – places the other party on hold
- Dialpad – enables entering digits at auto attendants
- Transfer - allows the call to be transferred to a contact or a dialed number
- Add Call – creates the second call and puts the first call on hold. Once a second call has been added this button will become a Swap Call button to allow for switching between calls when two are active.
- Switch call – moves the call to another device associated with the same user

Contacts
The Contacts view shows other users in the organization as well as any contacts that have been added in the Portal. Organization contacts show presence; indicated as a green, red or gray circle; and favorite contacts are indicated with a star.
Switching Contact Views
By default, this view will show all contacts. To select a predefined filter or user-created group, click the Contacts pulldown at the top, then select the filter needed.


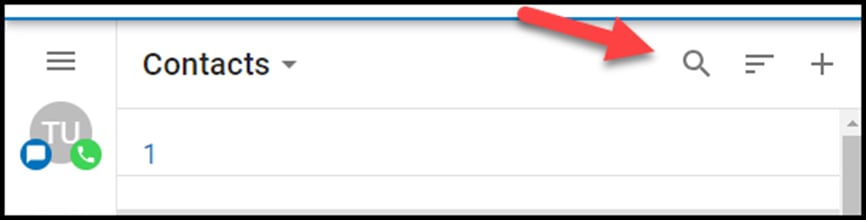
Searching Contacts
To filter/search contacts, click on the magnifying glass in the upper right, then type in the name to filter.
Adding Contacts
Click the plus in the upper right to bring up the add contacts view. Complete the fields to add a contact then click the check button in the upper right to save the contact.

Editing/Dialing
When viewing the list of contacts, you can click on a contact to view details. The contactʼs extension/phone number(s) and email address (if available) will be displayed.
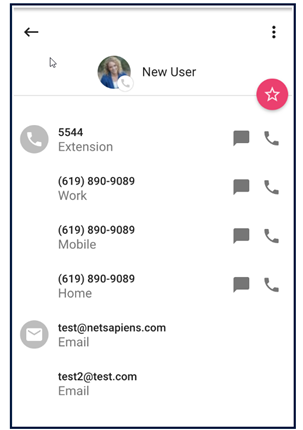
- Clicking on the extension/phone number will dial that number.
- Clicking the Star icon will toggle the favorite status of the contact.
- Click on the three dots in the top right corner to display a pulldown menu of additional options:
- Edit - edits the contactʼs information
- Copy to Clipboard – copies user data which can be pasted into another application

Voicemail View
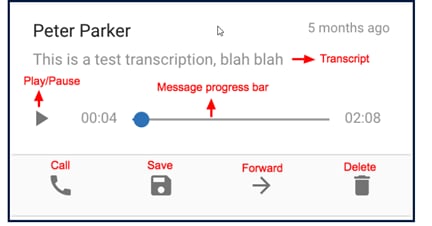
The Voicemail view shows the userʼs voicemail box. Users can click the play button to listen to the message or click elsewhere on the message to expand the options.

- Message progress bar – shows the current place in the message, drag and drop the circle or click on the bar to jump to a particular part of the message
- Play/Pause Toggle – click play to begin playback, when a message is playing becomes a pause button
- Call – call back the number, if caller ID is known
- Save – moves message to saved box
- Forward – forwards the message to another user in the domain
- Info – brings up screen of additional message details and actions
- Delete – moves message to trash
-
Transcript – the message transcript will be displayed, if available, directly below the caller name
Changing Mailbox Views
By clicking on the Voicemail header you can select whether you see New or Saved messages.

Call History
The Call History view displays the userʼs call history including inbound, outbound, and missed calls.

The entries displayed will show caller ID (if available), call direction (inbound, outbound or missed), call time, and call duration. Clicking the info icon will display additional details and options.
Clicking on the call history entry will return the call, chat with another user, send an SMS if enabled. Create a new contact or add to an existing contact.

Changing Call History Views
By clicking on Call History in the header you can select a view of All, Missed, Inbound, or Outbound Call History.

Chat and SMS
How to chat with another user or send a text message (if enabled)

1. Click new conversation

2. Select contact to message
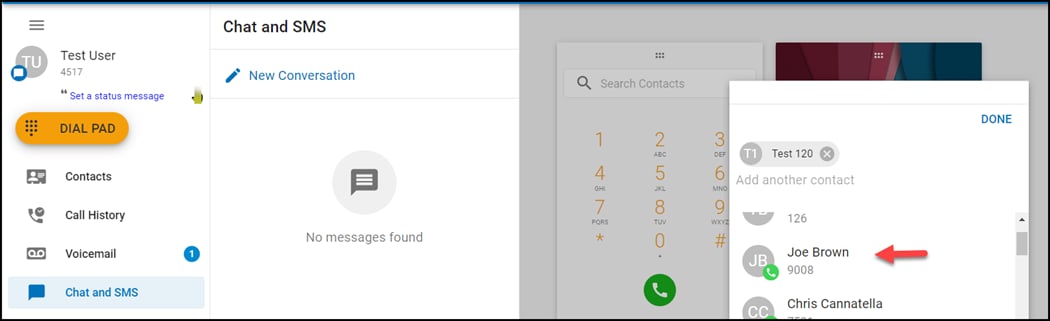
3. Click Done

4. Type Message

Call Parks
Call Parks are used to place or retrieve a call on system wide or location wide hold

Answering Rules
The answering rules section can be used to view and reorder the answering rules that have already been created for the user.
- Dragging and dropping the rules will reorder the rule processing.
- The active rule is denoted by a blue dot.
- Clicking on a rule will display the details of that particular rule.

Greetings
The greetings section manages the userʼs voicemail greetings.

Clicking on the downward arrow to the left of the greeting name will present options to play the greeting, select it as the active greeting, or delete the greeting'

Record a New Greeting
1. To record a new greeting, click the + sign

2. Name the Greeting and press the blue mic to record

3. Click save or redo when finished recording.

Settings
The settings section allows you to select your preferred options for the following:
- Microphone
- Audio
- Output
- Ringtone
- Output
- Call Waiting tone

Logout
Click Logout to logout of the Web Phone and take you back to login screen.
