
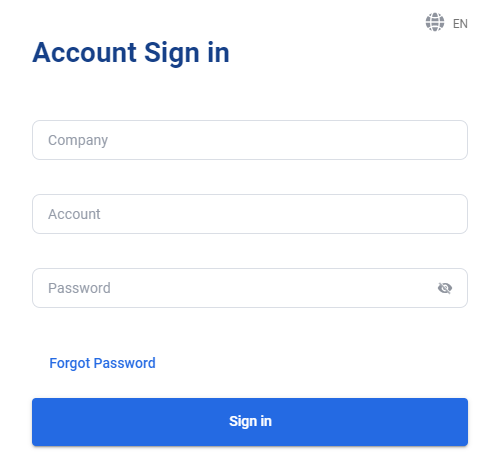
Account Login
- Navigate to https://axxomni.axxessnetworks.com/ in your web browser
- Enter your Company, Account, and Password.
- If your system administrator has linked your tenant to a domain, you do not need to enter the Company name.
- Click Sign In to access the system.
Note: For the Account field, you can use either your username or your email address.
Adding Team Members
Add Agents
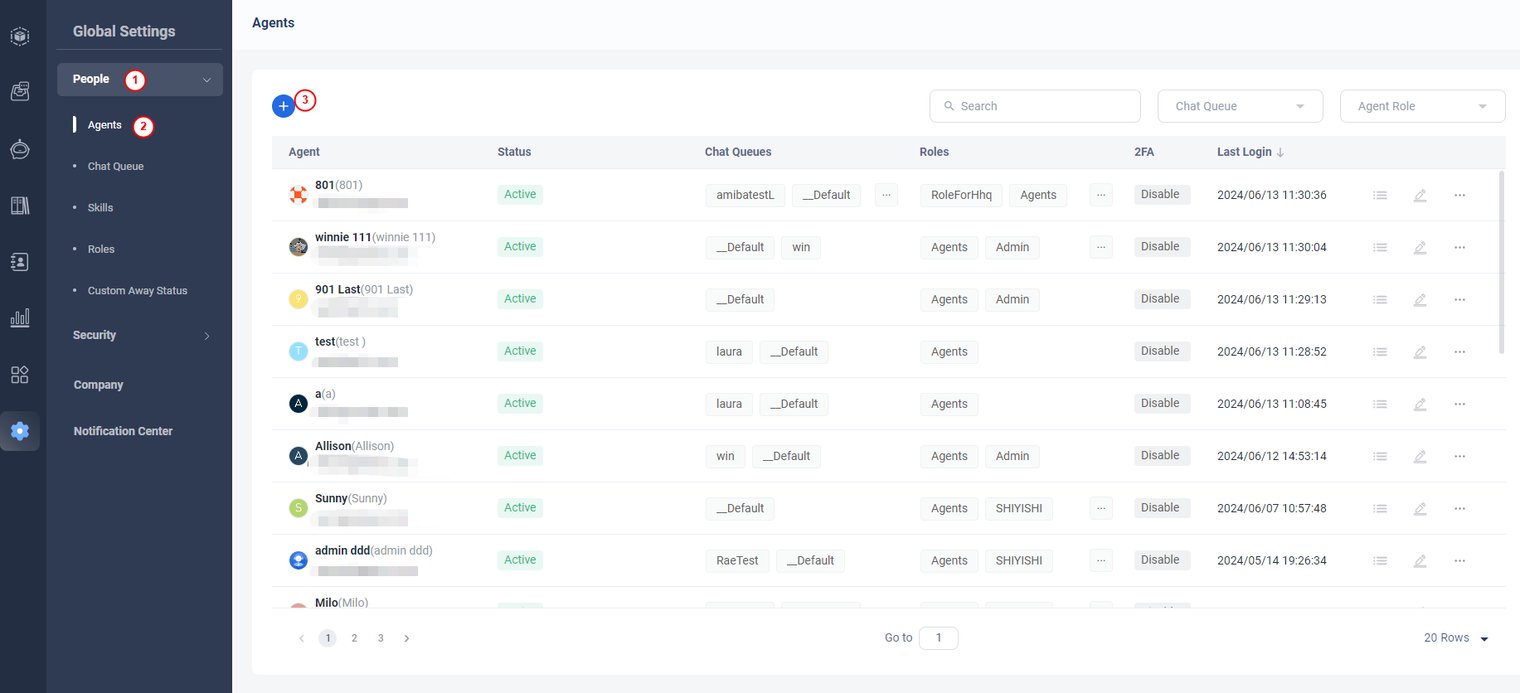
- Log in to your Axx Omni Control Panel.
- In the left navigation menu, go to Global Settings > People > Agents.
- Click Add to create a new agent
- Enter the agentʼs information.
.png)
- Click Save to create a new agent. The agent will receive a notification via email.
- Account (Required): The username the agent uses to log in.
- First Name (Required) / Last Name: The agentʼs full display name.
- Alias (Required): The name that appears to visitors in the chat window.
- Email (Required): The agentʼs email address.
- Phone: The agentʼs phone number.
- Chat Queue: Select the queue the agent will be assigned to. For more options, see Chat Queue.
- Agent Roles: Choose the roles the agent will perform on your team. For more details, see Agent Roles
- Skills: Select the agentʼs skills. For more information, see Skills.
- Title: The agentʼs title, which can be displayed to visitors in the chat window header.
- Bio: A short biography of the agent, which can also appear in the chat window header.
Add Queue
- Log in to your Axx Omni Control Panel.
- In the left navigation menu, navigate to Global Settings > People > Chat Queue.
- Click Add to create a new chat queue.
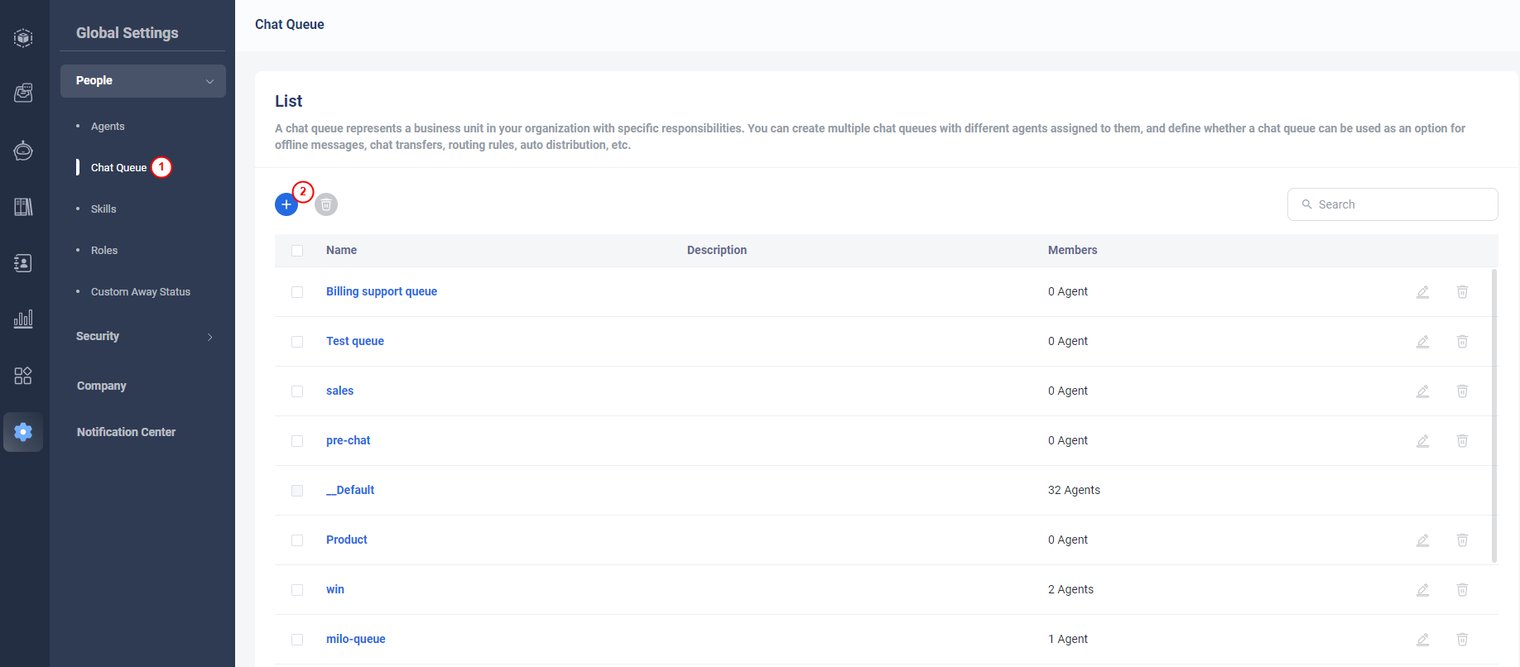
- On the New Chat Queue page, enter a Name and Description to identify the department. Then, add the agents who should be assigned to this queue.
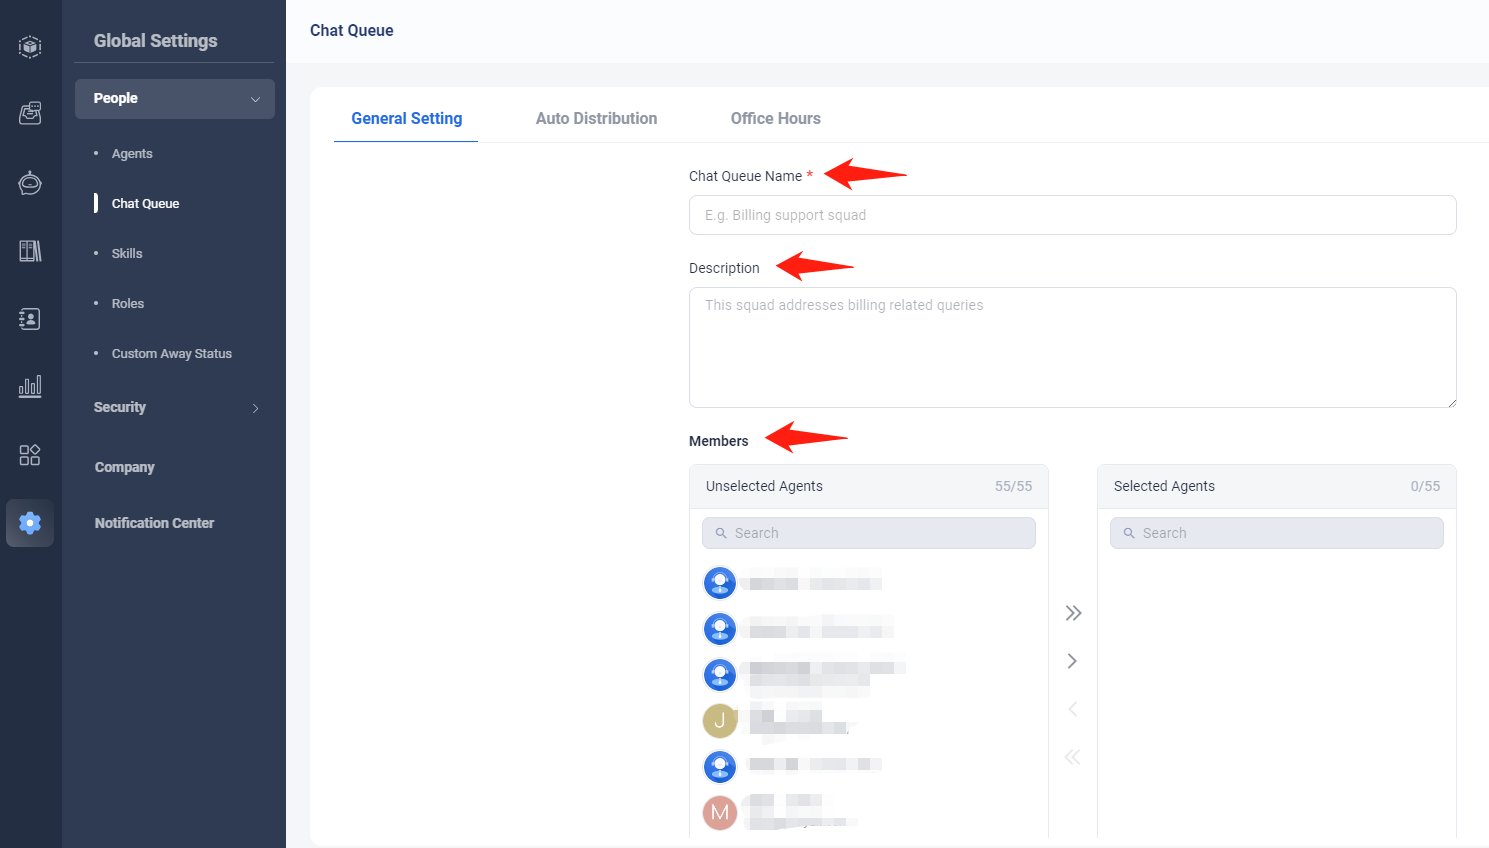
- Choose whether this queue should be available for Webchat and Inbox.
- Then Click Save
Manage Omnichannel Widget
Widgets
A widget is a set of configurations that defines the style of your chat button and the visitor-side chat windows. Each widget has its own unique widget code.
Axx Omni allows you to create and deploy multiple widgets, enabling you to provide personalized support experiences to your customers.
For example:
- The support experience on your product listing page may differ from the order tracking page.
- If you manage multiple brands, each brand can have its own tailored support experience.
By using multiple widgets, you can offer unique, page-specific experiences to your visitors.
Step by Step Instructions
- Log in your Axx Omni.
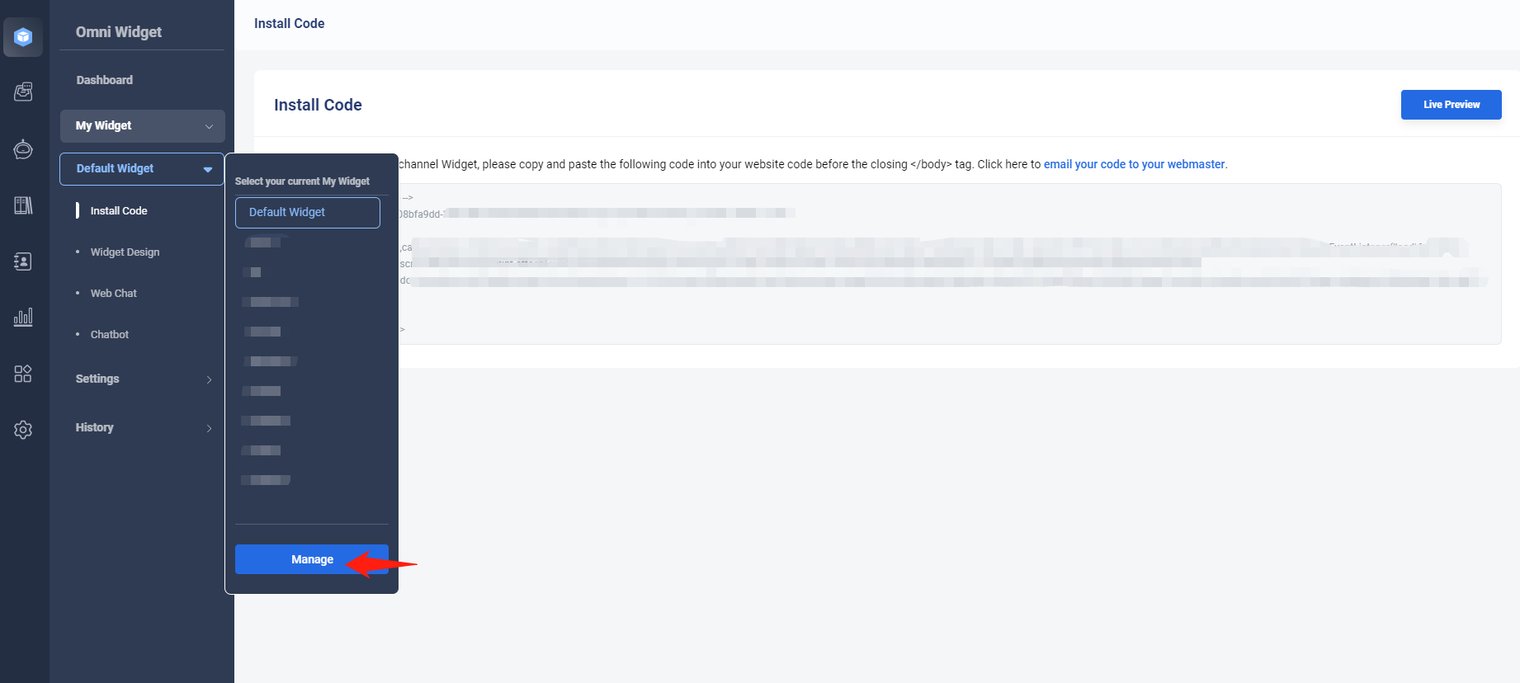
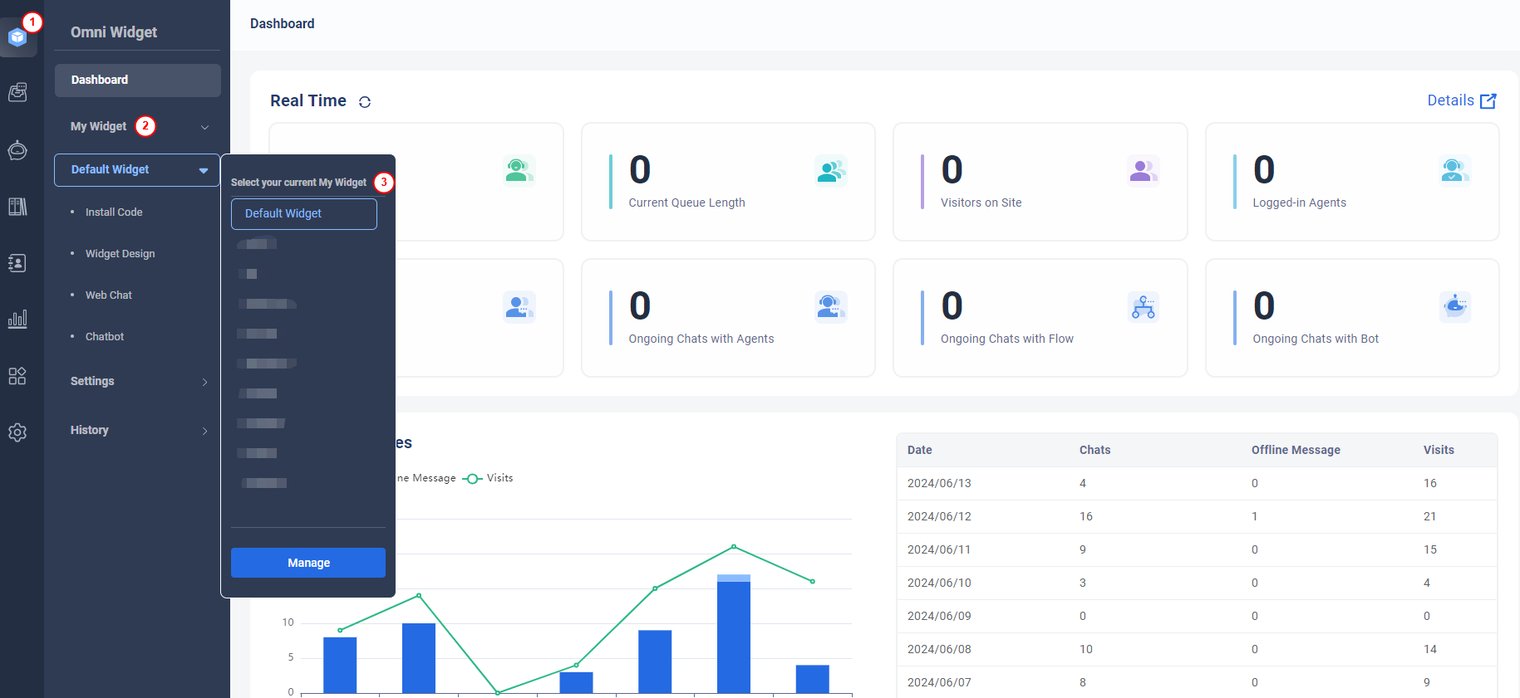
- In the left navigation bar, go to Omni Widget > My Widget, and then click Default Widget.
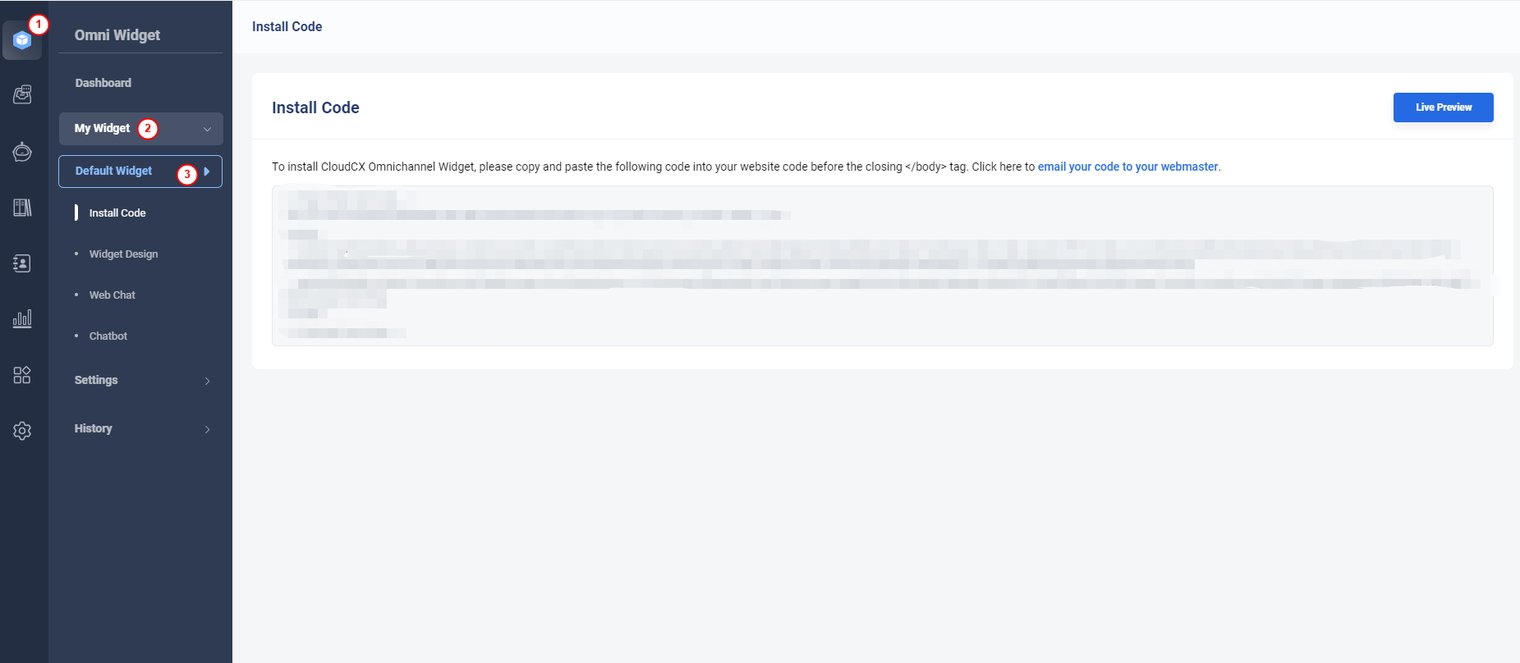
- Click “Manage”
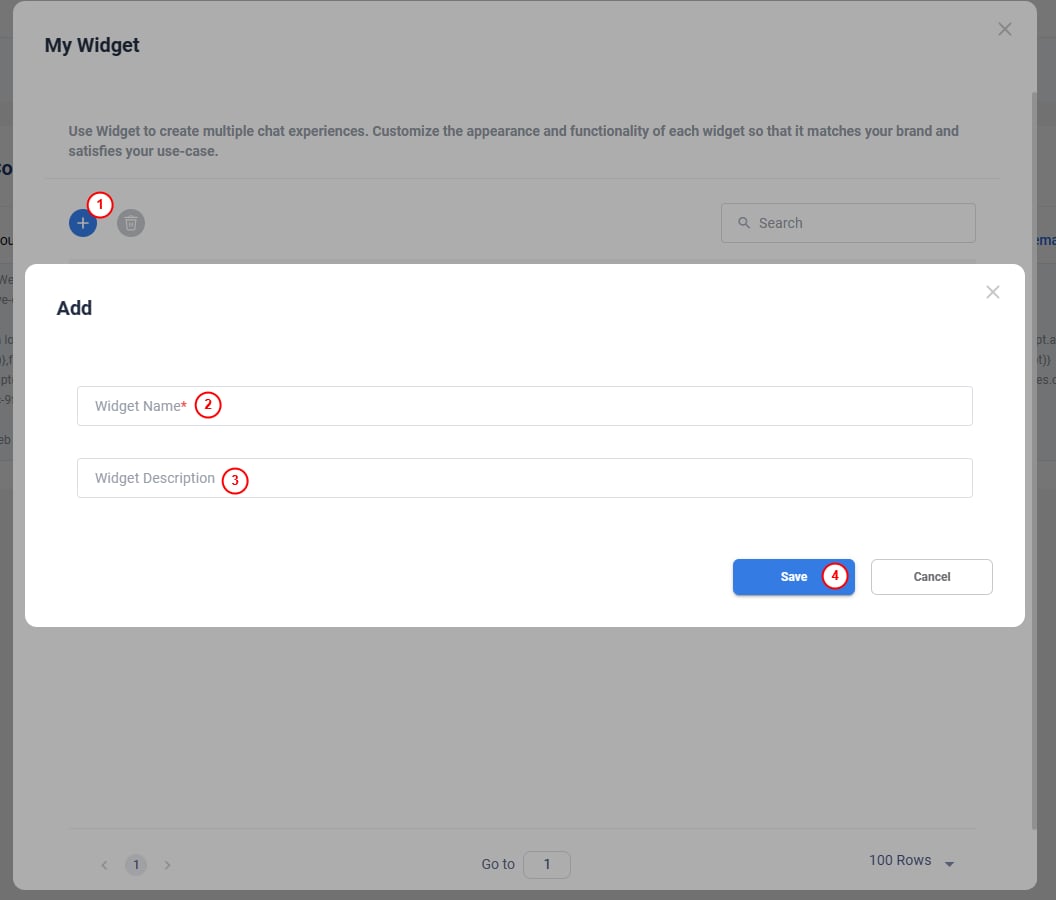
- If you want to create your own Omnichannel Widget, click “Add”, and then fill in your Widget Name and Description.
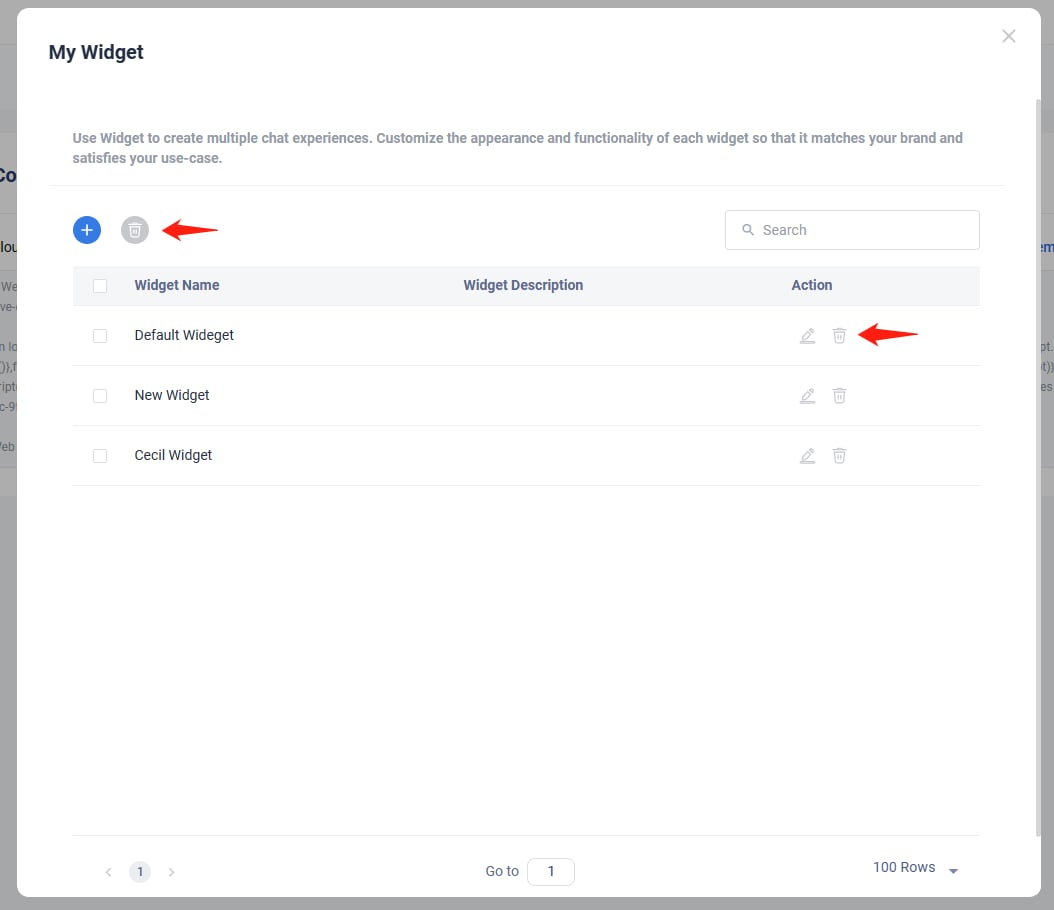
- If you want to edit Omnichannel Widget: click”Edit” icon, and then fill in Widget Name and Description.
- Click “delete” icon, you can delete this Widget.
Installing Omni-Widget a Website
Installing Axx Omni-Widget
This guide will help you install the Axx Omni-Widget on your website, enabling chat functionality for your visitors.
To get started, you need to obtain the widget code from your Axx Omni account and insert it into your websiteʼs HTML just before the closing <body> tag.
You can use the default widget code provided by HELIOS or create a custom widget tailored to your specific needs.
How to Install Your Widget Code
- Log in to your Axx Omni Control Panel.
- In the left navigation bar, go to Omni Widget > My Widget.
- From the My Widget dropdown list, select the widget you want to install.
.png)

- Go to Install Code.
- If you have multiple widgets, select the appropriate one from the My Widget dropdown list.
- By default, the Installation page with the widget code will appear.
- Copy the provided code and paste it into your website’s HTML just before the closing
</body>tag

- Alternatively, you can click Email Your Code to send the widget code to your webmaster.
- If you’re not familiar with coding or don’t have access to your website’s source code, send the code to your webmaster or site developer for assistance.
- Click the Live Preview button to see how the widget will appear on your website.
Customizing Axx Omni-widget
Button Design
Chat Button Overview
The Chat Button appears on your homepage and allows visitors to initiate a conversation with your agents, receiving instant responses to their queries. You can configure the button to appear active when agents are online and gray when they are unavailable.
Step-by-Step Instructions
- Log in to AxxOmni.
- Access Your Widget
- From the left navigation bar, go to AxxOmni Widget > My Widget.
- Select the desired widget from the My Widget drop-down list.
- Configure the Button
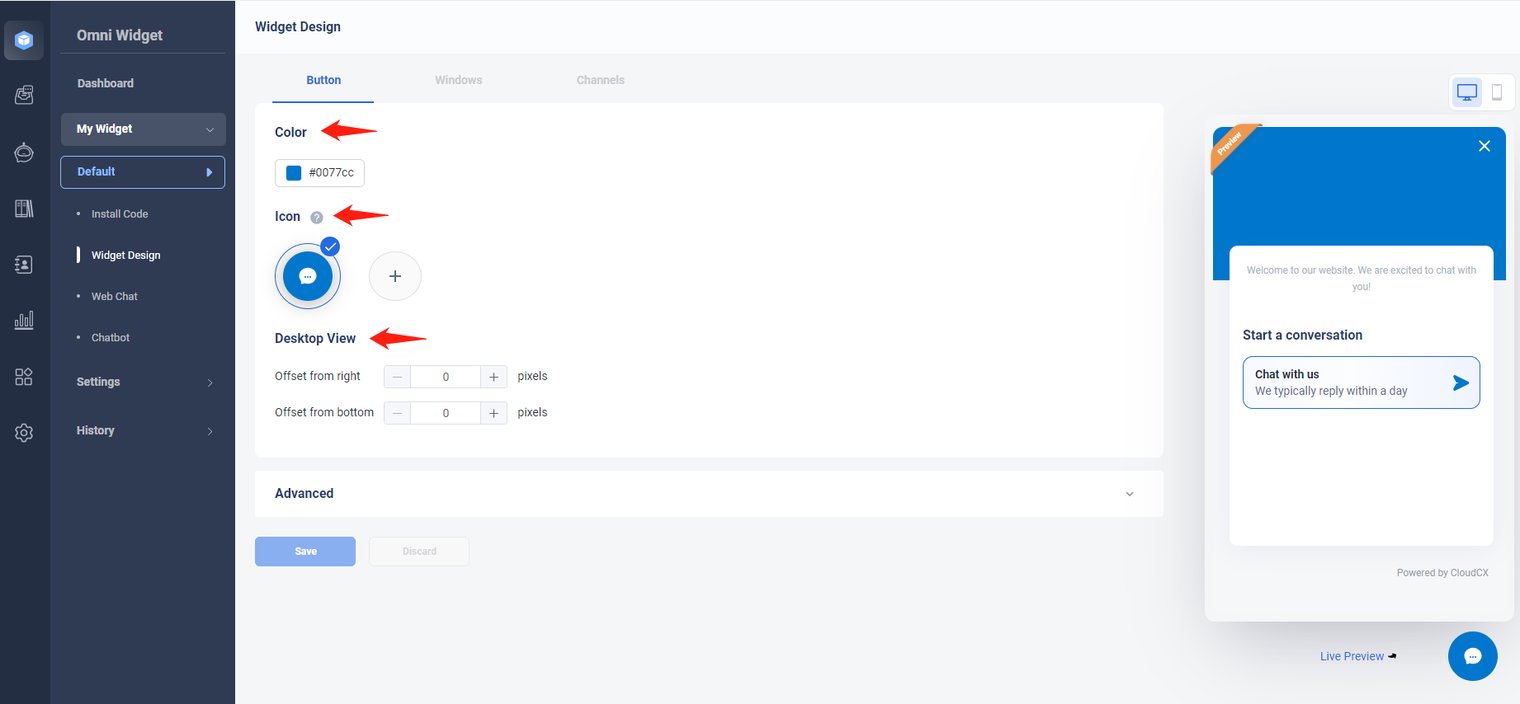
- Navigate to Widget Design > Button.
- Choose Button Color
- Select the color for your Chat Button.
-
Upload Custom Icon (Optional)
- You can upload your own design to use as the icon inside the adaptive Chat Button.
- Supported format: SVG
- Maximum file size: 20 KB
-
Set Float Position
- Choose the float position from the list (offset from right and bottom).
- Define the precise offset in pixels.
-
Configure Advanced Options (Optional)
-
Display chat button on specified domains/URLs only:
- This includes all pages under the same domain path.
-
For example, if you enter
http://www.adomain.com/example, the Chat Button will appear on all pages whose URLs start with this domain. - Note: This works only for websites that already have the AxxOmni Live Chat code implemented.
-
Display chat button on specified domains/URLs only:
-
Save and Preview
- Click Save
- To see how it looks live, click Live Preview.
Window Design
Step-by-Step Instructions
- Log in to Axx Omni.
- Access Your Widget
- In the left navigation bar, go to Omni Widget > My Widget.
- Select the desired widget from the My Widget drop-down list
- Configure the Chat Window
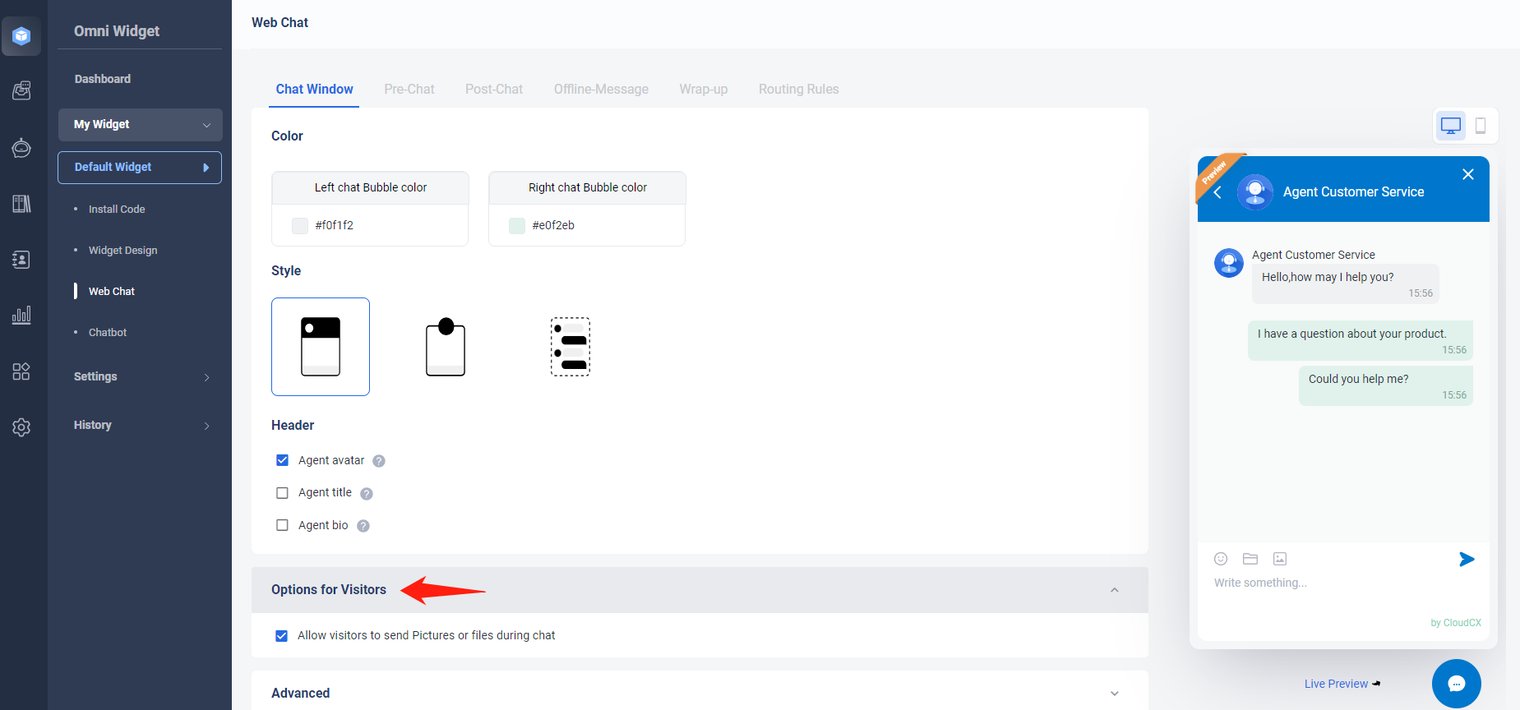
- Navigate to Widget Design > Windows
- Customize Appearance
- Choose a color for the chat window.
- Set the Header logo and Banner according to your preference.
-
Set Greeting Message
- Enter a greeting message that will appear at the top of the Chat Window.
-
Configure Advanced Options (Optional)
- Allow visitor to switch language: Visitors can change the chat window language, and you can set a default language.
- Remove “Powered by…” in Widget: Hides the “Powered by…” text link in the chat window.
-
Save Changes
- Click Save to apply your customizations.


Adding Channels in Widget
Step-by-Step Instructions
- Log in to your AxxOmni control panel.
-
Access Your Widget
- In the left navigation bar, go to Omni Widget > My Widget.
- Select a widget from the My Widget drop-down list.
-
Go to Channels
- Navigate to Widget Design > Channels.
-
Configure Web Chat Channel
- The Web Chat channel is enabled by default.
- You can edit the title and content displayed in the channel.
-
Enable Social Media Channels (Optional)
- Turn on the social media channels to let visitors contact you via their preferred platform.
- You can modify the title for each channel.
- Click “Add a Channel” to include additional channels.
- Fill in the label and the required number, ID, or email for each channel.
-
Save Changes
- Click Save to apply your settings.


Web Chat Channel
Chat Window Overview
The Chat Window is the interface through which visitors communicate with your agents. It is fully customizable, allowing you to change its style and appearance. Advanced settings let you automatically receive chat transcripts, end chats if visitors donʼt respond within a specified time, and manage other behaviors. The Chat Window can either be embedded directly on your webpage or set to pop up, while visitors can continue navigating other pages during the chat.
Pre Chat
- You can use the Pre-chat window to gather information from the visitor before a chat begins, for example, their name, email address, and so forth. This feature saves time and prevents agents from asking repetitive questions. You can also use the Pre-chat window for chat routing and allocation.
- Custom fields can be created to collect any information you need with various input types available, from drop-down lists to simple text fields. You can also set a greeting message to tell your visitor more about your company.
Step by Step Instructions
- Log in to the Axx Omni Panel.
- In the left navigation bar, go to Omni Widget> My Widget. Select a Widget from the My Widget drop-down list, Note: If you have multiple widgets, you need to first choose the one you are using.
- Go to Web-chat.
- Go to the Pre-chat tab and turn on the Pre-chat toggle key to enable your Pre-chat window.

- If you select Use pre-chat form, set the team name and choose Display agent avatars if needed.
- Scroll down the page and set the Visible and Required fields for the pre-chat window. You can also add more fields to collect visitor data based on your business needs.
- Click Options, you can select Remember visitor info collected from pre-chat form. Then click Save.

- If you select Trigger a flow, when a visitor clicks on your chat button to start a chat, the flow automates basic actions, including collecting visitor info, qualifying leads, routing visitors, and more. For More settings about Flow, please refer to Flows Setup
 .
.

- Select your Flow from the drop-down list.
- If required, you can also turn on the Enable input area toggle key. Note: By default, the visitor input area inside the chat window is turned off for the flow. If you want to allow visitors to send content to the flow, you can enable it.

- Click Save.
Now you have successfully customized your pre-chat window. The new settings will take effect automatically and immediately. You can refresh your website and see how the settings work to your satisfaction.
Post Chat
Post-Chat Survey Window Overview
The Post-Chat Survey Window allows visitors to provide feedback and rate agentsʼ performance after a chat.
Using post-chat surveys helps you collect client feedback, assess employee performance, and identify opportunities for improvement.
Step-by-Step Instructions
- Log in to the Axx Omni Panel.
- Access Your Widget
- In the left navigation bar, go to Omni Widget > My Widget.
- Select a widget from the My Widget drop-down list.
Navigate to Web Chat
- Enable Post-Chat Survey
- Go to the Post-Chat tab.
- Turn on the Post-Chat toggle to enable the survey window.

Customize Greeting Message
- Enter a greeting message that will display to visitors in the survey window.
- Add Survey Fields
- Edit or Delete Fields
Offline Message
Offline Message Window
The Offline Message window allows your website visitors to leave a message when the chat button is set to offline. Visitors can also choose to send a message if they prefer not to wait for a live agent to respond.
Although offline messages can always be viewed in your Axx Omni Panel, you can also configure them to be delivered directly to your email inbox. The Offline Message window can be fully customized to match your needs.
Follow the steps below to set it up.
Step-by-Step Instructions
- Log in to the Axx Omni Panel.
- In the left navigation menu, go to Omni Widget > My Widget.
- From the My Widget drop-down list, select the widget you want to configure.
- Navigate to Web-chat.
- Open the Offline Message tab .

- Choose one of the following options for your offline message behavior:
- Redirect visitors to a custom page when they click the offline message button
- If you select Use default offline message window:
- Set your Team Name
- Write a Greeting Message
- Optionally, enable Display agent avatars
Use default offline message window
- In the Fields section, click Add a Field to create additional fields.
- If you select Redirect visitors to a custom page:
- Click Save to apply your changes.
Agent Wrap-up
Agent Wrap-Up
The Agent Wrap-Up feature allows agents to categorize and add comments to chats either during the conversation or once it has ended. Wrap-up fields make it easier to organize and retrieve chats from the archive for review, training, or quality control purposes.
By using wrap-up categories and notes, you can quickly filter and locate specific chats whenever needed.
Step-by-Step Instructions
- Log in to the Axx Omni Panel.
- In the left navigation menu, go to Omni Widget > My Widget.
- From the My Widget drop-down list, select the widget you want to configure.
- Navigate to Web-chat.
- Open the Agent Wrap-Up tab.

- On the Agent Wrap-Up page, Axx Omni provides two default system fields:
- Comment
Category
If youʼd like to add more fields, click Add a Field.

- On the Add a Field page:
- On the Add a Field page:
- Choose the type of field you want to add
- Configure it as Visible, Required, or both
Routing Rules Setup
Routing Rules
The Routing Rules feature allows you to efficiently direct visitors to the right department or agent based on factors such as location, source, navigation history, or other system fields. This ensures that each visitor is connected to the most suitable resource quickly.
Important Notes
- When Routing Rules are Disabled
- Visitors are randomly assigned to any online agent.
- If no agents are online, the visitor is directed to the offline message window.
- Visitors are assigned to agents according to the defined rules.
- If the assigned agent is offline, the visitor will either be routed to another available agent at random or sent to the offline message window.
When Routing Rules are Enabled
Step-by-Step Instructions
- Log in to the Axx Omni Panel.
- In the left navigation menu, go to Omni Widget > My Widget.
- From the My Widget drop-down list, select the widget you want to configure.
- Navigate to Web-chat.
- Open the Routing Rules tab.

Select Route visitors based on custom rules.
- In the Rules area, click Add.
- Enter a name for the new rule.
- Click Save.
- Click Save.
- Repeat the process to create multiple rules as needed.
- If a visitor cannot be routed through any of your custom rules, you can redirect them to either an offline message email address or a queue.
Ban List
Visitor Ban List
Axx Omni allows you to block unwanted visitors from accessing your chat service. When a visitor is banned:
- The chat buttons will be invisible to them.
- They will not appear in the visitor list of the Agent Console.
Axx Omni supports banning visitors using either Visitor ID or IP address.
Understanding Visitor Bans
- Visitor ID
- Stored in the visitorʼs browser cookie.
- If a visitor is banned by Visitor ID, they cannot see the chat button when using the same browser.
- Note: If the visitor switches to another browser, device, or clears cookies, they can access the chat button again.
- Banning an IP address prevents all visitors using that IP from seeing your chat button.
- You can also ban an IP range through the Control Panel, but use this carefully, as it may block multiple potential customers.
- Agent Console: Agents can ban visitors directly from the visitor list or during an active chat.
- Control Panel: Agents can add Visitor IDs or IPs to the banned list manually.
IP Address
Ban Locations
Step-by-Step Instructions
- Log in to the Axx Omni Panel.
- In the left navigation menu, go to Omni Widget > Settings > Ban List.

- On the Ban List page, choose whether to ban visitors by ID or IP.

To Ban by Visitor ID:
- Go to the Banned Visitors page and click Add.
- On the New Banned Visitor page, enter the Visitor ID.
- Click Save.
To Ban by IP Address:

- Go to the Banned IPs page and click Add.
- On the New Banned IP page, enter the IP address or range you want to ban.
- Click Save.

History
Viewing Contact History
Axx Omni Webchat stores all visitor contact history in its database, allowing you to track and review past interactions. You can search for a specific contact within your account.
There are two ways to access a visitorʼs contact history:
Through the Agent Console
- Through the Control Panel
The guide below explains how to view contact history via the Control Panel.
Chats
Step-by-Step Instructions
- Log in to your Axx Omni Control Panel.
- From the left navigation menu, go to Omni Widget > History > Chats.
- On the Chats page, you will see a list of all chat records.
- On the Chats page, you will see a list of all chat records.

- To view a detailed chat transcript:
- Select the chat record you want and click the Details icon.
- Select the chat record you want and click the Details icon.

To filter or locate a specific chat transcript:
- Choose the date or duration of the chat.
- Select the Chat Queue or Agent from the corresponding drop-down lists.
- Enter specific keywords in the search bar, such as the visitorʼs name or other chat content.

Offline Message
Step by Step Instructions
- Log in to your Axx Omni control panel.
- From the left navigation menu, go to Omni Widget > History > Offline message.

- Set the filter conditions to get your messages.

- Click the Details icon to view the message.

Missed & Refused
- Missed messages: Messages missed by agents. Missed means that customer leaves before agents accepted the chat.
- Refused messages: Messages refused by agents.
Step by Step Instructions
- Log in to your Axx Omni control panel.
- From the left navigation menu, go to Omni Widget > History > Missed & Refused. On the page, you will see a list of records.

- To view the detailed chat transcript, you can choose a certain record and click the Details icon.
- Filter/locate a specific chat transcript by doing the following:
- Select the date type and select the Queue, Agent, their corresponding drop-down list. Or,
- Enter specific keywords of the chat content in the Keywords search bar. Keywords can be visitor name.

Email Integration with Axx Omni Inbox
Email remains one of the most popular and effective customer service channels. With Axx Omni Inbox, you can connect your email accounts to manage customer inquiries directly from the platform. Once connected, all incoming emails automatically create tickets, and outgoing messages are saved in your email account's Sent folder.
Supported Email Accounts:
- POP3 account: Connect using POP3 and SMTP configurations.
- IMAP account: Connect using IMAP and SMTP configurations.
- Office 365 account: Integrate with Microsoft 365, including Office, Exchange Online, or a standalone Exchange Online account.
- Gmail account: Connect your Gmail account for seamless integration.
Step-by-Step Instructions
- Access Email Settings
- Log in to your Axx Omni Control Panel.
- Navigate to Inbox > Channels > Email from the left-hand menu.

Adding a POP3 or IMAP Account
Note: The steps for adding an IMAP account are the same as POP3.
- Click Add Email Account and select POP3 (or IMAP) from the dropdown.
- Enter your email account details:

User Info
- Email Address: Enter the address of the email account you want to add.
- Username: Usually the part before the “@” symbol or your full email address. For corporate Gmail accounts, prepend to your username (e.g., ).
- Password: Enter your email account password.
- Display Name: Enter the name your recipients will see, e.g., Axx Omni Customer Support.
Server Info
- Incoming Mail Server (POP3/IMAP): Check with your email provider for the server address.
- Incoming Mail Server (POP3/IMAP): Check with your email provider for the server address.
- Outgoing Mail Server (SMTP): Check with your email provider for the server address.
- Sign in with your Microsoft account and password. A permission request window will appear.
- Once permissions are granted, your Office 365 account is added and will appear in the email account list.
- Enable your account to complete integration.
Routing Rules Setup
Routing Rules Setup
Routing rules determine which chat queue or agent is assigned a ticket when a customer reaches out and a new ticket is created. These rules are configured in the Axx Omni Control Panel to ensure tickets are automatically directed to the most appropriate agent.
With advanced routing rules, management no longer needs to manually assign tickets. Assignments are handled automatically based on predefined criteria.
Example:
If you have separate email inboxes for your Support and Sales teams but want to manage both in Axx Omni, you can configure routing rules to automatically assign messages sent to the Sales inbox to the Sales team and messages sent to the Support inbox to the Support team.
Note: To use Routing Rules, Auto Distribution must be enabled.
Step-by-Step Instructions
- Log in to your Axx Omni Control Panel.
- From the left navigation menu, go to Inbox > Settings > Routing Rules.
-

Option 1: Route Visitors to a Specific Queue or Agent
- Choose a Chat Queue as the default assignee and set the priority level.

Note: By default, tickets are assigned Normal priority if no other setting is specified.
- A new custom rule is created. You can create and manage multiple rules, setting their order of precedence.
- If a ticket does not match any custom rule, assign it to a default queue.

- Click Save.
✅ Your routing rules are now active, and tickets will be automatically assigned to the selected queues or agents.
Other Setup
Block Senders Feature
The Block Senders feature allows you to prevent unwanted messages from specific email addresses or domains by either moving them to the Ticket Junk folder or rejecting them entirely.
 Note: This feature applies only to new tickets. It does not affect tickets created before the sender was blocked.
Step-by-Step Instructions
- Log in to your Axx Omni Control Console.
- From the left navigation bar, go to Inbox.
- In the Settings dropdown, select Blocked Senders and click Add.
- Enter the email address or domain you want to block and select the Block Level:
- Mark future messages as Junk: All future emails from this sender will go to the Junk folder.
- Reject all future messages: Future emails from this sender will not create tickets in the system.
- Click Save.
- Click Save.
SLA Policies Setup
Service-Level Agreement (SLA) Setup
A Service-Level Agreement (SLA) is a commitment between a service provider and a client, defining the standards by which service performance is measured. In Axx Omni, you can configure SLAs for Time to First Response, Time to Next Response, or Time to Resolution for tickets within the Inbox.
Step-by-Step Instructions
- Log in to your Axx Omni Control Panel.
- From the left navigation menu, go to Inbox > Settings > SLA Policies.
- Click Add.
- Enter a name for the SLA policy.
- In the Target section, specify the response and resolution times (in hours and minutes) that align with your business SLA objectives. Choose between:
- Calendar Hours: Full 24/7 hours. Use this if your SLA promises round-the-clock support.
- Operating Hours: Your teamʼs working hours. The SLA clock only runs during these hours.
- Define Conditions for when the SLA policy applies to tickets.
Fields & Mappings
Fields & Mappings in Axx Omni Inbox
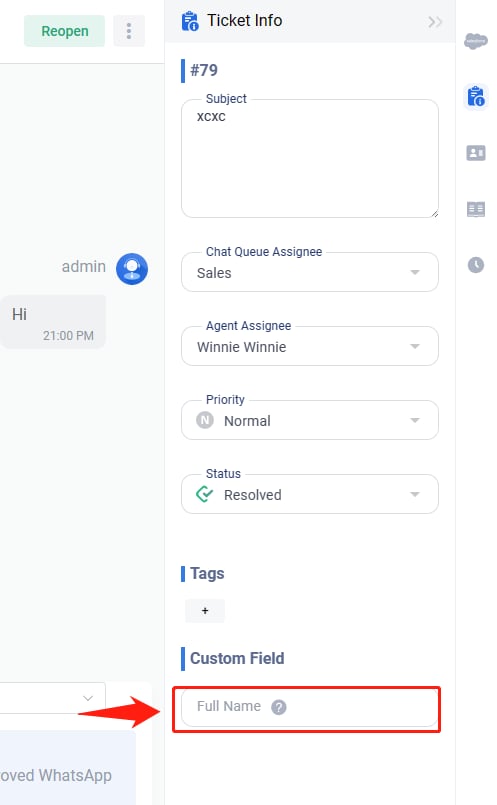
The Fields & Mappings feature in Axx Omni Inbox allows you to create additional fields to capture contextual information for tickets. System fields are provided by default, while custom fields can be created to meet your specific operational or business needs.
Available Custom Field Types:
- Text
- Text Area
- URL
- Radio Button
- Checkbox
- Dropdown List
- Checkbox List
Custom fields can be mapped to fetch data automatically, ensuring important information is captured and stored in each ticket.
Creating Custom Fields
- Log in to your Axx Omni Control Panel.
- From the left navigation menu, go to Inbox > Settings > Fields & Mappings.
- On the Fields & Mappings page, click New Field.
- Select the data type that suits your needs.
- Enter the field details, including Name, Field Length, Help Text, or whether a value is required.
-
 v
v
Creating Field Mappings
- Log in to your Axx Omni Control Panel.
- From the left navigation menu, go to Inbox > Settings > Fields & Mappings.
- Select the Mappings tab.
Note: You can edit mappings for any custom field you create. - Click the Edit icon under the Action column for the desired field.
- In the Edit Mapping drawer, choose the mapping field from the available Chat fields, including Visitor and Pre-Chat fields.
Note: The system obtains the value based on the ticketʼs channel. For example, if the ticket is from Web Chat, it reads the Chat field. - Click Save.
Note: If a custom field is mapped to a Chat field and that Chat field is later deleted, the custom fieldʼs value in the Agent Console will be empty.
Flow Templates
Axx Omni provides three pre-built Flow templates that you can use as a starting point to create a custom Flow. These templates allow you to quickly build and adapt workflows to meet your business needs.
| Template | Description |
| Lead Generation | It is used to get contact information from your visitors. |
| Routing Bot | It is used to classify visitors by asking them questions and guide them to find the most suitable support agents or resources. |
| FAQ | It is used to provide the frequently asked questions list and let your visitors help themselves. |
| Forward Webchat/Whats App to Email | It is used to send an email when your flow received a new visitor/Whats App message. |
Create a Flow
You can create a Flow either from scratch or by using one of the pre-built templates. Steps to Create a Flow:
- Log in to your Axx Omni account.
- From the left navigation menu, go to Automation > Flow Builder > Flows.
- On the Flows page, click Create new flow.
- The Flow Builder page will open, showing pre-built connected Actions. See Flow Actions for details.
- Click any component to edit its text.
- If a required field is left blank, it will be flagged above the component.
- When finished, click Publish to make the Flow active.
- Visitor information collected by Flows is available under Collected Leads.
Step-by-Step Instructions: Managing Canned Messages in Axx Omni
Creating a New Canned Message
- Log in to your Axxess Omni Control Panel.
- In the left navigation menu, navigate to Help Center > Canned Messages.
- Select either the Public or Private tab, then click New Canned Message.
- Fill in the following fields:
- Name: A unique identifier to locate the canned message.
- Category: Groups related messages together.
- Message: The full content of the canned message.
- Message: The full content of the canned message.
- Shortcuts: A quick-access code prefixed by
- Shortcuts: A quick-access code prefixed by
- Click Save. The message is now ready for use.

Canned Message Sorting Rules
Messages are sorted based on the first character in their name in ascending order:
Spaces
- Symbols (excluding letters and numbers)
- Hyphens and apostrophes are ignored
- Other symbols follow ASCII ascending order
- Numbers (0–9)
- Letters (A–Z)
Contacts Management
Effective contact management is vital for building strong customer relationships. Axx Omni provides powerful tools to capture and organize contacts, enabling businesses to deliver more personalized interactions. With Axx Omniʼs contact management features, you can gather and manage contacts from web chat, email, SMS, and social channels like Facebook and Instagram. Customizable contact fields give you the flexibility to categorize customers using details that align with your business needs. By keeping contact information well-organized, you can send tailored messages and automate communications to effectively reach your target audience.
This article introduces the processes for managing contacts and customizing contact fields.
Public Contacts
You can create, edit, delete, import, and export contact data in the contact management system.
Note: Be careful when deleting contacts. After a contact is deleted, you cannot follow up on the tickets related to the contact. The history messages are not deleted.
- Log in to the Axx Omni Control Panel.
- From the left navigation menu, go to Contact > Company Contacts.
Add Company Contacts
Click Add icon,

Enter the contactʼs information.
- Contact name is required. Different contacts can have the different name.
- The contactʼs account in different channels (such as email, SMS, Facebook, Whats App) are identity fields. When adding a contact, one of the identity fields is required.
- You cannot create two contacts with the same identity information, for example, the same email address.
Notes: You can select Customer Attribution,
- Private, the contact is owned by the current user.
- Share by Queue, the contact is shared by a specified queue.
- Own by Agent, the contact is owned by a specified agent.
Import Company Contacts
Click Import icon,

Download Template, then fill in the business card in the template, click Browse, select the template, click Import.

Export Company Contacts
Click Export icon, you can download all Contact.
Delete Company Contacts
Select desired contact, click Delete icon, can delete the contact.
Edit Company Contacts
Select desired contact, click Edit icon, can edit the contact.
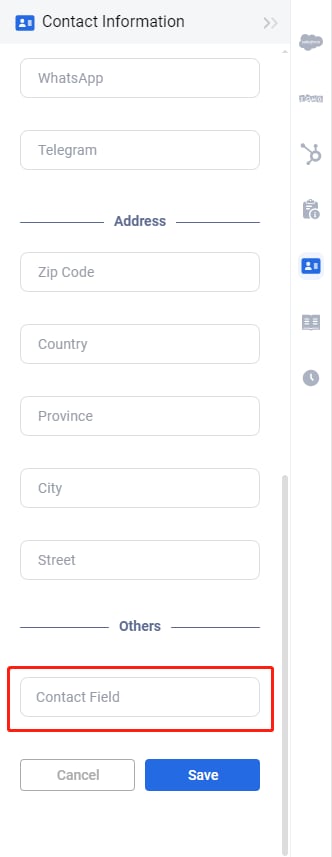
Contacts Field
Contact Fields Overview
Contact information in Axx Omni is stored within contact fields. These fields are divided into two types: system fields and custom fields.
- S (System field): System fields cannot be deleted, and only some of their details can be edited.
- C (Custom field): You can create, edit, or delete custom fields to better track your contact information.
- I (Identity field): All identity fields are system fields. At least one identity field is required when creating a new contact.
Creating a Custom Contact Field
- Log in to the Axx Omni Control Panel.
- From the left navigation menu, go to Contact > Fields.
- Click Add.
- Choose the appropriate data type for the field.
- Enter the field details, such as Name, Field length, Help text, or whether a value is required.
- Enter the field details, such as Name, Field length, Help text, or whether a value is required.
- Example: A Dropdown list field.
-
Analytics
Optimizing Web Chat and Inbox Performance
Improving the performance of your Web Chat and Inbox channels starts with understanding the current quality of service. Some key questions to ask include:
- Is your web chat team adequately staffed?
- What are the main reasons visitors contact your web chat team?
- How quickly does your team respond? How long are customers waiting?
- Which agent or queue performs best, and which struggles the most? Why?
- How effectively are your Inbox channels being managed?
- What does your ticket distribution look like? Are you consistently meeting SLAs?
Axx Omni provides powerful reporting tools that highlight the metrics most important to chat quality, agent productivity, and inbox management. These reports give you actionable insights to make data-driven improvements. This user guide explains the available reports, their structure, and the meaning of each metric.
Real-Time Dashboard
The Real-Time Dashboard provides up-to-the-minute Web Chat data and a snapshot of todayʼs performance. Real-Time Report includes:
| Widget | Description |
| Agents in Chat | Number of agents currently engaged in conversations with customers. |
| Ongoing Chats | Number of active chat sessions. |
| Current Queue Length | Number of visitors waiting in the chat queue. |
| Visitors on Site | Number of visitors currently browsing your website. |
| Logged-In Agents | Number of agents logged into the system. |
Chats & Messages Report
This report provides insights into overall chat volume and visitor engagement.
| Widget | Description |
| Chats | Total number of chat sessions (initiated by visitors, manual agent invites, or auto-invitations). |
| Offline Messages | Total number of messages left by visitors outside of business hours. |
| Visits | Ratio of Converted Chatted Visitors / Chatted Visitors. |
Inbox Dashboard
Inbox Dashboard Overview
The Inbox Dashboard provides insights into the status of all tickets generated from your Inbox channels as well as your agentsʼ performance. The dashboard is divided into two sections:
Real-Time Report
- Volume Report
Real-Time Report
The Real-Time Report offers an at-a-glance view of ticket handling activity and agent performance. It updates continuously, keeping you informed of all active conversations across your Inbox channels.
Metrics included in this report:
| Widget | Description |
| Unassigned Tickets | Total number of tickets not yet assigned to any queue or agent. |
| Open Tickets | Tickets with a status of New, Pending Internal, Pending External, or On-Hold. |
| New Tickets | Tickets that have not yet received a reply. |
| Pending Internal | Tickets awaiting action from an internal team member. |
| Pending External | Tickets awaiting a response from an external party. |
| On-Hold Tickets | Tickets placed on hold by agents for later review or follow-up. |
| Urgent Tickets | Tickets marked with Urgent priority. |
| High Priority Tickets | Tickets marked with High priority. |
Volume Report
The Inbox Volume Report tracks the number of tickets created on your site within a specific time period (e.g., the past 7 days).
Metrics included in this report:
| Widget | Description |
| Replied Tickets | Total number of tickets that received a reply within the selected timeframe. |
| Resolved Tickets | Total number of tickets resolved within the selected timeframe. |
You can click the Replied or Resolved icons to view detailed ticket volume.
Web Chat
Real-Time Reports
The Real-Time Report provides live data on web chat activity along with an overview of todayʼs performance.
Real-Time (Website)
This report is divided into two sections: Right Now and Today. Right Now
This section displays real-time statistics, allowing you to check the current number of chats, visits, available agents, and queue length.
Metrics include:
- Agents in Chat – Number of agents currently engaged in chats with customers.
- Ongoing Chats – Number of active chat sessions.
- Ongoing Chats with Agents – Total number of chats between visitors and agents.
- Ongoing Chats with Bot – Total number of chats between visitors and the chatbot.
- Current Queue Length – Number of visitors waiting in the chat queue.
- Visitors on Site – Number of visitors currently browsing the website.
- Logged-In Agents – Number of agents currently logged in.
- Chat Utilization – Percentage of ongoing chats (across all online agents) compared to the maximum concurrent capacity of those agents. This shows how accessible the web chat team is.
Today
This section displays accumulated chat data for the current day. Metrics include:
- Chat Overview – Summary of requested, answered, missed, abandoned chats, and those converted into offline messages.
- Chat Requests – Total number of chat requests (from visitors, manual invitations, or auto-invitations).
- Chats – Total number of completed chat sessions.
- Chats – Total number of completed chat sessions.
- Chat Acceptance Rate – Percentage of chat requests accepted by agents.
- Abandoned Chats – Requests abandoned when visitors closed the chat window before an agent responded.
- Switched to Messages – Number of requests converted into offline messages by visitors.
- Missed Chats – Sum of abandoned chats and switched-to-message chats.
- Bot Only Chats – Total chats handled exclusively by the chatbot.
- % of Bot Only Chats – Proportion of bot-only chats versus total chats.
- Chats from Bot to Agent – Chats transferred from bot to an agent.
- Bot-to-Agent Acceptance Rate – Percentage of bot-initiated chats successfully accepted by agents.
- Avg. Wait Time – Average time visitors wait before being answered, abandoning, or switching to offline messages.
- Avg. Chat Time – Average duration of chat sessions.
- Avg. Agent Response Time – Average response time for individual agent replies.
- Accepted Invitations – Number of invitations accepted by visitors.
- Service Accessibility Rate – Accessibility of web chat services, calculated as (Chats + Switched to Message Chats) ÷ Chat Requests.
- Total Transferred Chats – Number of chats transferred between agents or queues.
- Agent Status Breakdown – Distribution of an agentʼs status (e.g., Available, Busy, Offline) since 12:00 a.m., displayed with color-coded indicators.
- Agent Status Breakdown – Distribution of an agentʼs status (e.g., Available, Busy, Offline) since 12:00 a.m., displayed with color-coded indicators.
Pre-Chat Survey
The Pre-Chat Survey collects visitor information before a chat begins (e.g., name, email, question type). The Pre- Chat Survey Report shows statistics on how visitors respond to predefined questions.
Metrics include:
- Count – Number of times an option was selected.
- Percentage – Share of responses for each option.
Like post-chat surveys, pre-chat survey results can be filtered by widget or queue.
Rating Report
In Axx Omni Web Chat, visitors can rate the chat service they receive. The Rating Report provides detailed statistics on chat ratings by agent, queue, and team within a specified time frame.
⚠ Note: Ratings are part of the post-chat survey but reported separately. The Rating Report focuses on numeric scores, while the Post-Chat Survey Report covers multiple-choice feedback.
Metrics include:
- Rating Times – Total number of chats rated in the defined timeframe.
- Ratings by Score – Count of ratings by score (from 1 to 5). Clicking a score reveals all chats associated with that score.
- Avg. Score – Average rating given to agents for their chat performance.
Inbox
Inbox Reporting Overview
With Axx Omni Inbox reporting, you can monitor the status of all tickets generated from your Inbox channels and evaluate both agent and queue performance. Track ticket volume, resolution history, SLA compliance, and more to ensure your team consistently meets customer expectations.
Popular Inbox reports include:
- Real-Time
- Volume (Inbox)
- Channel
- Efficiency
- SLA Policies
Real-Time Report
The Real-Time Report provides an at-a-glance view of ticket handling and agent performance. It keeps you updated in real-time on all active conversations from your Inbox channels.
You can view Website, Chat Queue, and Agent Real-Time Reports. Metrics include:
| Widget | Description |
| Unassigned Tickets | Tickets not yet assigned to any queue or agent. |
| Open Tickets | Tickets with statuses of New, Pending Internal, Pending External, or On-Hold. |
| New Tickets | Tickets that have not yet been replied to. |
| Pending Internal | Tickets requiring internal team action. |
| Pending External | Tickets awaiting response from an external party. |
| On-Hold Tickets | Tickets placed on hold by agents for later follow-up. |
| Urgent Tickets | Tickets marked with Urgent priority. |
| High Priority Tickets | Tickets marked with High priority. |
| Created Tickets | Total tickets created. |
| Resolved Tickets | Total tickets resolved. |
| Replied Tickets | Total tickets that received agent responses. |
Volume (Inbox) Report
The Volume Report shows ticket activity within a selected time range. You can filter by Time, Agent, Chat Queue, Channel, or Channel Account.
Metrics include:
| Widget | Description |
| Open Tickets | Total tickets with statuses of New, Pending Internal, Pending External, or On-Hold. |
| Created Tickets | Tickets created during the defined time period. |
| Replied Tickets | Tickets replied to within the defined time period. |
| Transferred Tickets | Tickets transferred to another agent or queue. |
| Resolved Tickets | Tickets resolved during the defined time period. |
| Visitor Messages | Number of visitor messages received in all tickets. |
| Agent Messages | Number of messages sent by agents across all tickets. |
Channel Report
The Channel Report breaks down ticket creation by communication channel within a defined time period.
Metrics include:
- Email – Tickets created from email messages.
- Facebook – Tickets created from Facebook Messenger.
- SMS – Tickets created from SMS messages.
- Whats App – Tickets created from Whats App Business messages.
- Instagram – Tickets created from Instagram messages.
- Chat – Tickets created from Live Chat.
Efficiency Report
The Efficiency Report highlights average response times and overall ticket resolution efficiency.

Metrics include:
| Widget | Description |
| Total Agent Response Time | Total time agents spent responding to tickets. |
| Avg. Agent Response Time | Average time taken by an agent to respond. |
| Avg. Ticket Time | Average time required to resolve a ticket. |
| Min. Response Time | Fastest agent response recorded. |
| Max. Response Time | Longest agent response recorded. |
SLA Policies Report
The SLA Policies Report provides insights into SLA performance across agents, chat queues, and SLA policies.
Metrics include:
| Widget | Description |
| SLA First Response Rate | % of tickets with a first response sent within SLA. |
| SLA Avg. First Response Time | Average time taken to send the first response within SLA. |
| SLA Next Response Rate | % of tickets with follow-up responses sent within SLA. |
| SLA Avg. Next Response Time | Average time taken to send follow-up responses within SLA. |
| SLA Resolution Rate | % of tickets resolved within SLA. |
| SLA Avg. Resolution Time | Average resolution time for tickets resolved within SLA. |
| Breached Tickets | Number of tickets that did not meet SLA goals. |
Global Features
Availability Report
The Availability Report provides insights into agent status changes within a defined time range. Logged-in agents can switch their status between Online, Away, or select from a set of custom statuses. This report helps you determine whether agents are adhering to normal working schedules over the selected period.
You can view the report by Time, Chat Queue, or Agent.
Metrics Included
| Widget | Description |
| Online | The total amount of time an agent, chat queue, or the entire web chat team is available online. A queue is considered online if at least one agent in that queue is online. The team is considered online if at least one agent is online. |
| Logged-in | At the agent level, this represents the sum of Online time and Away time. |
| Total Away | At the agent level, this represents the sum of all time spent in Away status, including both standard Away and any custom Away statuses. |
Note: The report distinguishes between different types of Away time. For example:
- Logged-in = Online + Away
- Total Away = Away + Custom Away
- Away = Standard Away time only
Chat Queue Report
The Chat Queue Report provides real-time visibility into queue activity, showing the current status of agents in the queue, web chat performance, and ticket processing progress.

Integrations
Global Settings
Add Agents
- Log in to your Axx Omni Control Panel.
- From the left navigation menu, go to Global Settings > People > Agents.
- Click Add.
- Enter the agentʼs information:
- Account – Username used for login.
- First Name / Last Name – Display name shown to visitors (can differ from the agentʼs real name).
- Alias – The alias shown to visitors in the chat window.
- Chat Queue – Assign the agent to a queue. (For more about Chat Queue settings, click here.)
- Agent Roles – Define the agentʼs role(s) within your team. (For more about Agent Roles, click here.)
- Skills – Select the agentʼs skills. (For more about Skills settings, click here.)
- Skills – Select the agentʼs skills. (For more about Skills settings, click here.)
- Mobile Number – The agentʼs mobile phone number.
- 2FA – Enable Two-Factor Authentication. (For more about 2FA settings, click here.)
- Email – The email address used to log in to Axx Omni.
- Title – The agentʼs title, displayed in the chat window header.
- Bio – A short biography displayed in the chat window header.
- Click Save to add the agent.
- Reset Password: Click the Reset icon to reset the agentʼs password.
Queue Management
Add a New Queue
- Log in to your Axx Omni Control Panel.
- From the left navigation menu, go to Global Settings > People > Chat Queue.
- Click Add.

- On the New Queue page:
- Enter a Queue Name.
- Add Agents to the queue.
- Add a Description (optional, for identification).
- Choose whether the queue will be used in Web Chat or Inbox.
- Click Save.
✅ You have now successfully created a queue.

Auto Distribution
Web Chat Auto Distribution
When enabled in the Omnichannel Widget, the queue appears as an option in Web Chat configurations such as auto distribution rules.
Axx Omni Web Chat supports advanced rule-based auto distribution, ensuring chats are routed automatically to the most suitable agent using a combination of basic rules, preference rules, and backup rules.
Chats are only distributed to online agents who have not reached their maximum concurrent chat capacity. Chats are not routed to agents marked as Away or Offline.
Basic Distribution Rules
-
Load Balancing – Assigns chats to the agent with the fewest concurrent chats.
- If multiple agents have the same load, the chat goes to the one with the earliest last allocation time.
- If no active chats exist, the chat goes to the agent with the longest idle time.
- Going Offline and coming back Online resets both idle and allocation time.
-
Round Robin – Distributes chats sequentially in the order agents log in, giving equal opportunity to all agents (ideal for sales teams).
- Agents at maximum capacity are skipped.
- If a new agent logs in, they are added to the rotation after the current round finishes.
-
Capability Weighted – Assigns chats based on lowest capacity utilization ratio: Ongoing chats ÷ Maximum concurrent chats.
- If tied, chats go to the agent with the earliest last allocation or longest idle time.
Preference Rule
- Last Chatted Agent Preferred – Routes chats to the last agent the visitor interacted with (if available and within capacity).
- Visitor identification relies on browser cookies (clearing cookies or switching browsers resets visitor identity).
Backup Rule
- Allows assigning a backup queue.
- Chats are routed to backup agents when the primary queue is offline or overloaded.
- In reports, chats handled by backup agents are counted under the original queue.
Inbox Auto Distribution
When enabled in Inbox settings, queues can be used for automatic ticket distribution.
- Tickets are distributed only once when they are newly created.
- By default, tickets go to online agents. You can configure to include Away or custom statuses.
- If a ticket is manually reassigned, it cannot be auto-distributed again.
- Tickets wait in queue when all agents are offline and are distributed as soon as agents come online.
Auto Distribution Rules for Inbox
- Load Balancing – Assigns tickets to the agent with the lowest load/capacity utilization.
- Round Robin – Rotates ticket assignments based on login order.
- Keep Chat Queue as Assignee – Assigns tickets to the chat queue itself rather than directly to agents.
Configuration Steps
- In Auto Distribution Method, toggle to enable assigning tickets to their last assignee (optional).
- In Maximum Number of Auto-Assigned Tickets, set limits either:
- For all agents
- Per individual agent (filter of queue)
- (Optional) Exclude tickets with Pending External or On Hold status from the ticket count.
- (Optional) Allow auto-distribution to Away or custom statuses by turning off the "distribute only to online agents" toggle
-
Click Save
- Your tickets are now automatically assigned to agents.
Steps
- Select Default by specific settings.
- Choose your Time Zone.
- Under Working Hours, set the days and hours your team is available.
- Under Holidays, click Add Holiday to define exceptions, or remove holidays from the Operations column.
Skills Management
Skill-Based Routing (SBR)
Skill-Based Routing (SBR) ensures chats are directed to agents with the right expertise, so visitors receive the most relevant support. Skills can include languages, technical knowledge, or product expertise.
In Axx Omni, agents can be grouped into departments based on their responsibilities. By combining SBR with department grouping, you can route incoming visitors to the most suitable agents. This setup ensures that customers are connected quickly to an agent in the right department who also has the required skills.
Step-by-Step Instructions
- Log in to the Axx Omni Control Panel.
- From the left navigation menu, go to Global Settings > People > Skills.
- Click Add.
- Enter the Skill Name, assign the agents who possess this skill, and (optionally) add a description for clarity.
- Click Save. The new skill will be created and applied.
- (Optional) Repeat the process to create additional skills.
Once skills are defined, you can configure routing rules to direct visitors to agents with specific skills, ensuring fast and targeted support.


Roles & Permissions
Roles Overview
Roles allow you to manage permissions for groups of agents more efficiently. Instead of assigning permissions to agents individually, you can grant them permissions collectively through roles.
In Axx Omni, there are two default roles:
- Administrators – Have full permissions.
- Agents – Have basic permissions, such as accepting chats.
You can edit the permissions for the Agent role or create new roles tailored to your business needs. To configure roles, you must be a site administrator or have permission to manage agents.
Create a New Role
- Log in to the Axx Omni Control Panel.
- From the left navigation menu, go to Global Settings > People > Roles.
- Click Add.
- On the New Role page, enter a Role Name and assign agents to this role.
- Click Save. After saving, you can edit the role and configure its permissions.
- Toggle the switches for the permissions you want to enable or disable.


Configure Role Permissions
Role permissions determine which actions all agents in that role can perform. You can enable or disable specific permissions as needed.
- Log in to the AxxOmni Control Panel.
- From the left navigation menu, go to People > Roles. The list of roles will be displayed.
- Find the role you want to configure, then click the gear icon in the Permissions column.
- Toggle the switches for the permissions you want to enable or disable.
- Click Save to apply changes.


Custom Away Status Management
Step-by-Step Instructions
- Log in to the Axx Omni Control Panel.
- From the left navigation menu, go to Global Settings > People > Custom Away Status.
- Click Add.
- Enter the Status Name.
- Click Save.
- To modify a status, click the Edit icon and update the name.
- To remove a status, click the Delete icon.

Profile Setup
Change Password and Reset Password
Change Password
- Click the user icon located in the top-right corner of the page.
- The dropdown menu will appear.
- Select Change Password. A pop-up window will open.
- Enter your Old Password, New Password, and confirm the new password in the Confirm Password field.
- Enter the New Password, re-enter it to confirm, and then click Save.


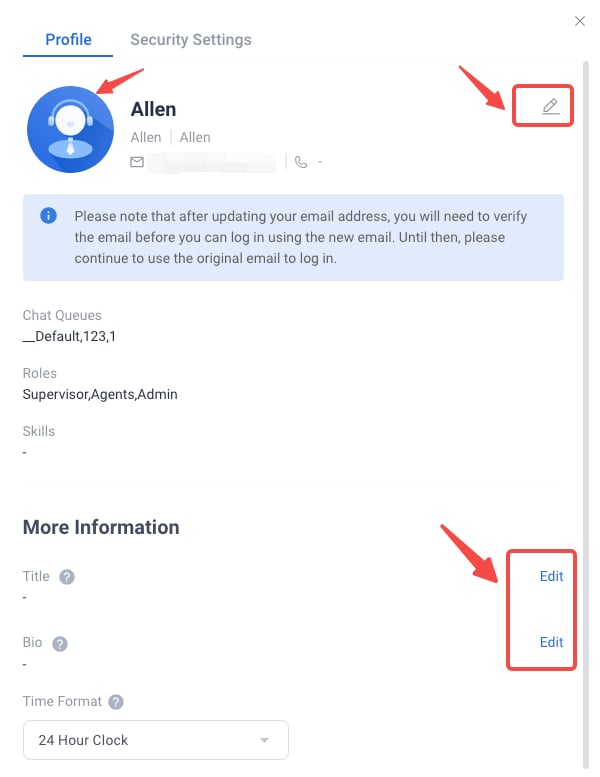
Change User Info
- Click Change Userinfo icon, then the following pop-up will appear:
- Click the button in the default avatar, then you can select a picture as your avatar.
- You can edit or add First Name, Last Name, Mobile Number, Email Address, Title and Bio, and Timezone, if needed.
- Click the Save Button.

AxxOmni Pricing
Plan |
Agents Included |
Price |
|---|---|---|
Starter |
2 Agents |
$99 / month |
Business |
5 Agents |
$199 / month |
Add Ons
Add-On |
Price |
|---|---|
Each additional Agent |
$39 / month |
Each Bot |
$49 / month |