
This guide is for agents of the Team who need to use the Customer Experience (CX) system to delight customers with smarter conversations .
Getting Started
Account Login
- Enter your Company Name, Account, and Password.
- If your tenant is already linked to a domain by the system administrator, you donʼt need to enter the Company Name.
- Click the Sign In button.
Note: Use your username or email address as ‘Accountʼ.
(3) After log in successfully, click the top right corner Agents Panel.
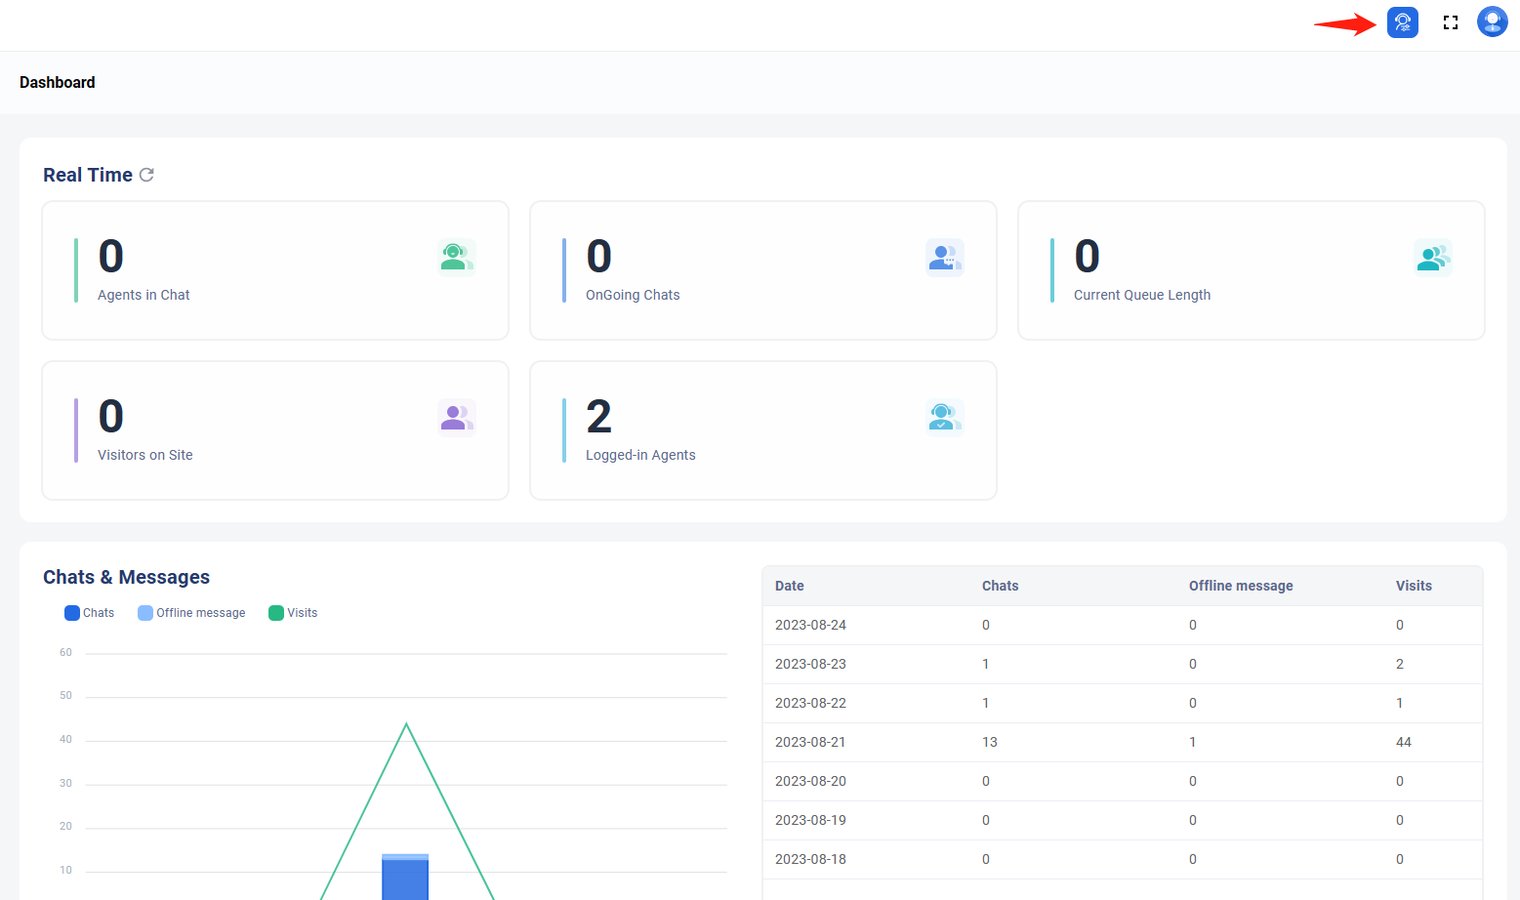
(4) Go to Agents Panel.

Agent Status Setup
Agent Status in Axx Omni
Agent status shows if you are available to handle chats, tickets, or calls.
- Online – ready to accept chats or calls
- Away – use this during breaks
- Logout – use this when your workday ends
If Cloud PBX is connected and you have a phone extension, youʼll also see a phone status:
- Offline – you will not receive customer calls
To start working, log in to the Agent Console and set your status to Online.
- Agent Status
- Click Agent Status and choose one:
- Online – you are available to take chats and tickets.
- Away – you wonʼt receive auto-assigned chats or tickets, but you can still accept them manually.
- Logout – you are signed out of Axx Omni.
- Phone Status
- Click Phone Status and choose one:
- Online – you are available to take calls.
- Offline – you are not available to take calls.
You can also customize the Agent away status.
Agent Console Setup
Agent Console settings let you personalize your chat experience. You can create shortcuts, set notifications, add an auto-greeting, and more.
Step by Step Instructions
To configure the Agent Console settings, follow these steps:
- Log in to the Agent Console.

- Click on Preference Settings.3
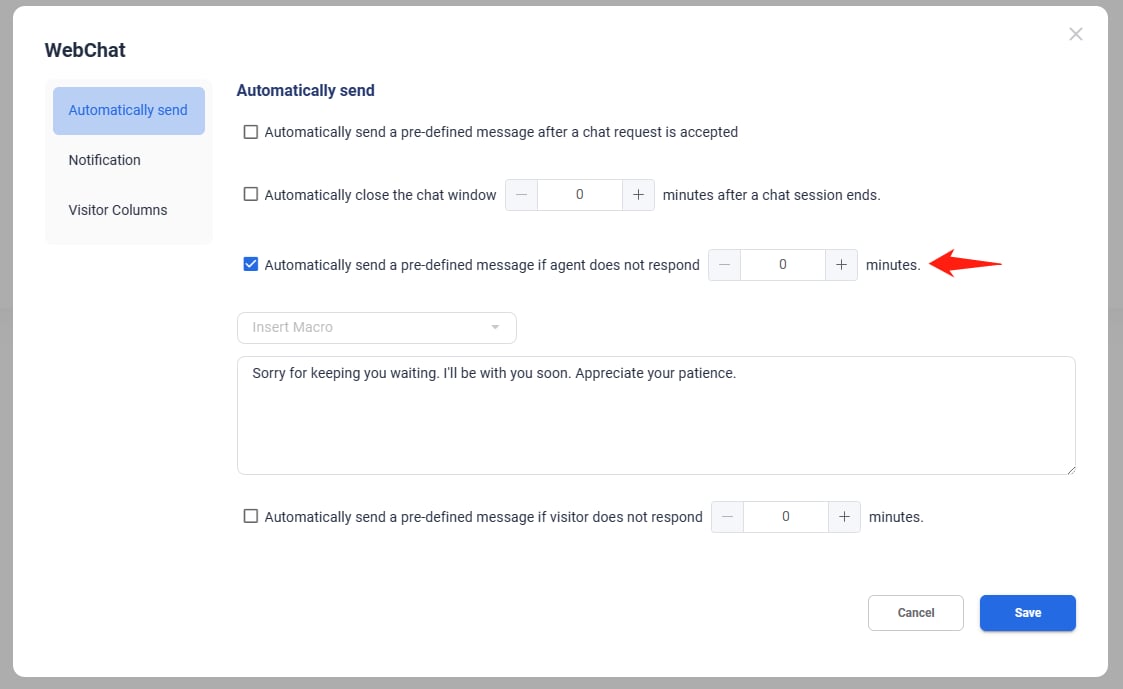
Web Chat
Automatically send
Go to the Automatically send tab.

- Check the box to automatically send a predefined message when a chat starts. The system will then send a greeting to the visitor. You can edit the message and use macros to make it more personalized.
Note: The suggested greeting works best if the pre-chat form is configured to ask for the visitorʼs name as a mandatory option. - Select the Automatically close the chat window checkbox. If the chat ends, the chat window will automatically close once the set time is reached.

- Select the Automatically send a pre-defined message if the agent does not respond checkbox.
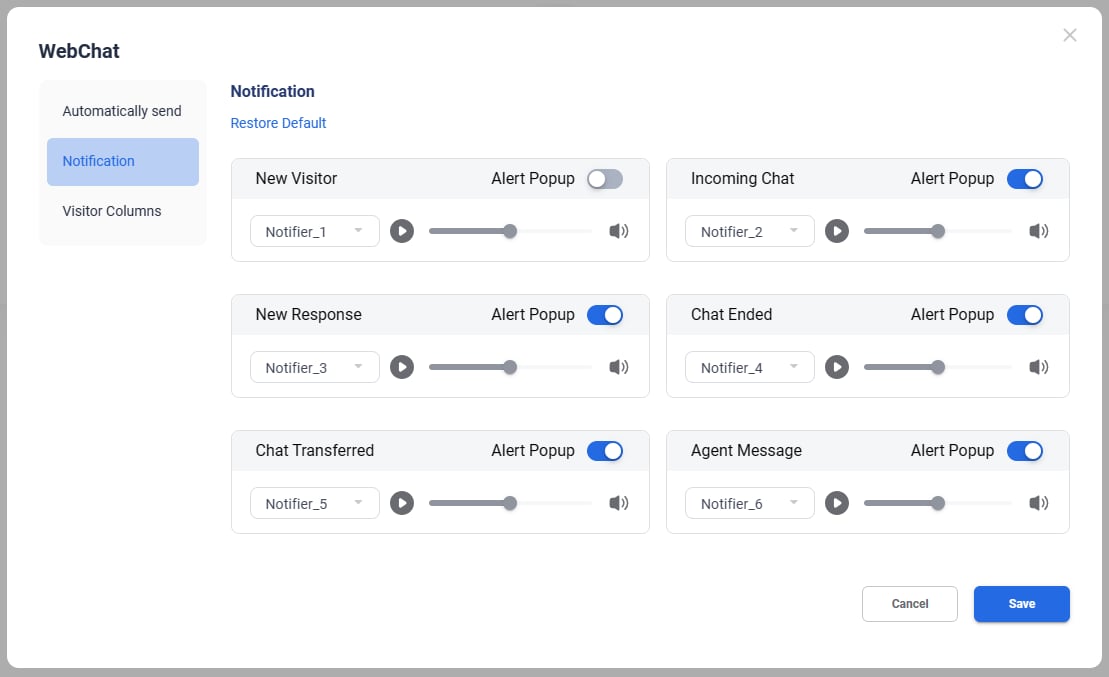
Notification
Notification
In the Notification tab, you can turn popup alerts on or off for different chat events, such as New Visitor, Incoming Chat, New Response, Chat Ended, Chat Transferred, and Agent Message. You can also choose a notification sound and adjust the volume.
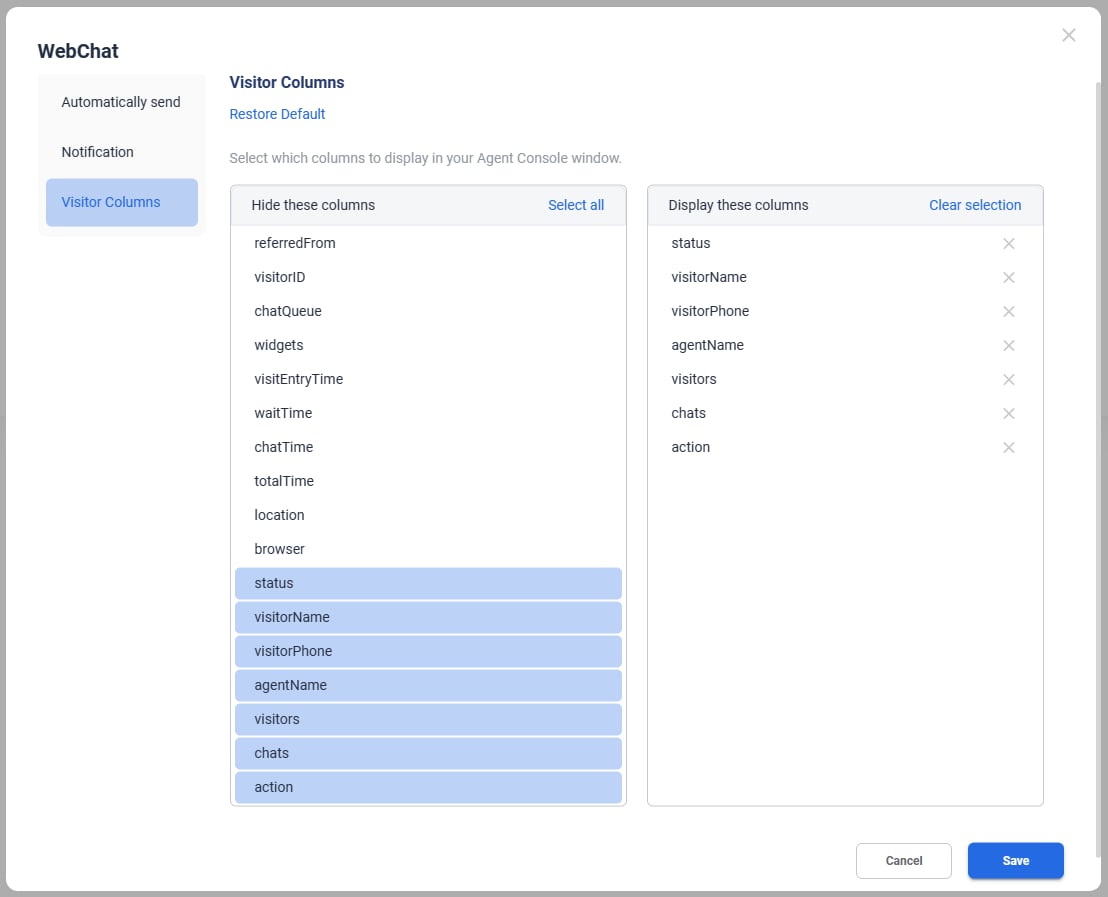
Visitor Columns
In the Visitor Columns tab, you can select which columns to hide or display in the Visitors tab in your Agent Console, as well as adjust their display order.
Inbox
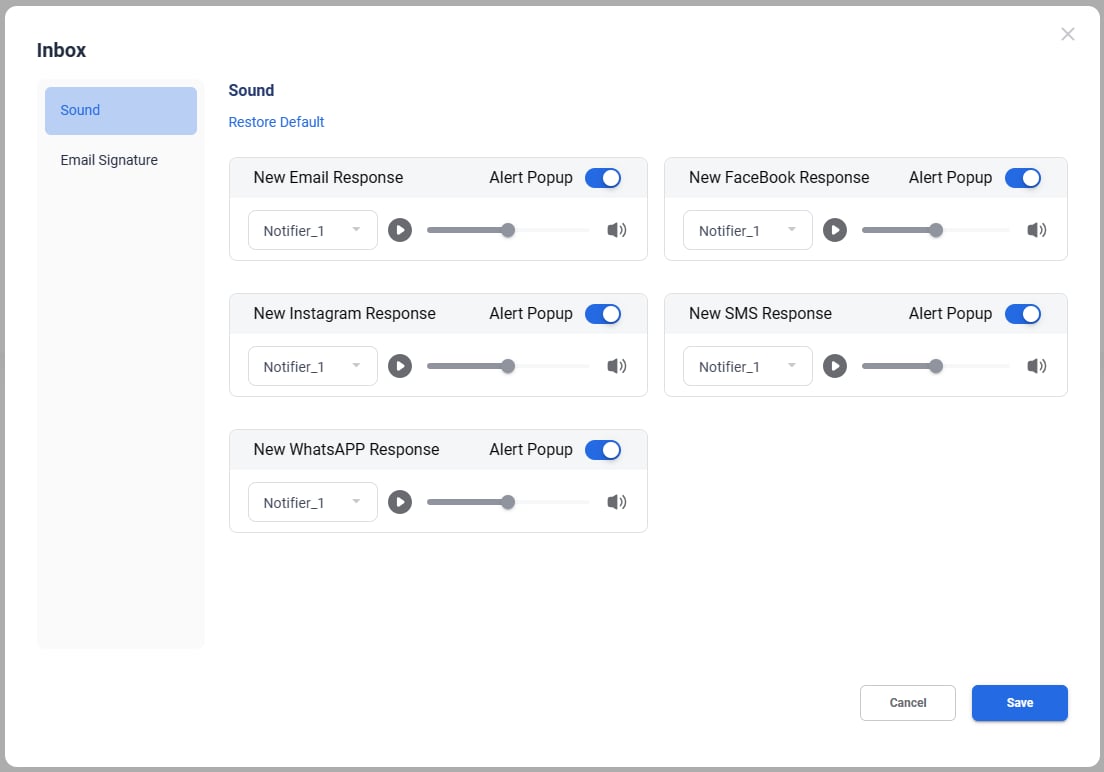
Sound
Use the Agent Console's Sound & Popup settings to set different alert sounds and popups to differentiate between channels. The Sound & Popup setting ensures no ticket requests or responses from your contacts are missed.
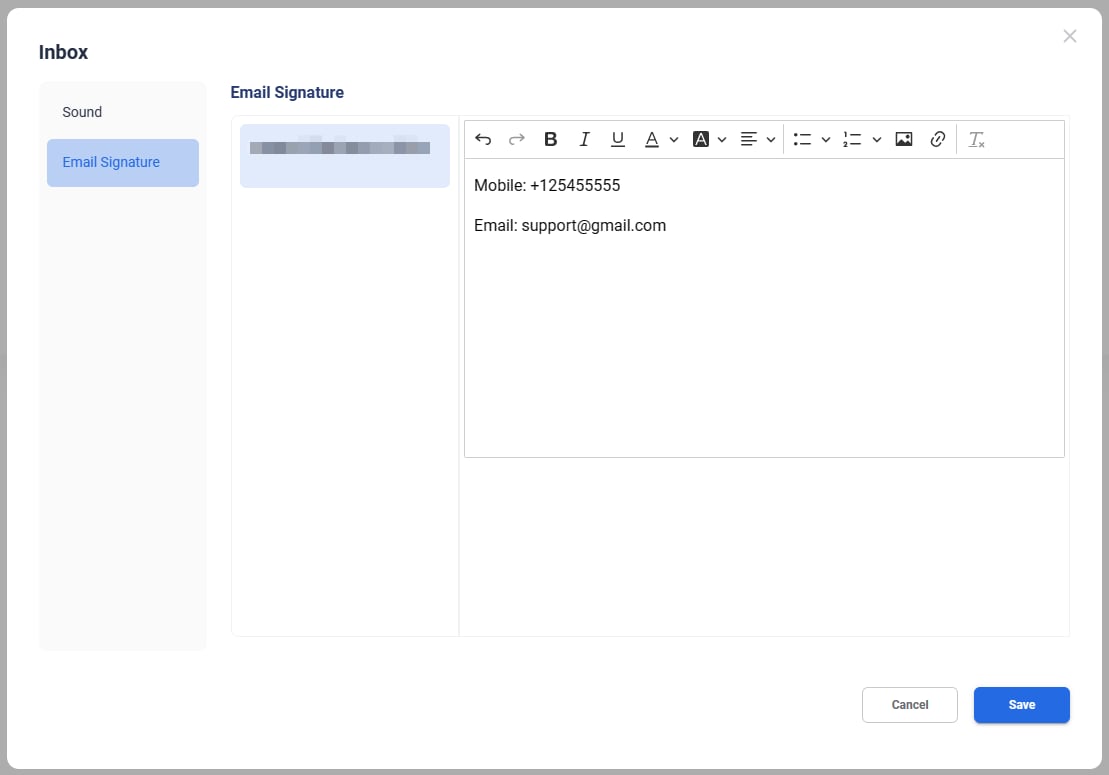
Email Signature
Each email account usually has its own signature to show your identity and company details. As an agent, you may have different roles and multiple email accounts for customer communication. This feature lets you create and use multiple ticket signatures for those accounts.
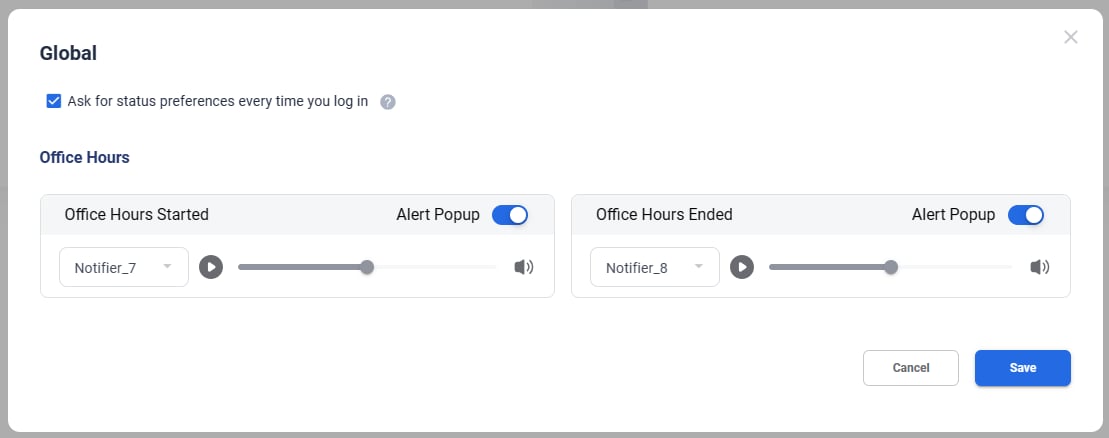
Global
- Select the Ask for status preference every time you log in checkbox. A pop-up window will prompt you to choose the status preferences every time you log in.
- You can enable or disable the notification alert popup for office hours, including start time and end time. You can also select the notifier tone and adjust the alert volume.
Shortcuts
- Choose either Press Enter to Send or Press Ctrl + Enter to Send chat messages from the Keyboard shortcut for ‘Sendʼ drop-down menu.
- Set keyboard shortcuts for Next Chat, Next Response, and Search Canned Message to quickly switch to another chat or response and locate a canned message.
Web Visitors
- Axx Omni Web Chat is a powerful tool for real-time monitoring and communication. It provides a comprehensive view of your on-site visitors by displaying detailed information and tracking their activities.
- Visitors can start a chat from the Web widget on your companyʼs website. Axx Omni Web Chat also allows you to manually invite a visitor to chat.
- To start accepting chats, your system admin needs to obtain the Web Chat code and paste it onto your companyʼs website.
- Once the admin pastes the code, the Web Chat button appears on the website. When a visitor initiates a chat, it will appear on your Agent Panel, where you can chat with the visitor.
The following table shows the meaning of all the available columns.
| Column | Description |
| Status |
Visitor status. A visitorʼs status may be one of the following.
accept the call.
or refused the request.
on your visitor list for about three minutes after they leave. |
Visits: The times of this visitor have visited your website
Chats: The number of sessions that have occurred for this visitor. Action
- Click invite icon, you can invite a visitor or Go to Chat with a visitor.
- Click Visitor Info icon, you can view visitor information.
- Click Ban icon, you can ban the visitor by Visitor ID or IP.
Web Chat
Chat List
Waiting for chat, Ongoing chat, Chat ended and Manually Invited are all listed here.

And unread number also shows here.

Chat Window
Chat Windons locates in the middle of the page.

Chat Window includes:

- Move mouse to below icons, you can view visitorʼs location and IP,
Operating System,
Browser.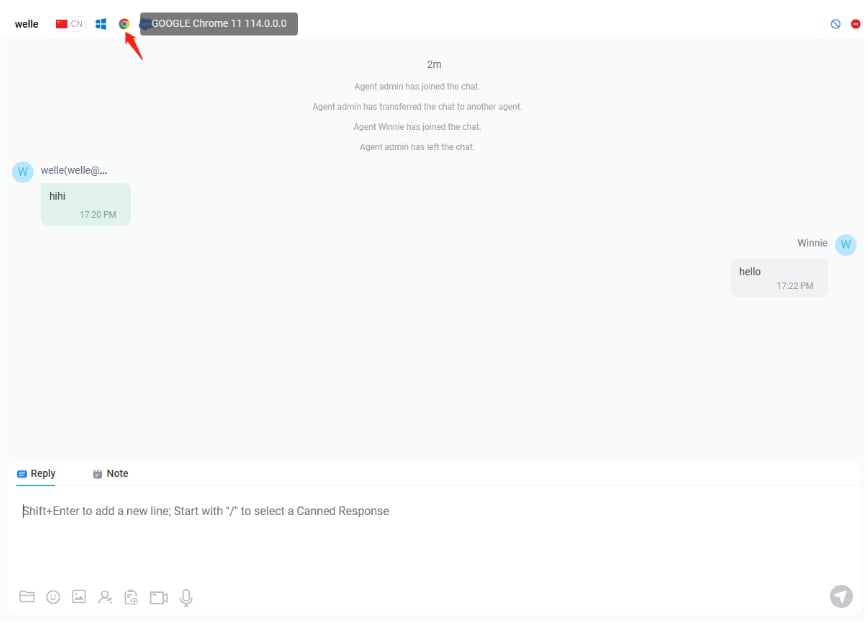
Chat Reply
- Click below icon, you can send an Attachment.
- Click below icon, you can send Meme.
- Click below icon, you can send Picture.
- Click below icon, you can send a video invitation to visitor.
- Click below icon, you can send a audio invitation to visitor.
- If your chat is ongoing via flow, you can click the icon below to stop the flow and join the chat.
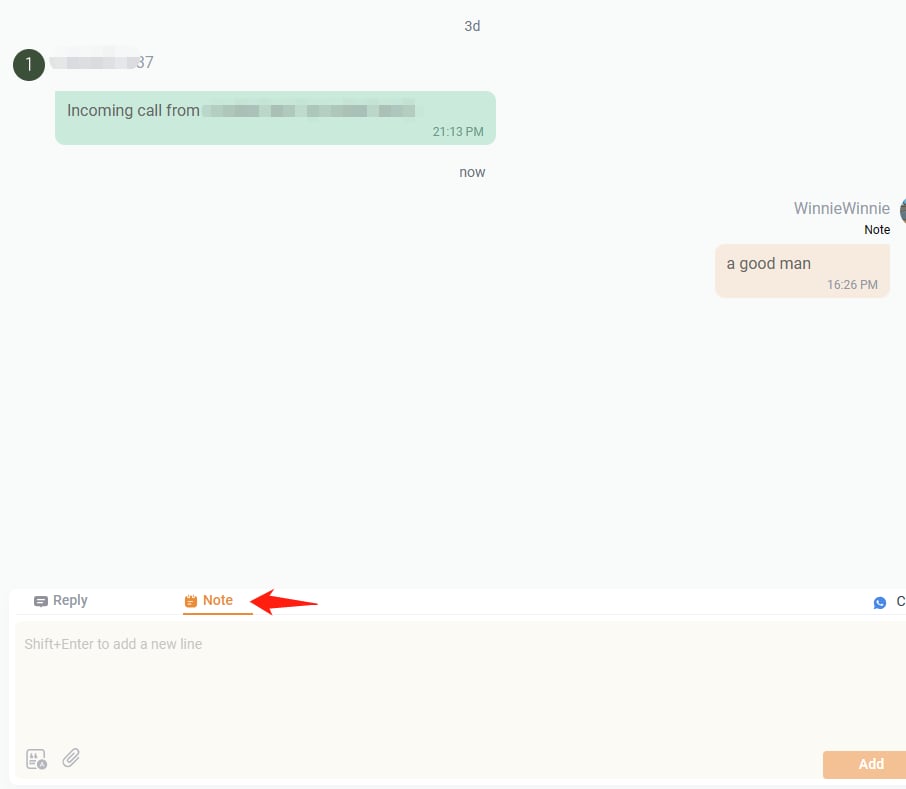
Internal Note
Click Note, then Enter message, click Send. You can add Note to the chat.
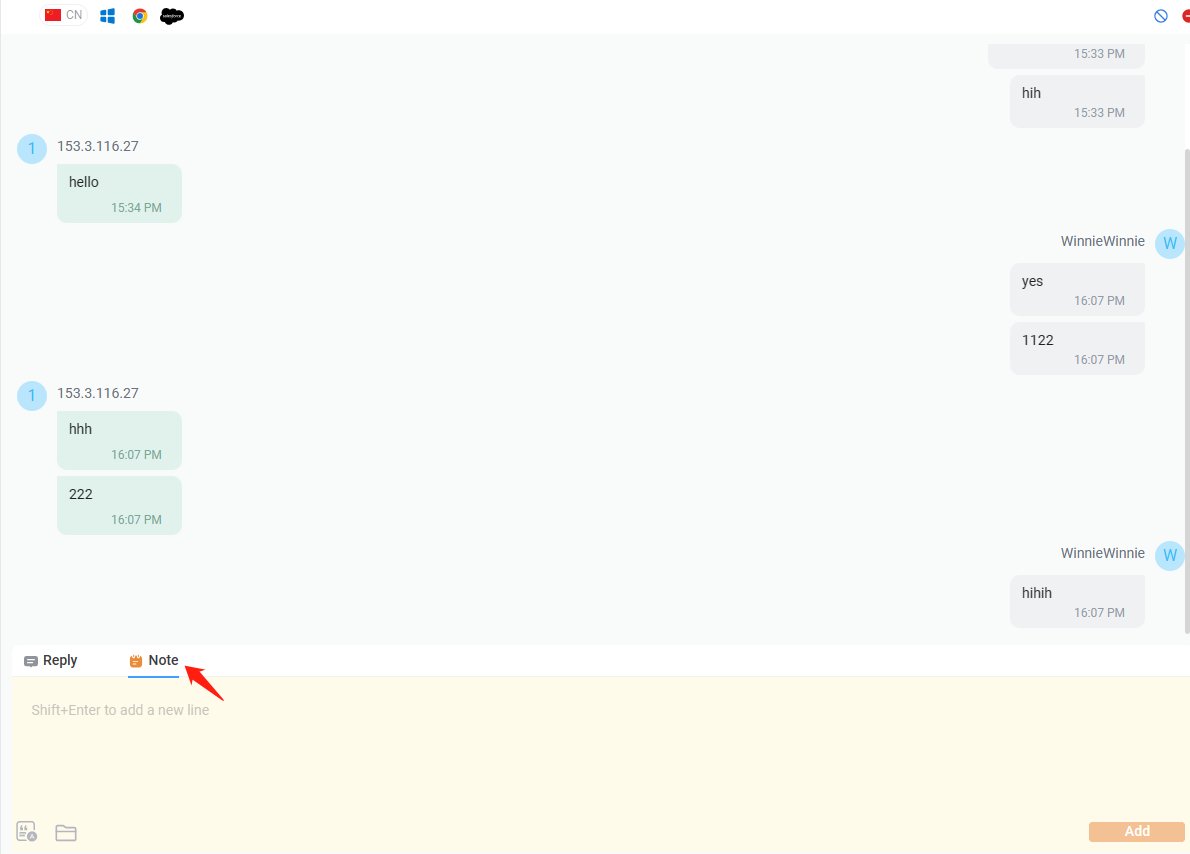
- Click below icon, you can add attachment to the Note.
- Click the Let agent assist make a summary button in the bottom left. A quick summary of the chat or ticket appears in the Note area. And click Add to share it with other team members.
Note: Note added by agent is not visible to visitors.
Send Canned Message
A canned message is a pre-defined message, usually created for greetings, frequently asked questions, and more. Using canned messages enables agents to save strength repetitively typing the same answers and thus improves chat efficiency.
Axx Omni Web Chat allows you to locate canned messages by category, search keyword, and shortcut. Please follow the instructions below to learn how to quickly send out a canned message during chat sessions.
- Click the Canned tab in the right section.
- Click on the category the message belongs to and locate the message, or type the keywords in the Search box to bring up the message.
- Double-click on the message to send it out to the visitor.

- If you need to edit the canned message before sending it out, please click the canned message, then it will show in your chat window where you can edit it.
- If you need to edit the canned message before sending it out, please click the canned message, then it will show in your chat window where you can edit it.
- Click on the located canned message or press direction keys on your keyboard to select canned message, then press Enter key on your keyboard to insert the message to your typing.
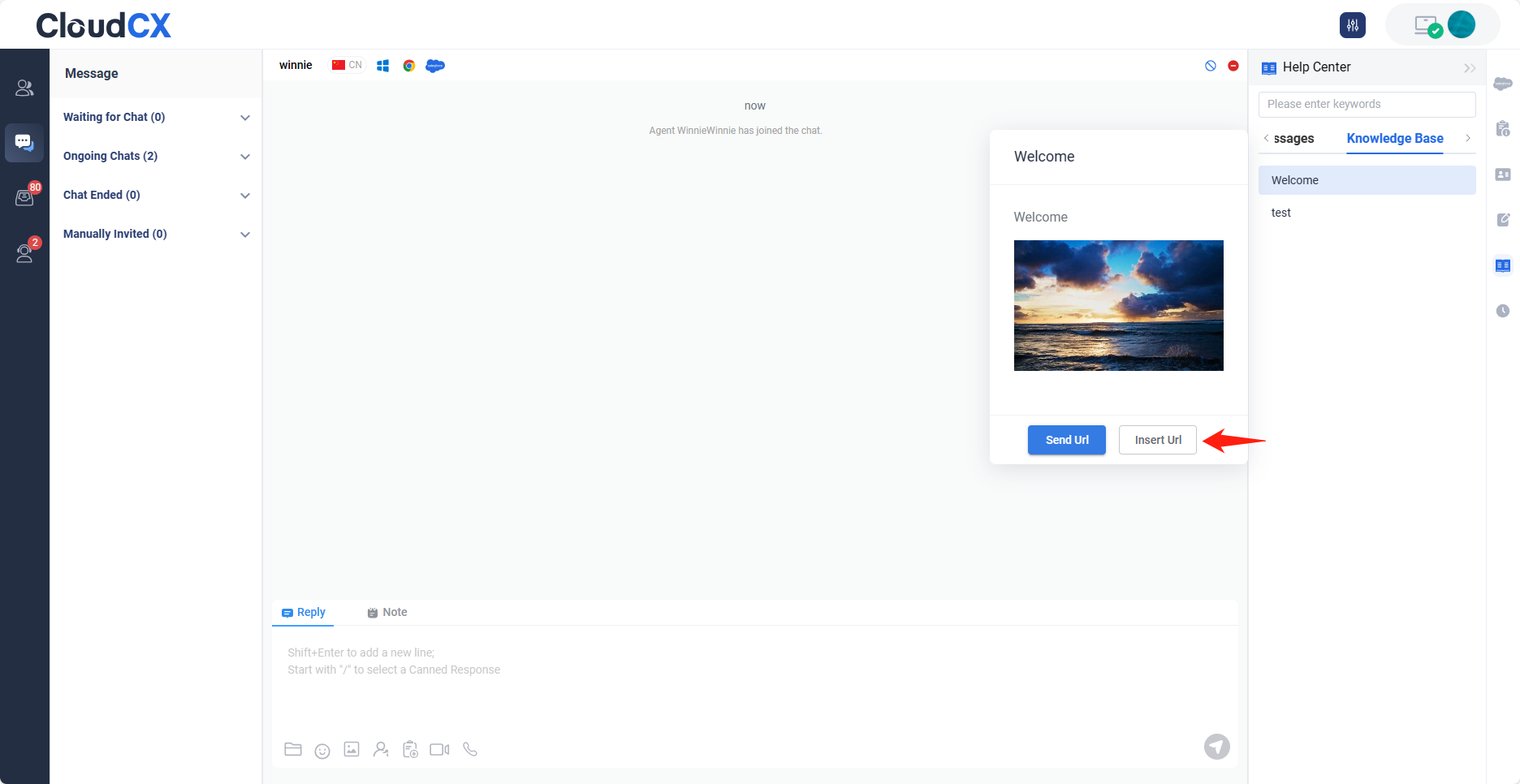
Send Knowledge Base URL
A Knowledge Base tab appears under the Help Content tab. Agents can then search for articles using keywords. Agents can send URLs of knowledge base articles straight to visitors as messages, and they can also insert the URL to the text input area to edit it further.
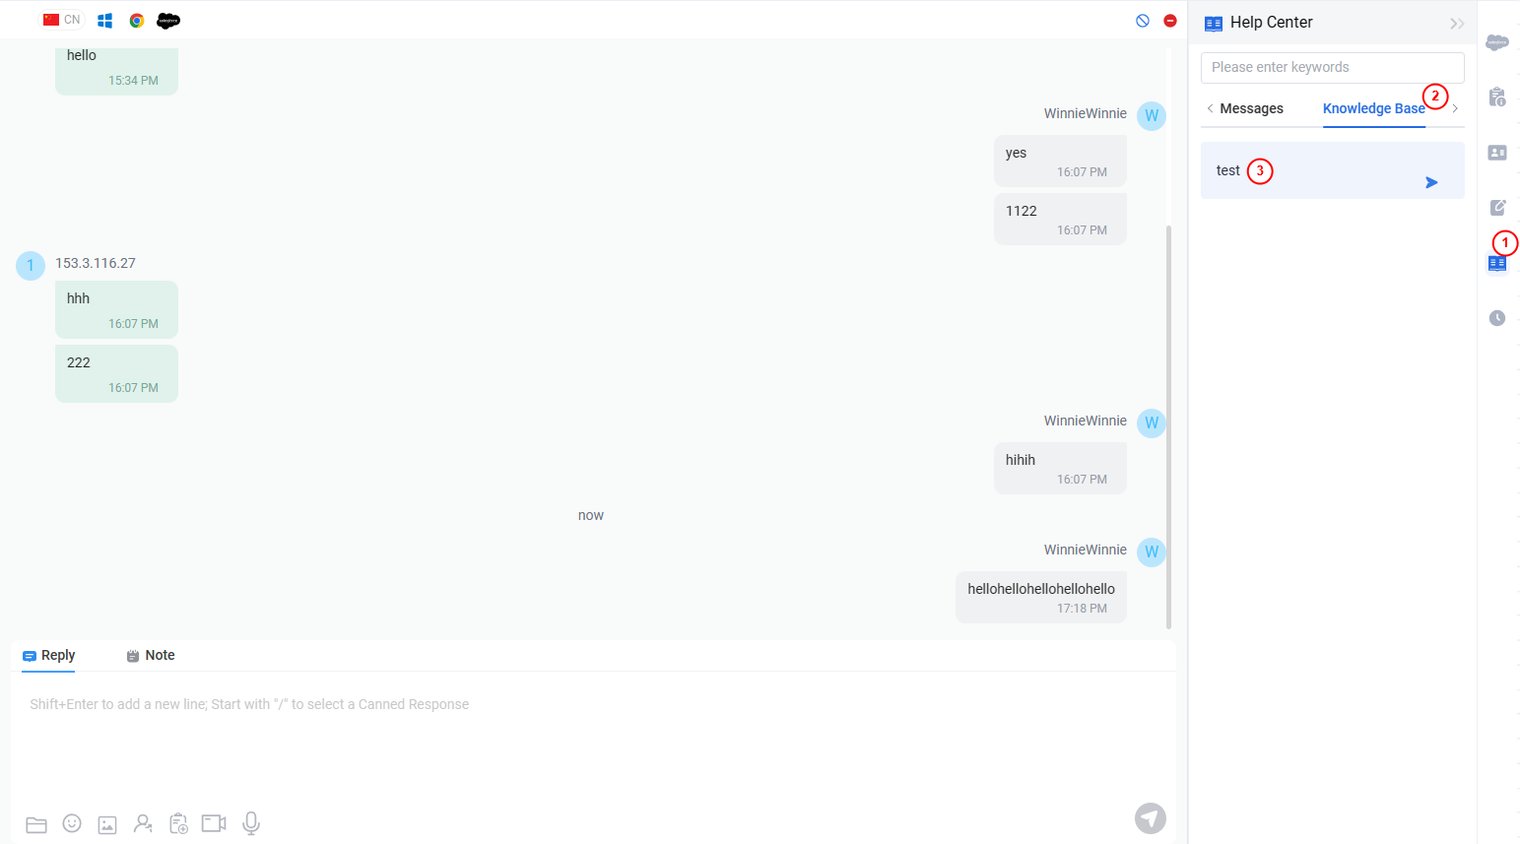
Agents can click on article titles to show the article details right under the KB tab. They can copy any sentences or images from the article, paste them into the text input box, and send them to visitors. Send URL and Insert URL is also available at the bottom of the article.
Other Setup
- Click Ban icon, Select Ban visitor from this Visitor ID or Ban visitor from this IP, add Comment if needed, then click Confirm. You can ban the visitor.
- Click Ban icon, Select Ban visitor from this Visitor ID or Ban visitor from this IP, add Comment if needed, then click Confirm. You can ban the visitor.
- Each visitor has its Visitor ID in Axx Omni Web Chat, planted in the visitorʼs browser cookie. If a visitor gets banned from his or her Visitor ID, this visitor will not see the chat button using the same browser. However, if this visitor switches to another browser, uses another machine, or clears the cookies in the browser he or she previously used to visit your website, this visitor can see your chat button and initiate chat requests again.
- Each visitor has its Visitor ID in Axx Omni Web Chat, planted in the visitorʼs browser cookie. If a visitor gets banned from his or her Visitor ID, this visitor will not see the chat button using the same browser. However, if this visitor switches to another browser, uses another machine, or clears the cookies in the browser he or she previously used to visit your website, this visitor can see your chat button and initiate chat requests again.
- If you ban an IP, all visitors using the same IP address will not see your chat button. However, you should be cautious about using this option as it may keep your Web Chat away from many other potential valuable clients.
- Click Leave The Chat icon, You can close the chat.
Transfer Chat
Click below icon, then select an available agent you want to transfer to. You can transfer the Chat.
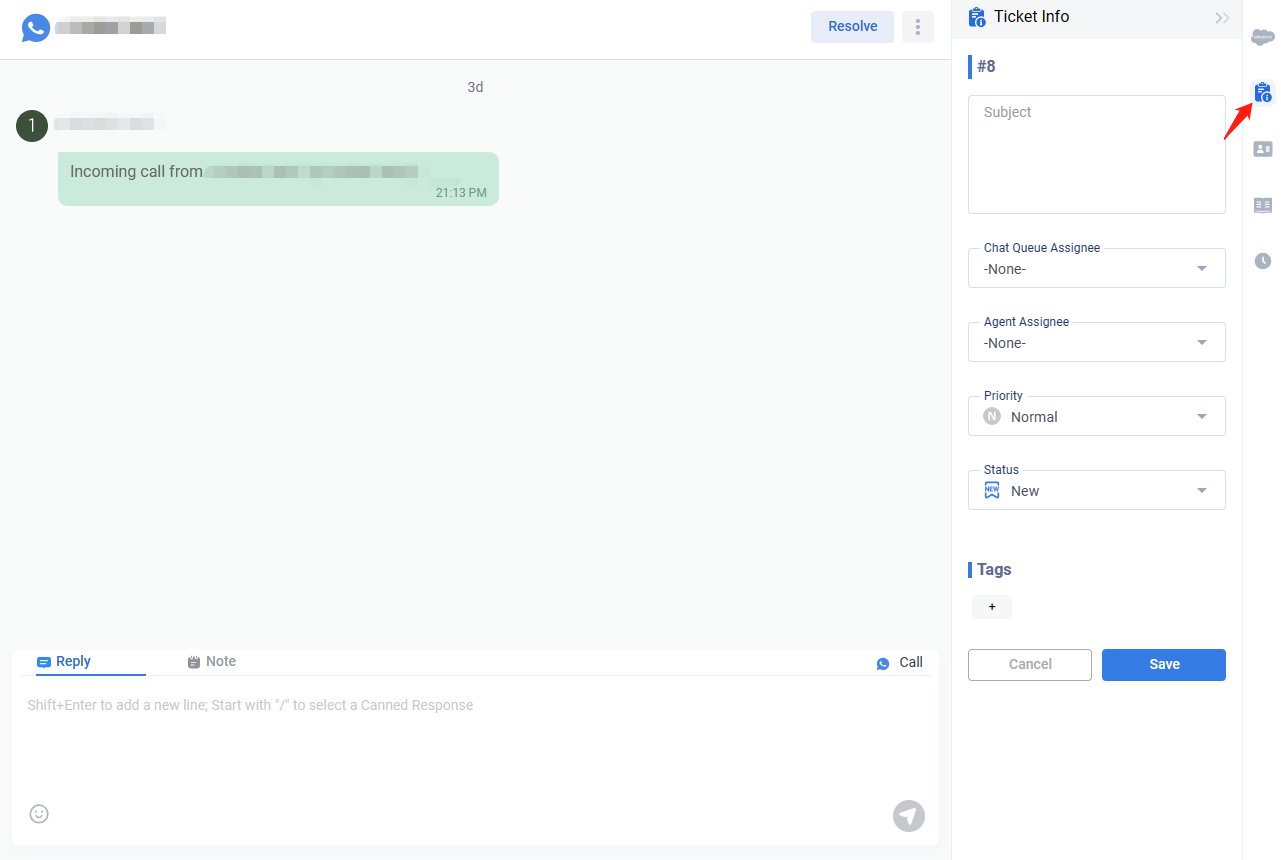
Create Ticket
Click below icon, then select Create a new ticket or Attach to ticket.

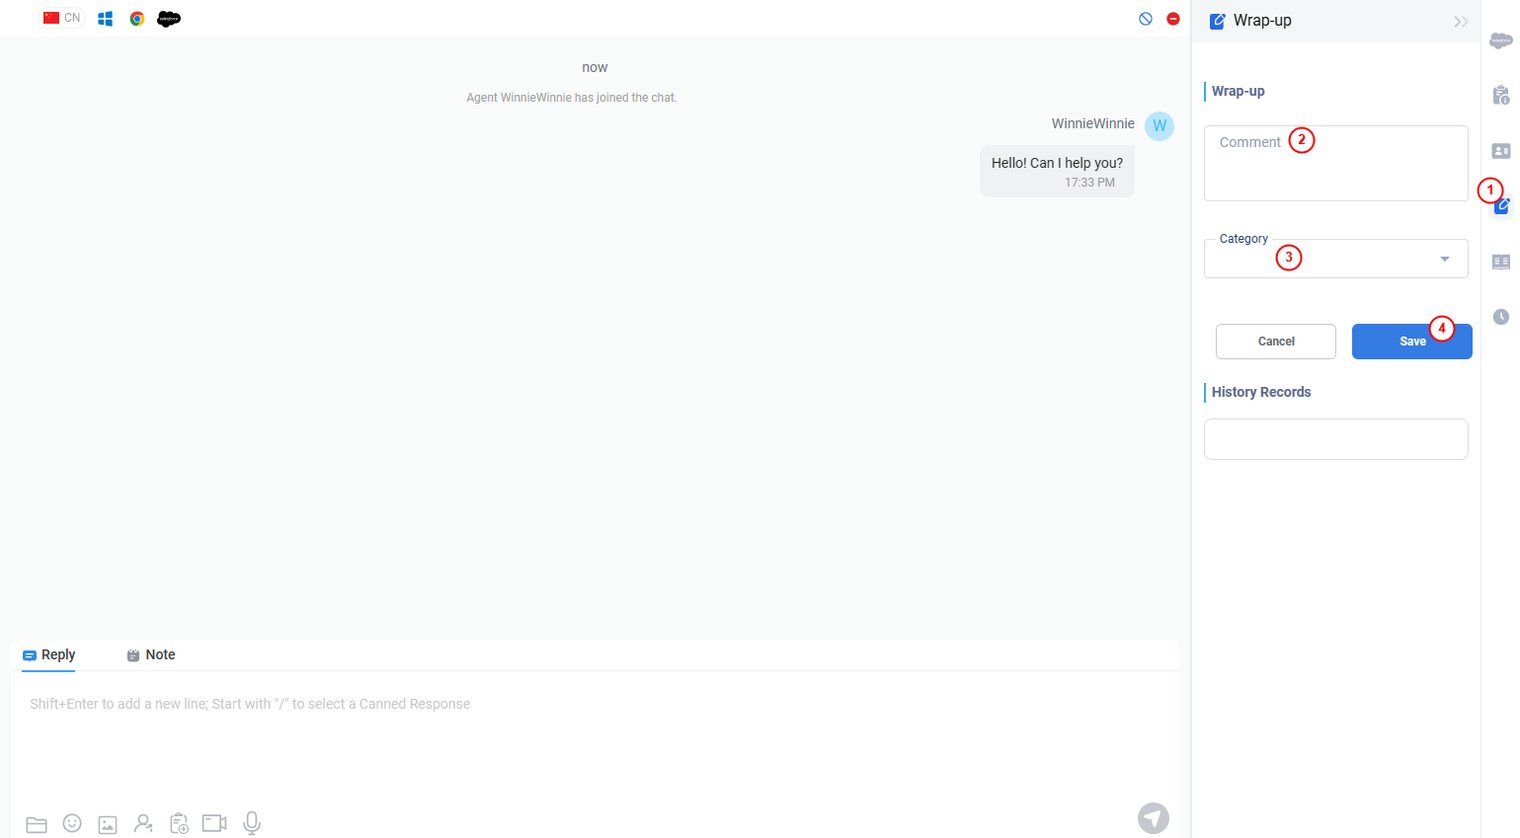
Wrap-up
Enter Wrap-up information, then click Save, you can save Wrap-up information. And Wrap-up History Record will show under the window.
Inbox Tickets
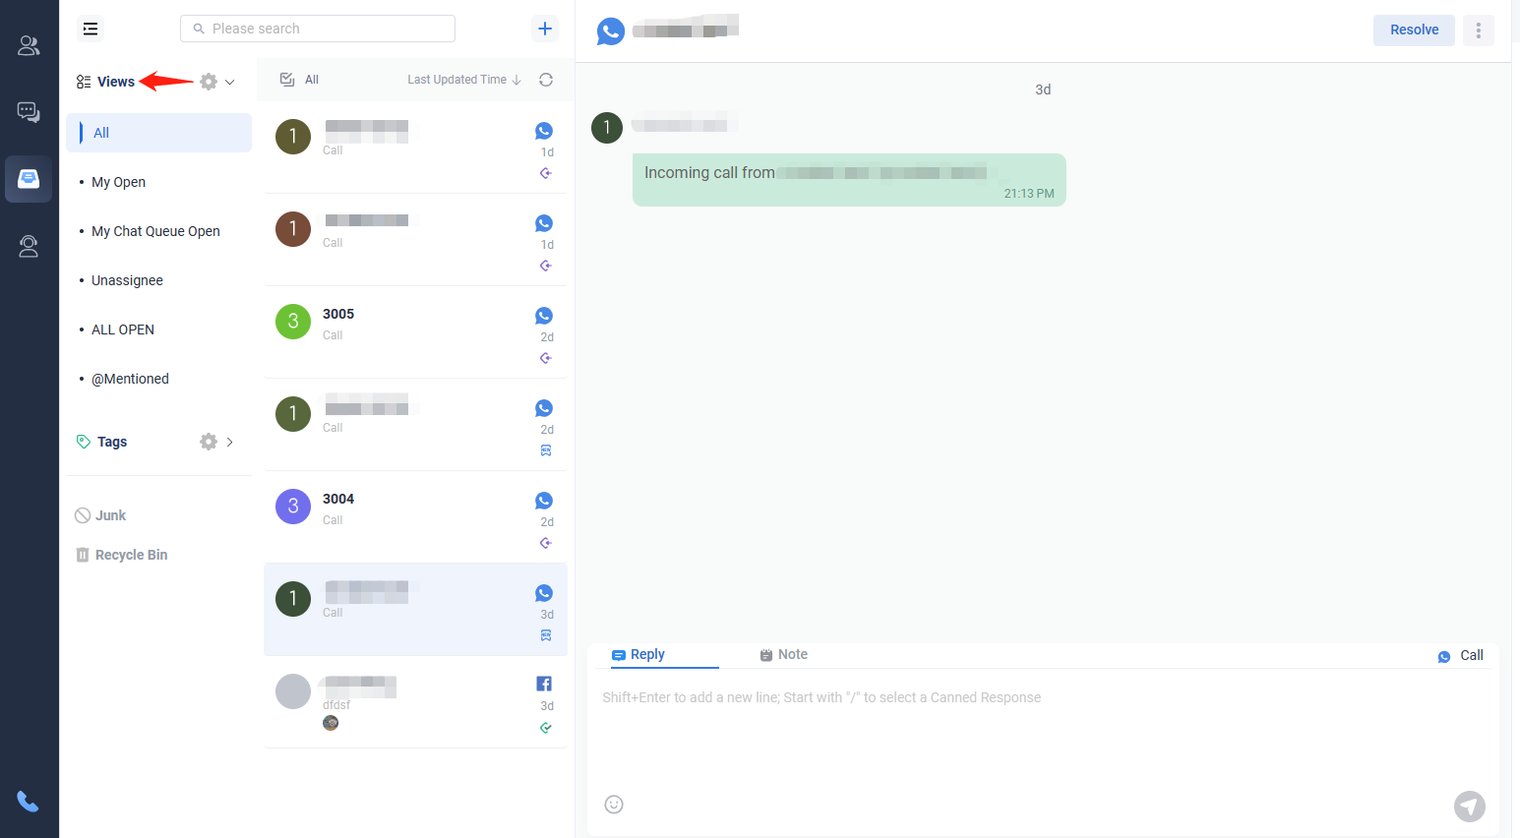
Ticket List
Ticket List locates in the left corner of the page. You can view the tickets under different views, tags, create New tickets, check tickets in Junk, Recycle Bin.

View
With Axx Omni Inbox, you can have multiple views to quickly locate certain tickets based on predefined co nditions. The views help you narrow down the tickets in your inbox system and only display the tickets which require your attention.
Click View icon, then click desired view, all the tickets based on the same condition will be listed there.
About View Types
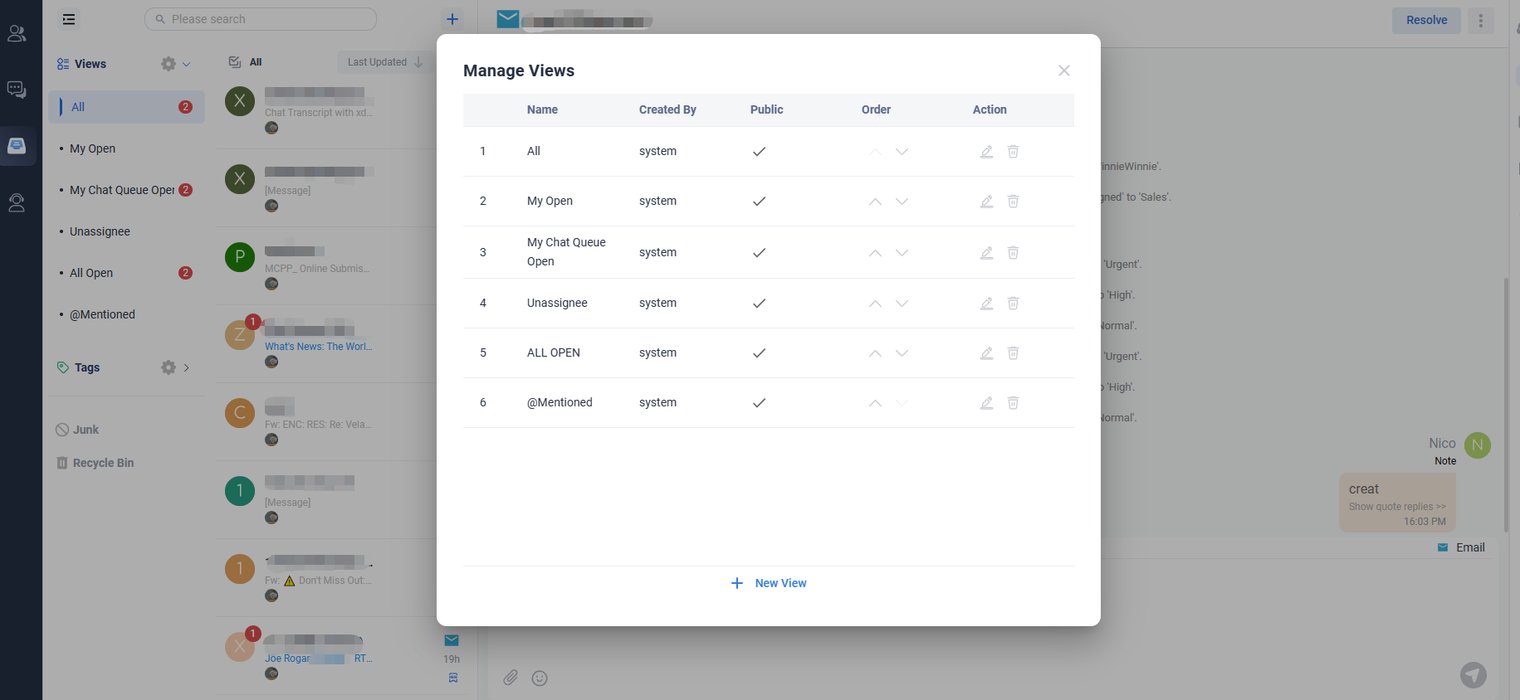
In Axx Omni Inbox, Views are categorized into two types:
- System Views. Also called default Public Views, which contain several pre- defined Views when accessing Axx Omni Inbox. You can delete or edit these views. These Views are available to all agents in a specific group.
- Custom Views. You can create your own Views that is available to yourself. You can organize Views into meaningful categories.
The following table lists default system Views in Axx Omni Inbox.
| View | Description |
| All | Displays the list of all tickets from all the integrated channels available in the Inbox system. |
| My Open |
Displays the list of tickets when all the following conditions are met:
|
| My Chat Queue Open |
Displays the list of tickets when all the following conditions are met:
|
| Unassigned |
Displays the list of tickets when all the following conditions are met:
|
| All Open |
Displays the list of tickets when any of the following conditions are met:
|
| @mentioned |
Displays the list of tickets when any of the following conditions are met:
|
How to Use the @Mentions Feature in Axx Omni CX Ticket
When you are working on a ticket, you may need to get other agents involved if you want them to follow up with a case and reach out to the customer. The @Mentions feature in the Axx Omni Ticket system allows you to collaborate with other agents more efficiently and keep them in the loop by using a simple @ symbol in your ticket Note field.
Step by Step Instructions
- Go to the Ticket list in Agent Console.
- Click on the ticket you want to add a note.
- Switch to Note field.
- Type @ to bring up the list of agents in your account.
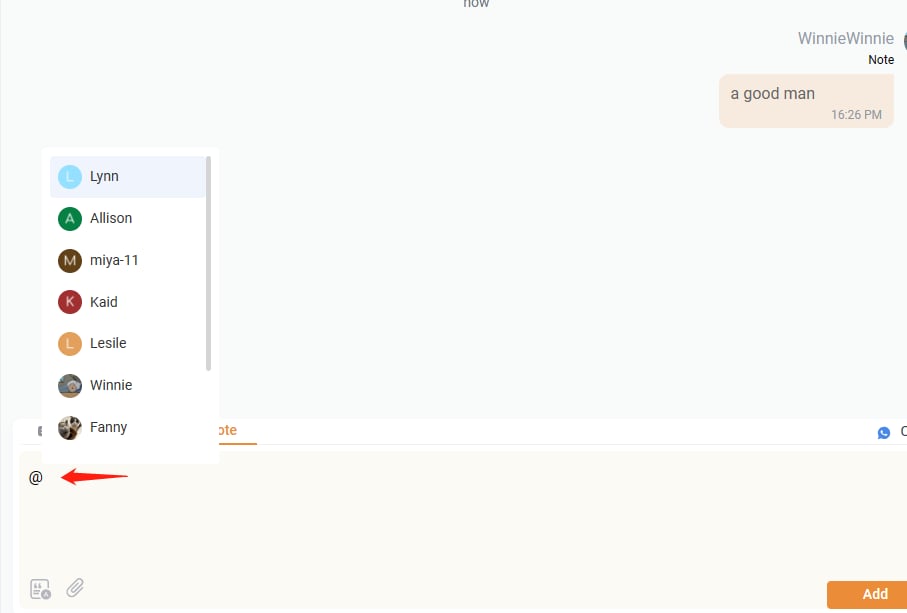
- Select the agent name from the agent list.
- Complete your message, then click the Add button. A note with @Mentions has been added.
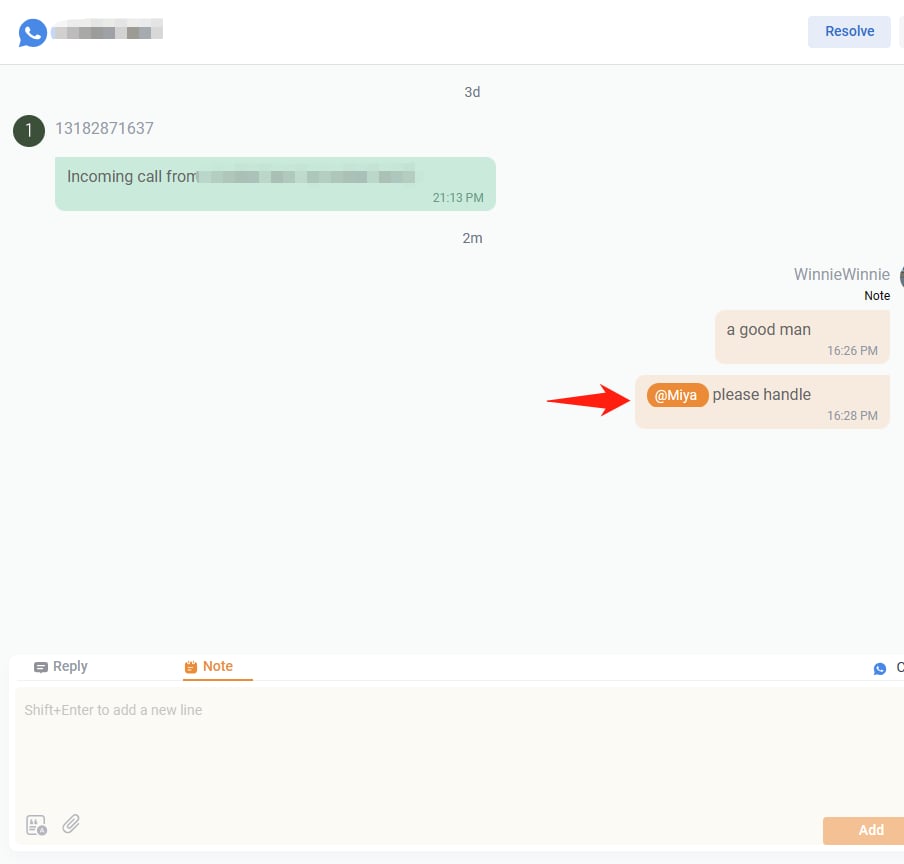
When you are @mentioned in a ticket note, an @ icon will be displayed in Filters List and Ticket List. It allows you to get notified and to easily locate the ticket that requires your attention.
Actions on Views
Axx Omni Inbox allows you to manage Views so that you can organize your tickets based on certain criteria. You can manage your views by creating, sorting, editing, and deleting them as needed. The following are the actions you can perform on Views from the Manage Views popup:- Create New View: You can create a new View by setting a trigger rule and adding multiple conditions. To create a new View, click the New View button.
- Sort Views: You can set the order of precedence of the View from the list. To set order of View, go to the View you want to order, and click the Move Up or Move Down icons.
- Sort Views: You can set the order of precedence of the View from the list. To set order of View, go to the View you want to order, and click the Move Up or Move Down icons.
- Edit Views: You can edit Views in case you need to modify the trigger rules and conditions. To edit a View, go to the View you want to edit, and click the Edit icon.
- Delete Views: You can delete Views from the list if it is no longer required. To delete a View, go to the View you want to delete, and click the Delete icon
- Click the New View button.
- Edit the View. Define a Name and set up Conditions for the View.
Note: If you uncheck the Public field, the View can be only accessed by the agent who creates it. A Public View will be available for all agents.(Only Admin can create public views)
- Click Save.
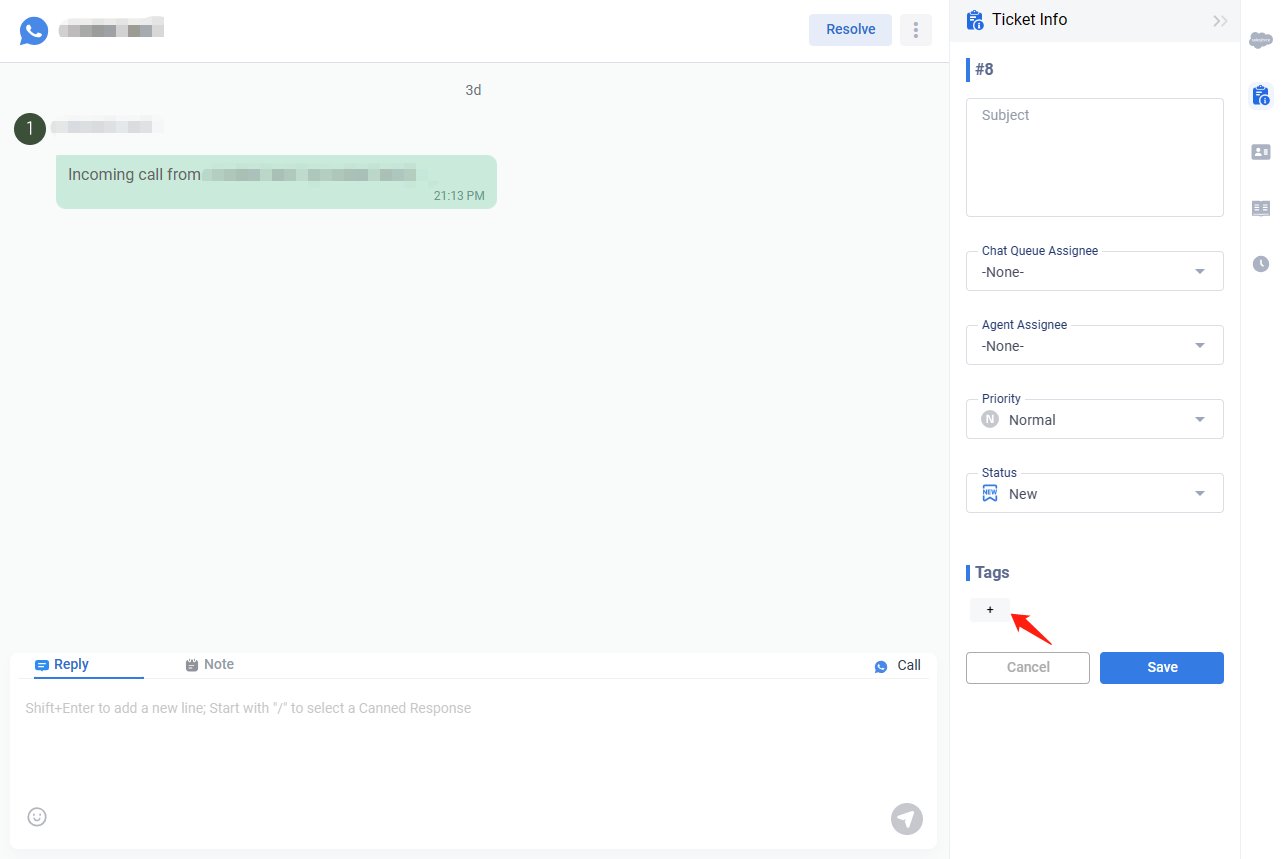
Tags
Using the social media tagging feature, you can attach one or more customized keywords or phrases to each of your social media conversations, making it easier for you to group them and review the messages later.
Click Tags icon, select desired tag, all the tickets with the same tag will be listed there.
Click this icon, then click“+New Tag”,you can create a new tag.

You can add a tag for a ticket on Ticket Info page.
Tickets Reply
Tickets Reply
Add Meme
- Enter message in Input box, select from which mail address, then click Send, message will be sent.
Note: Within the inbox tab on Agent Console, providing internal comments or attachments as a Note for tickets is the same as you do for Web Chat.
Consider a scenario where you manually assign the ticket to an agent. You can tag them (@) in the Note to remind the agent to follow up in time.
In the Note tab of the Conversation pane, you can type as many internal comments as possible or attach files to share information internally.
Whats APP Template
For Whats APP messages, You can choose template to send to visitors.
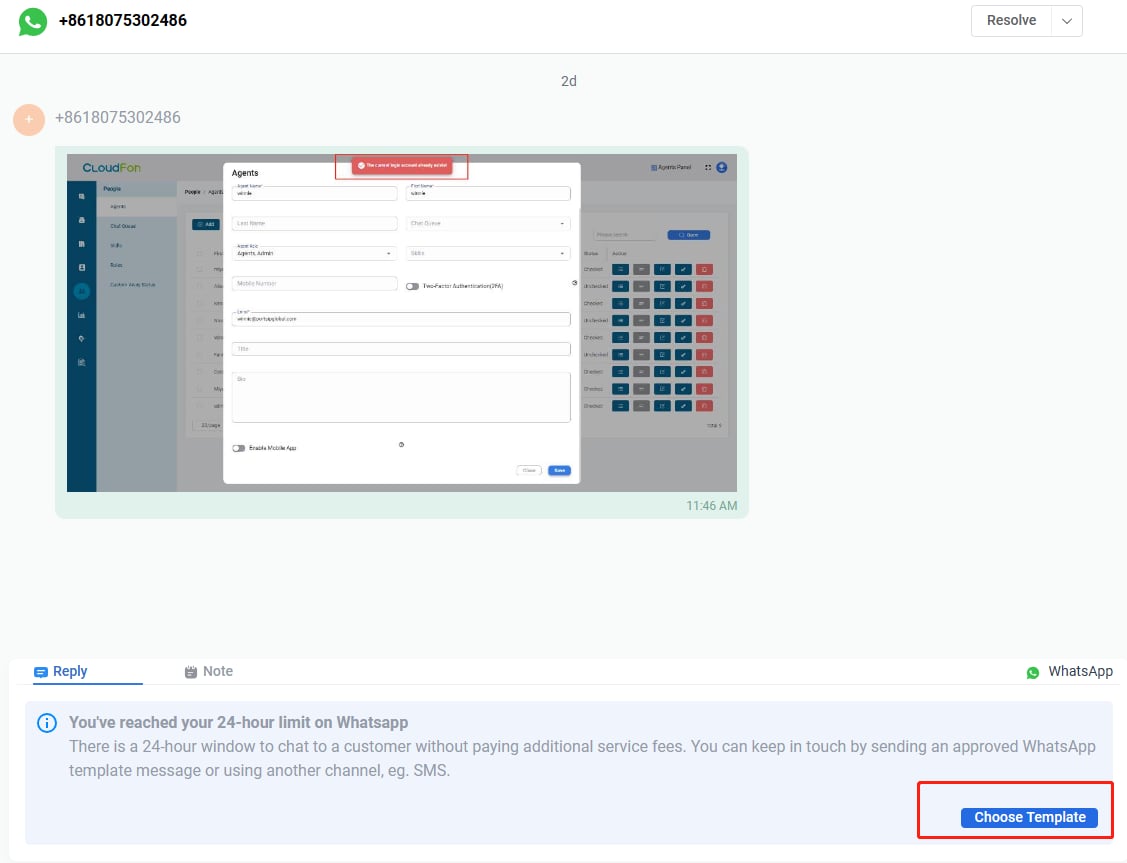
You can search Language or keywords.
Note: After you send templates, within 24 hours, if the customer replies, you can chat with the customer. Otherwise, you can only send templates.
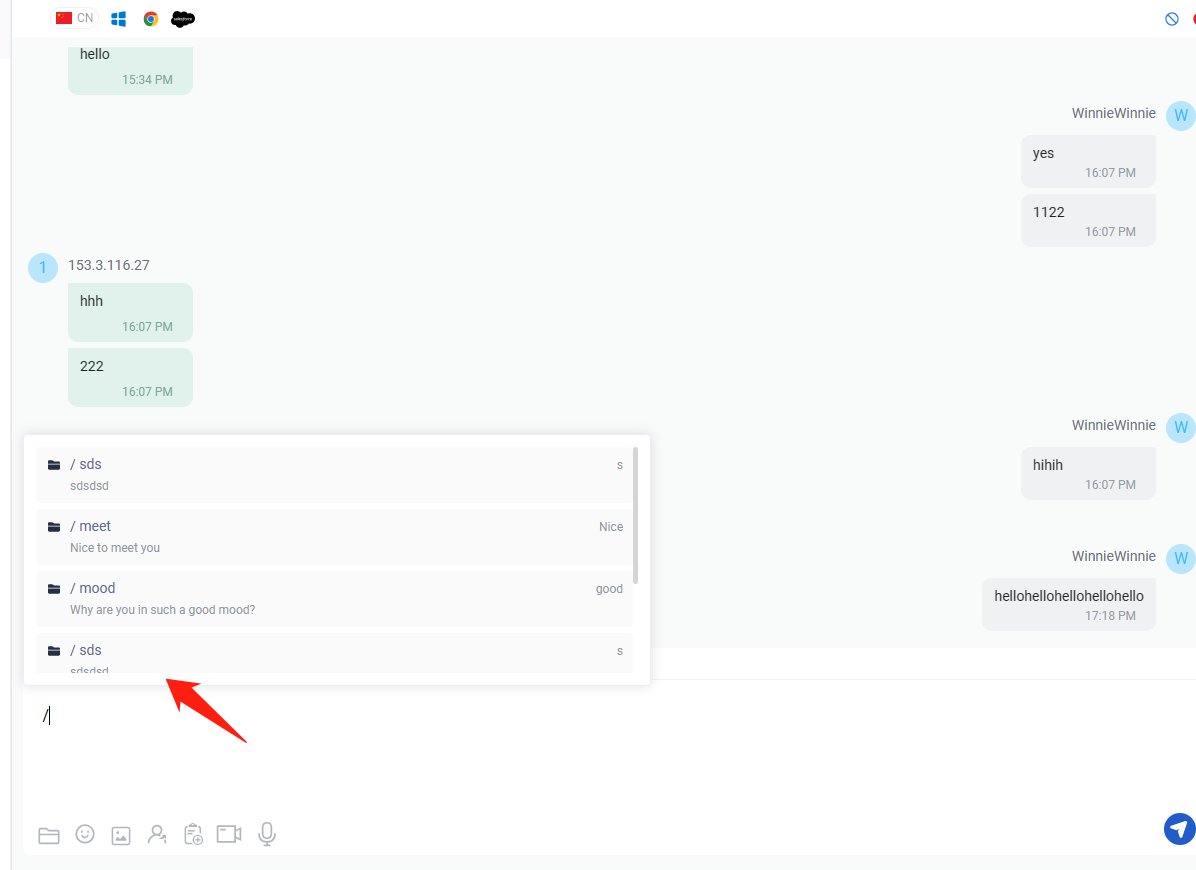
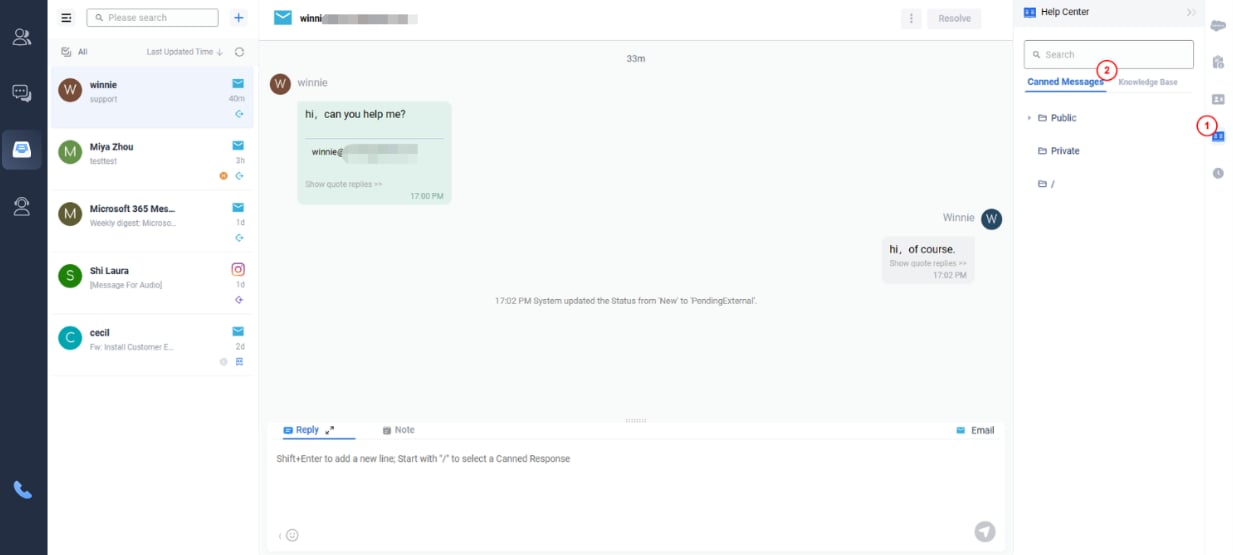
Canned Message
- Click the Canned tab in the right section.
- Click on the category the message belongs to and locate the message, or type the keywords in the Search box to bring up the message.
- Double-click on the message to send it out to the visitor
And Input /, you can enter Canned Messages.
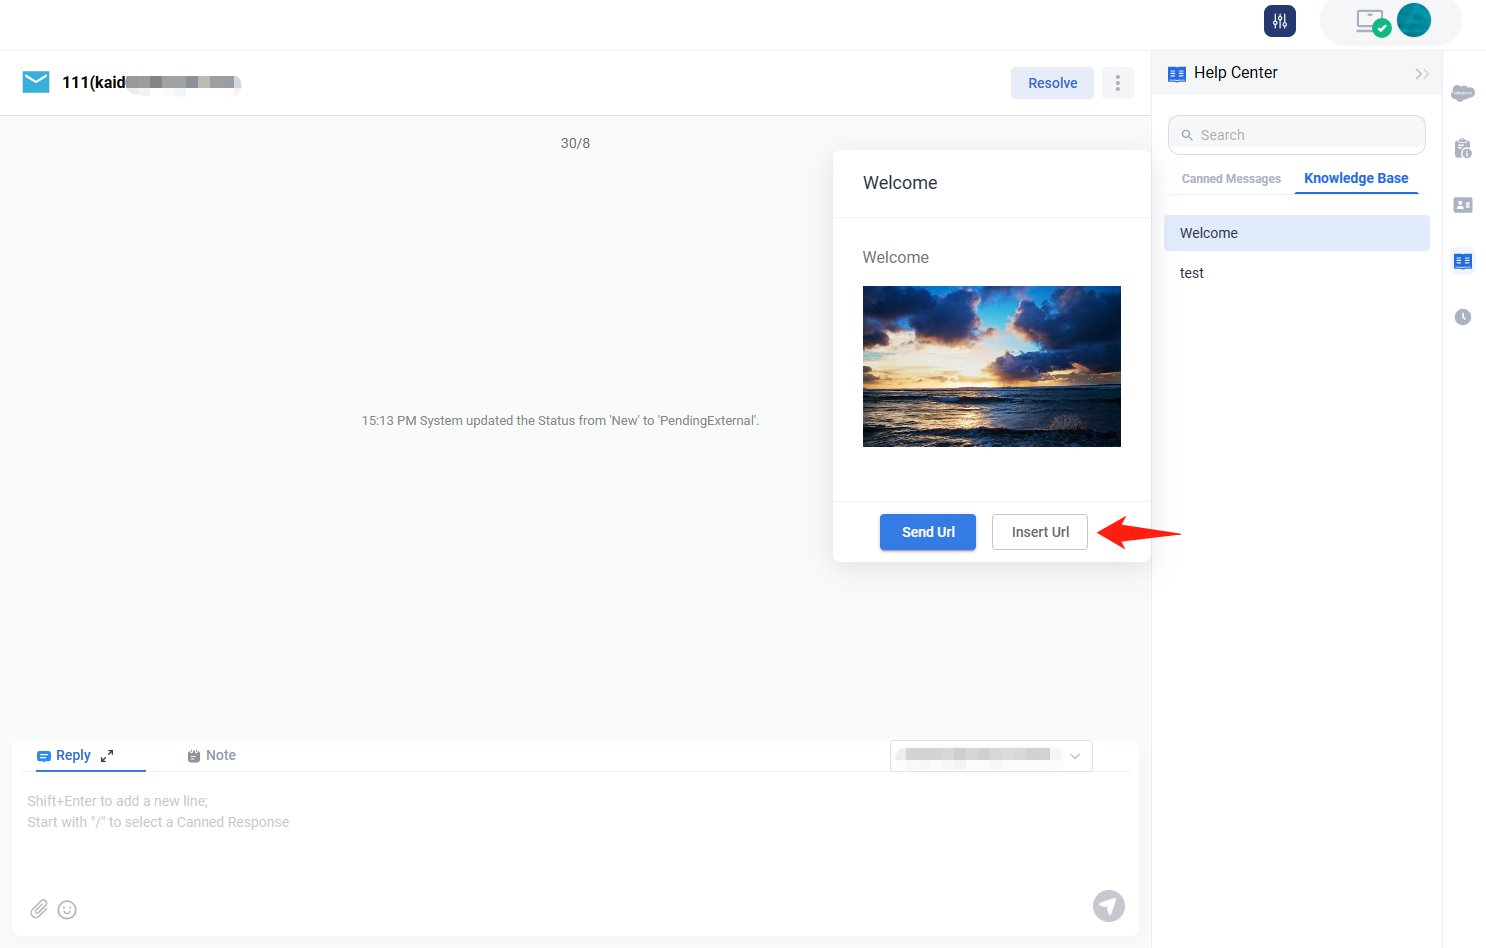
Knowledge Base URL
A Knowledge Base tab appears under the Help Content tab. Agents can then search for articles using keywords. Agents can send URLs of knowledge base articles straight to visitors as messages, and they can also insert the URL to the text input area to edit it further.
Agents can click on article titles to show the article details right under the KB tab. They can copy any sentences or images from the article, paste them into the text input box, and send them to visitors. Send URL and Insert URL is also available at the bottom of the article.
Application of the Call channel
If the administrator page is integrated with Cloud PBX and your account is bound to an extension number, a call icon will appear on your panel. You can communicate with customers through call channel in inbox.
- Click on this icon and a dial pad will appear.
- You can enter the customer's number or click the contact icon to select a contact to dial out.
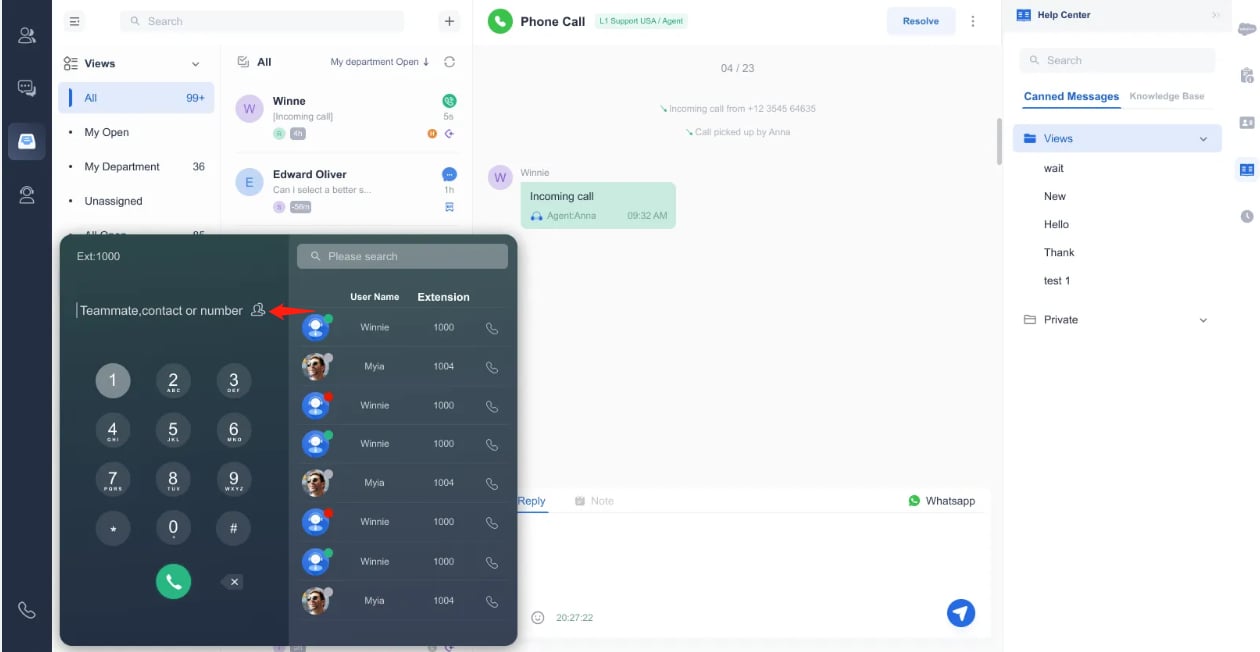
You can also click the phone icon in the contact information or click the phone icon after Call Ended in the chat dialog box, and the customer's number will be automatically filled in the dial pad.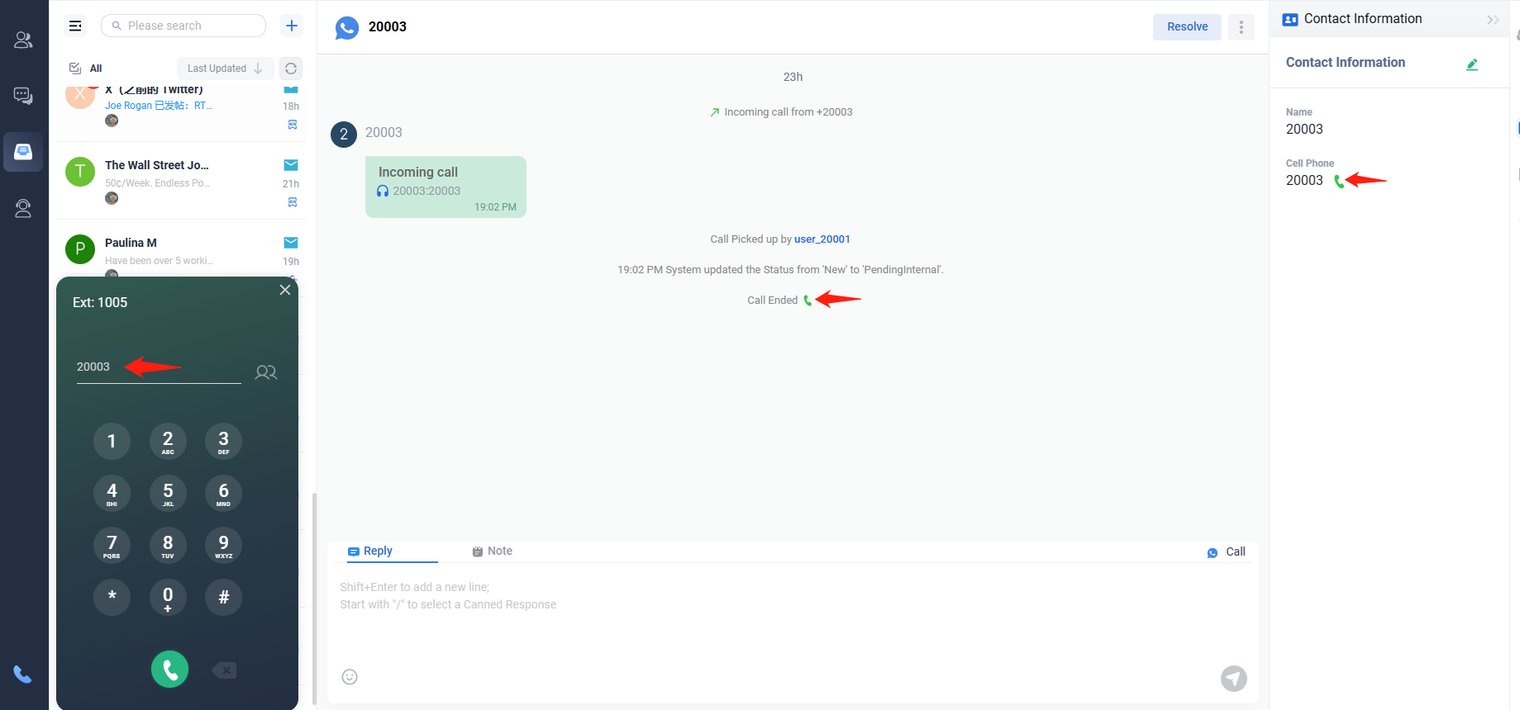
- During a call, you can click transfer to select another agent to transfer the current call to him.
- Click the dialpad icon, it will pop up the dialpad panel.
- Mute: Click Mute, your voice will not be heard by the other party.
Manage Tickets
Add New Tickets
Click + icon, select Email, SMS or Whats App.
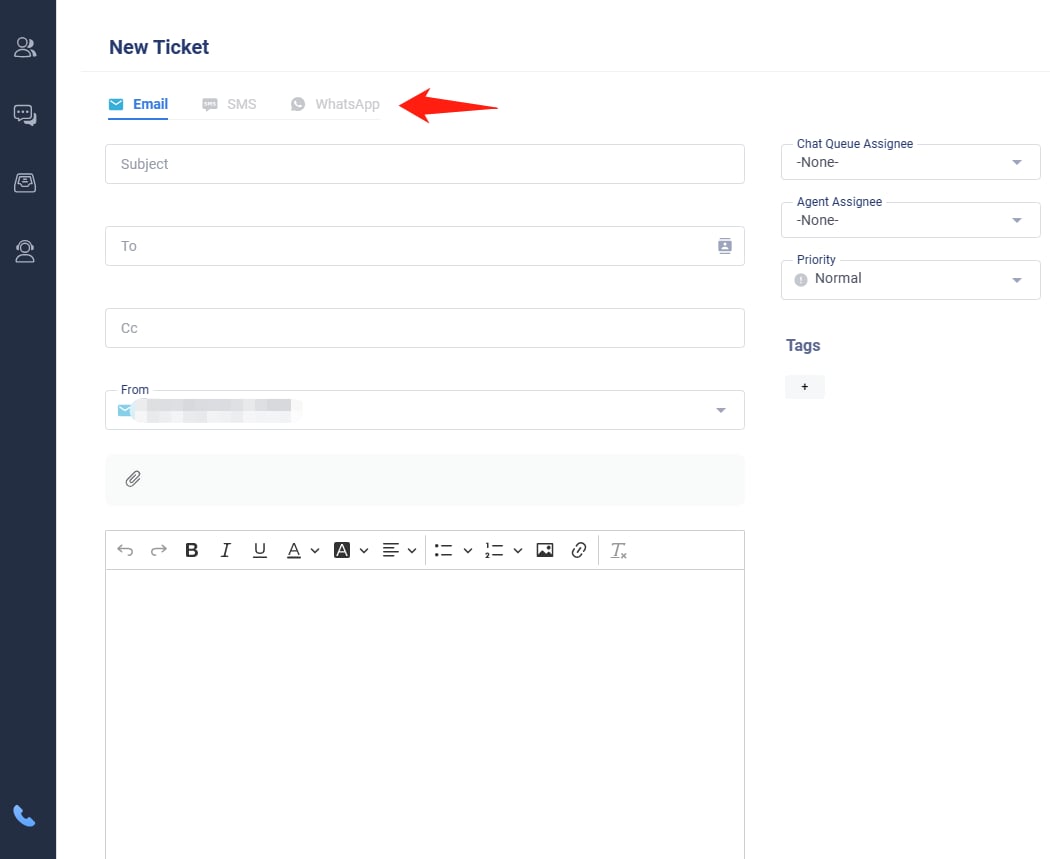
Complete below window, you can create a new ticket.
Note: You can add tags to a ticket. Tags help classify tickets and can be used when searching for them.
Junk
Email blocked by Blocked Senders will be listed here.
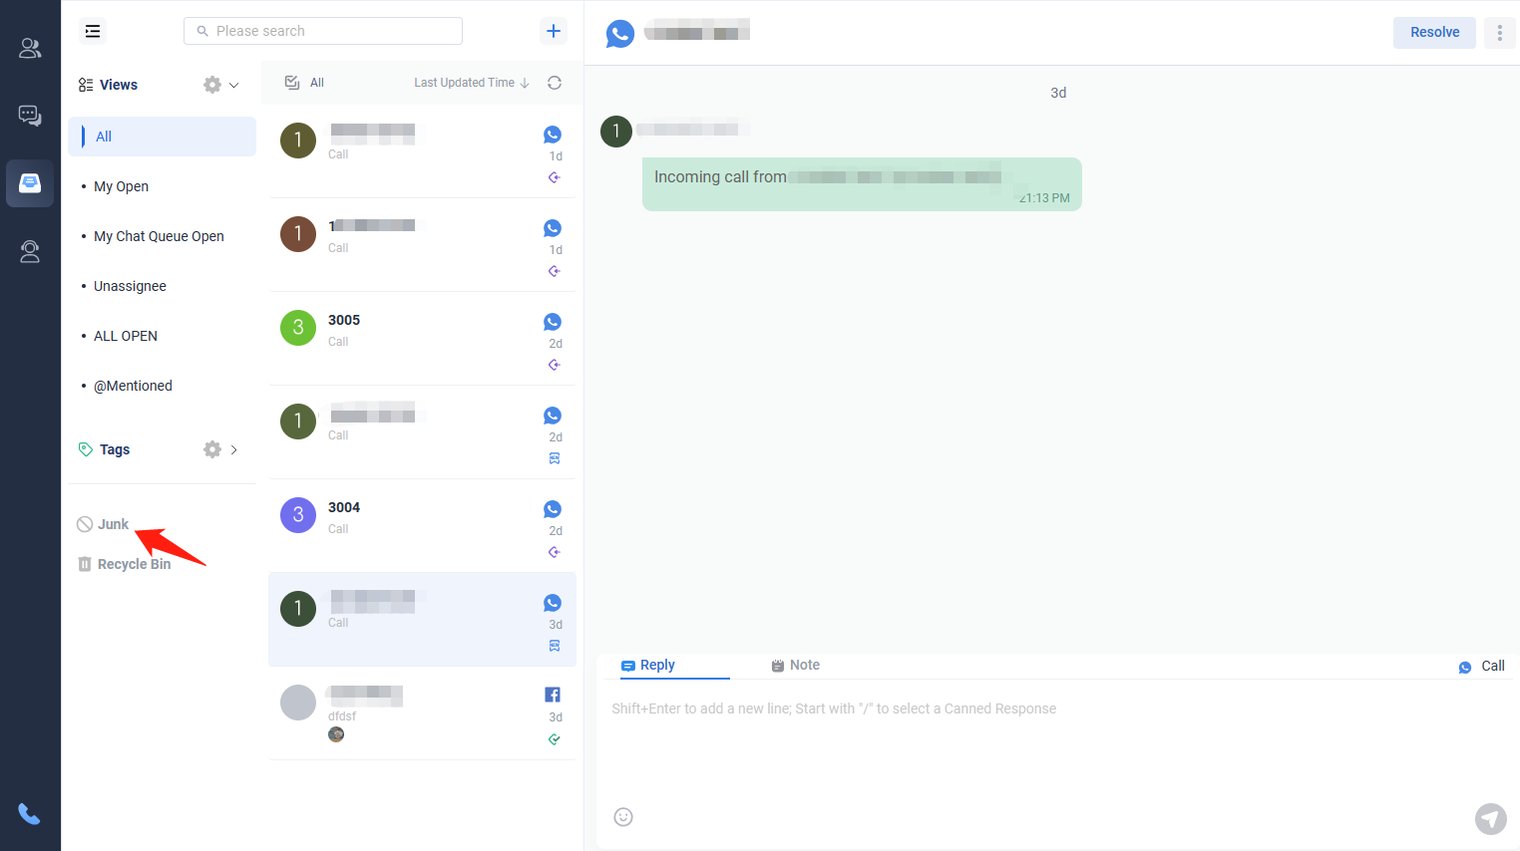
Recycle Bin
Emails you deleted are all listed here.
Edit Tickets
- Click “All”
- Select the ticket you want to edit, and click edit icon.
- Complete below window, a ticket can be edited.
Note:
Statuses include:
- New: The default status when a ticket is created.
- On-Hold: Used for tickets that require further investigation.
- Pending External: Tickets waiting for a reply from the customer.
- Pending Internal: Tickets waiting for a reply from your organization.
- Resolved: Tickets that have been closed by agents.
You can also edit tickets in the list on the right.
Change Ticket Status
Click status icon, select a status, you can change ticket status.
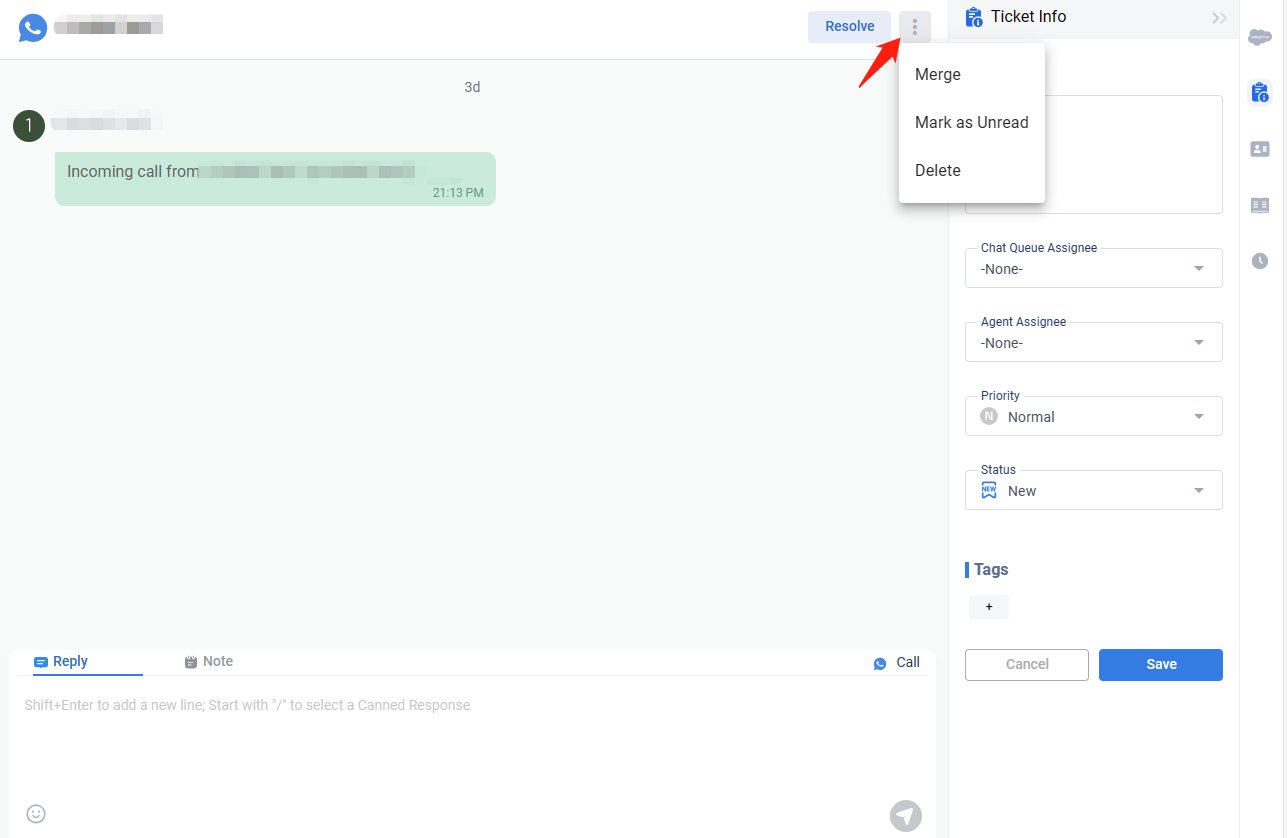
Merge Tickets
The Ticket Merge feature lets you combine the history of a source ticket with a target ticket.
- Important: This action is irreversible.
- After merging, the target ticket retains its property values.
- Any future emails, chat transcripts, or offline messages sent to the source ticket will automatically be attached to the target ticket.
- Searching for the source ticket in the future will display the target ticket.
- Click Merge.
- Select the ticket you want to merge into another ticket, then click Next.
- Select the target ticket and click Save. The ticket displayed on the right is the selected target.
- Select the target ticket and click Save. The ticket displayed on the right is the selected target.
- To undo this action, click Reverse.
- Select a blocked email account or blocked domain.
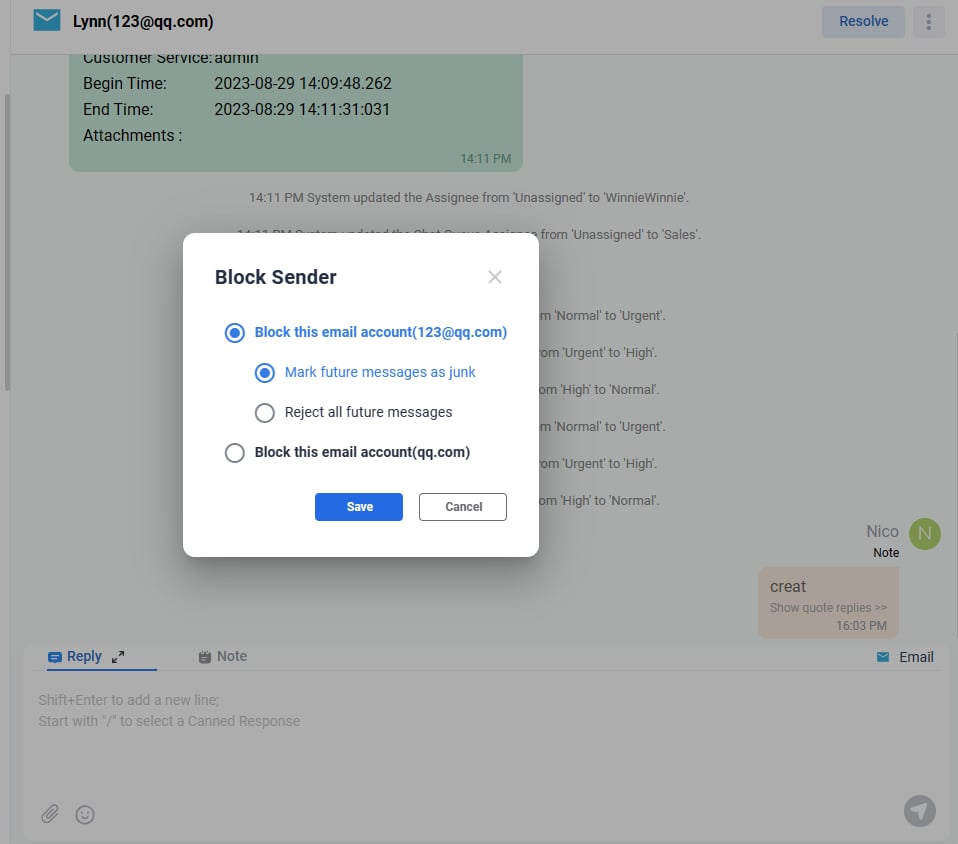
Note: Blocked senders can be managed in the Admin Control Panel by navigating to Inbox > Settings > Blocked Senders. From there, you can edit existing entries or add new blocked senders.
Mark as Read / Unread
- Click Mark as Unread or Mark as Read to change the ticketʼs read status.
Delete Tickets
- Click Delete to move the ticket to the Recycle Bin.
- Alternatively, click All, select the ticket you want to delete, and then click the Delete icon.
Resolve Tickets
- Click Resolve to close the ticket.
Reopen Tickets
- After a ticket has been closed, click Reopen to reopen it.
Edit Contacts
Click the Contact Information icon to edit a contact.
Chat History
Click the History icon to view your ticket history.
Select a record to see its details.
Internal Chat
On this page, you can start a chat with other users.
- Type the userʼs name in the Search box.
- Click on the desired user to open a chat window and begin chatting.
- To create a chat group, click the “+” button.
Click sessions, all sessions are listed.
Profile Setup
Change Password
Click the icon located in the top-right corner of the page.
The selection looks like:
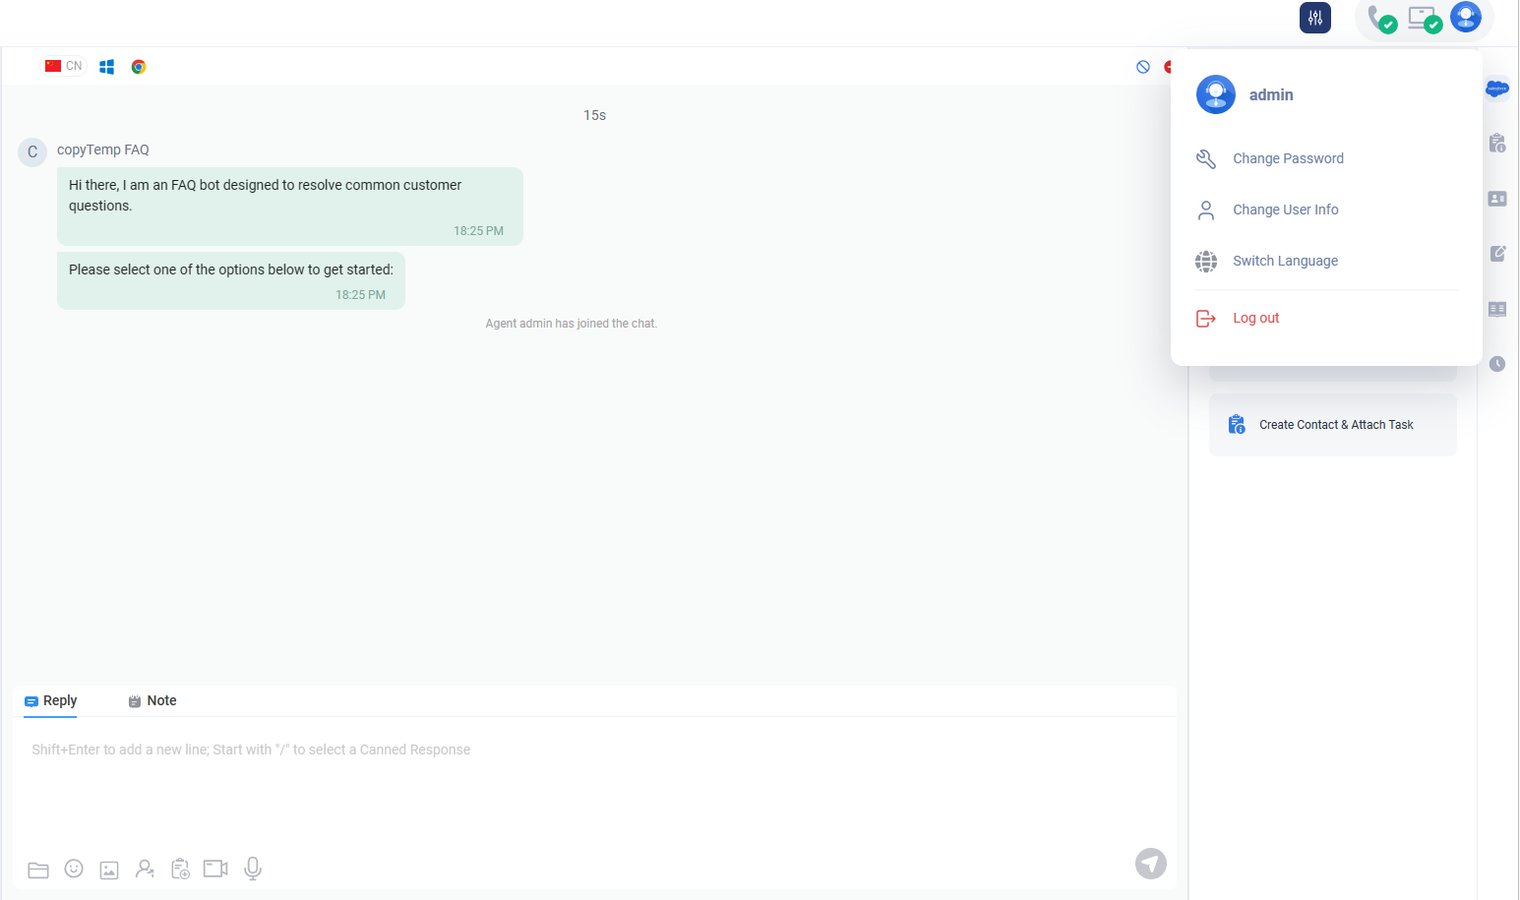
Select Change Password. A pop-up window will appear.
- Enter your Old Password, New Password, and Confirm Password.
- Click Save to update your password.
- Click Save to update your password.
User Setting
Change User Info
- Click Edit Profile icon, select Edit Profile menu, then the following pop-up will appear:
- Click the button in the window, then you can select a picture.
- Type First Name, Last Name, Mobile Number, Email Address, select timezone, if needed.
- Click the Save Button.
Note: Email is used to receive captcha code when you forget your password.
Single Sign-On(SSO)
Single sign-on (SSO) is a user authentication tool that enables users to securely access multiple applications and services using just one set of credentials.
Axx Omni SSO allows your agents to sign in to Axx Omni using a third-party application.
Step by Step Instructions
- Log in to your Axx Omni account.
- Click Edit Profile icon, then the following pop-up will appear:
- Click Single Sign-On. Select the third-party application you want to connect.
Note: You can connect to Google and Office365 only when the system admin has configured it.
When you connect successfully, it will show the account.
And now your have been bound to the Office 365 account, you can log in the Axx Omni by Office 365 account directly.
If you connect through the login page instead of User Setting for the first time, you need to bind an agent account after you connect to a third-party application.
Two-Factor Authentication
Two-Factor Authentication (2FA) is a security process in which two different authentication factors must be provided to verify your identity. It helps protect your Axx Omni account from unauthorized access by adding a second-level security layer to your primary-level authentication. The 2FA process is not necessary for all sites. However, Axx Omni suggests that it should be set up to enhance your account security further. With more robust security like 2FA, you can secure your customer's valuable data from unauthorized access and other cybercrime.
Set up and Reset Two-Factor Authentication (2FA) Set up 2FA
HELIOS provides two methods: Email authentication and Authenticator app authentication, You can set the authentication methods you want.
- Email authentication
To set up email authentication via Axx Omni Control Panel, follow these steps:
- Log in to the Axx Omni Control Panel.
- Go to Edit Profile> Security Settings > Two-Factor Authentication(2FA).
- If you want to set up email authentication, click Set up.
- Enter the six-digit numeric code you received in your email on the Enter the Authentication Code pop-up. The email authentication is successfully enabled with your Axx Omni account.
- Click View Backup Codes to view and download backup codes.
- Authenticator app authentication
- Install a third-party 2FA authenticator app on a mobile device and scan the QR code, which is provided on the Link the app to your account pop-up.
Note: You can also enter the secret code shared on the Link the app to your account pop-up into your 2FA authenticator app in case you find an issue connecting using a QR Code.
- Click Next. The 2FA authenticator app generates the six-digit numeric code.
- Provide the six-digit numeric code on the Enter the Authentication Code pop-up. The authenticator app authentication is successfully enabled with your Axx Omni account. Click View Backup Codes to view and download backup codes.
Note: In case you want to disable the email authentication or authenticator app authentication, click Turn off.
Login Using Two-Factor Authentication (2FA)
To login using 2FA on HELIOS Control Panel, follow these steps:
- On the User Sign In page, provide your Axx Omni credentials, and click Sign In.
The Input Authentication Code page appears. - Enter the six-digit passcode received in your email or generated from your 2FA authenticator app and click Verify.

2FA Warning Messages
Login Attempt Failed
Axx Omni gives you five login attempts to input the authentication code you receive from the Email or Authenticator app. However, if you fail to log in on the third and fourth attempt, the Input Authentication Code page displays a warning message: You have 2(1) login attempt(s) before your account is locked.
Account Lock
Axx Omni gives you five login attempts to input the authentication code you receive from the Email or Authenticator app. However, if agents fail to provide the correct code on all the attempts, his account gets a lock. He needs to contact administrator to unlock the account.

Switch Language
Click the Switch Language button, then choose your preferred display language..
Or
- Go to the Sign-In page.
- Click the Globe icon.
- Select your preferred language.