
How to Generate a HAR File for Troubleshooting
When any complex issues arise on your websites using Axx Omni, the Support team may require additional information from you to troubleshoot the issue. This information includes the network requests generated in your browser while a problem is still in occurrence. The Support team may request you to record a HAR (HTTP Archive) file and revert to them for further analysis.
A HAR file is used to identify performance issues, such as slow load times, page rendering, browser, and performance. The HAR file keeps track of each resource loaded by the browser and timing information for each resource. Thus, helping in debugging complex issues.
Most browsers support the HAR file format, including Google Chrome, Mozilla Firefox, Apple Safari, Microsoft Edge, and Internet Explorer.
This article acquaints you in creating HAR files in different browsers.
Note: Ensure to keep HAR files in a safe place as they contain sensitive data, including:
- Content of the pages you downloaded while recording
- Your cookies, which allows anyone with the HAR file to impersonate the account
- All the information that you submitted while recording
Step by Step Instructions
The following are the step-by-step instructions about how you can generate a HAR file via different browsers.
- Chrome
- Firefox
- Internet Explorer
- Safari
- Edge
- Save the file to your computer in .har format.
Chrome
- Open Google Chrome and go to the page where the issue is occurring.
- Look for the vertical ellipsis button and select More Tools > Developer Tools.
- Or you can right-click anywhere on the webpage and click Inspect on the pop-up menu.
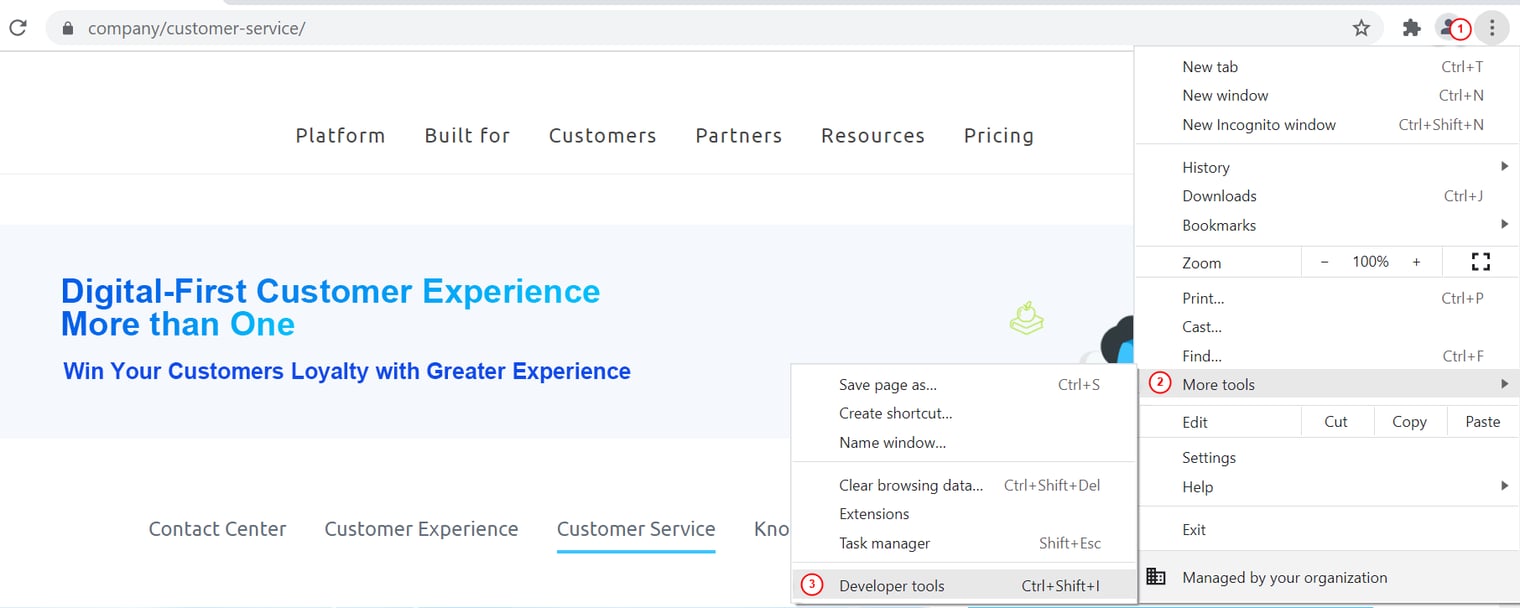
- From the panel opened, select the Network tab.
2. Look for the Record network log button in the upper left corner of the tab, and make sure it is red. If it is grey,
click it once to start recording.
3. Select the Preserve log check box.
4. Click the Clear button to clear out any existing logs from the Network tab.
5. Reproduce the issue that you were experiencing before while the network requests are being recorded.
6. Once you have reproduced the issue, right-click the network request log, and select Save all as HAR with content.
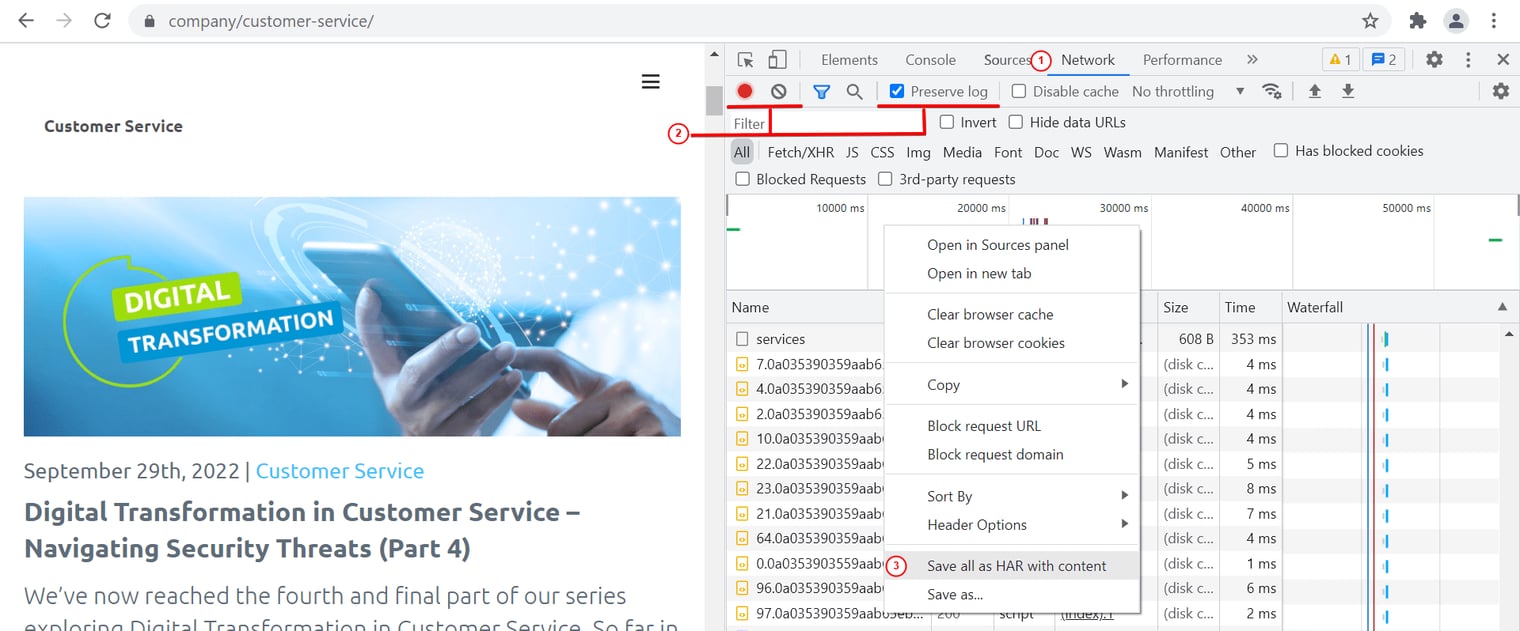
Save the file to your computer in .har format. Note: The steps to generate the HAR file are the same for MAC and Windows
Internet Explorer
To generate the HAR file for Internet Explorer, follow these steps:
- Open Internet Explorer and go to the page where the issue is occurring.
- Press F12 on your keyboard or click the Gear icon > F12 Developer Tools. Or you can right-click anywhere on the webpage and click Inspect on the pop-up menu.
- Click the Network tab.
- Reproduce the issue that you were experiencing before while the network requests are being recorded.
- Once done, click the Export as HAR button or Ctrl S.
- Save the file to your computer in .har format.
- After that, please share your HAR file with our Support team.
Note: The steps to generate the HAR file are the same for MAC and Windows.
Safari
Before you generate the HAR file, ensure that you have the Develop menu in Safari. If you do not see the Develop menu in the menu bar, choose Safari > Preferences, click Advanced, and select the Show Develop menu in the menu bar.
To generate the HAR file for Safari, follow these steps:
- Open the Develop menu and select Show Web Inspector.
- Click the Network tab and complete the activity that is causing issues.
- Click the Export icon and save the HAR file.
- After that, please share your HAR file with our Support team.
Edge
To generate the HAR file for Edge, follow these steps:
- Open Microsoft Edge and navigate to the page where the issue is occurring. Note: Edge is tab and window dependent, so if the issue occurs in a new tab or window, the HAR recording needs to be done in that new tab or window.
- Click the horizontal ellipsis menu button and select More Tools > Developer Tools. Or you can right-click anywhere on the webpage and click Inspect on the pop-up menu.
- Click the Network tab and click the Record network log button in the upper-left corner of the tab and verify that it is red; if it is gray, click to start recording.
- Select the Preserve Log check box.
- Click the Clear button to clear out any existing logs from the Network tab. Note: Do not close the Developer Tools panel, as this will end recording, and the needed HAR file will be lost.
- Reproduce the issue that was being experienced while the network requests are being recorded.
- Once you have reproduced the issue entirely, right-click anywhere on the grid of network requests and choose Save as HAR with content and save the file to the computer.
- After that, please share your HAR file with our Support team.
Note: If you are using other browsers and need our assistance in generating the HAR, you can contact our online Support team.
How to Fix Network Related Issues with Axx Omni
This article outlines issues you might be experiencing that are caused by network errors, root causes of network issues, as well as potential solutions to these problems.
Problem
- When I try logging in to the Axx Omni agent console to chat with my visitors, I receive a Network Error message.
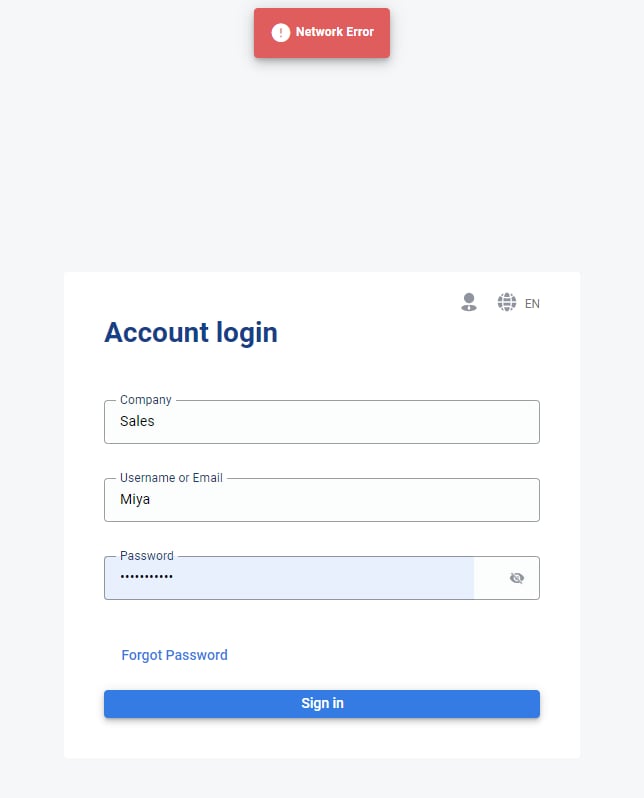
- I am getting an error message saying We are not able to connect to the server when trying to log in to my agent console.
- When logged into the agent console, I see the message: Internet connection is unstable or unavailable. Please check your Internet connection.
- When logged into the agent console, I see the message: Internet connection is unstable or unavailable. Please check your Internet connection.
MTR:
You will have to test the connection between you and the Axx Omni CX Axx Omni- CX server you are trying to connect to. You can download the software program Win MTR which is a Windows application combining the functionality of traceroute and ping utilities in a single network diagnostic tool.
Perform the following steps to collect the data Axx Omni CX needs to diagnose the issue:
- Click here to download the testing tool.
- Enter the domain in Host and then click Start. If your Axx Omni is deployed on your own server, please enter your domain name instead. For example, if your Axx Omni server address is http ://CX.y ourcomp any .com address in the Host.
- Wait about 5 minutes, then click Stop, please enter this.
- Click Copy Text to clipboard and then send back the data to us.
- Click Copy Text to clipboard and then send back the data to us.
Why Arenʼt the Changes Iʼm Making in Axx Omni Reflected on My Website
Problem
I am making changes to my Axx Omni account, but the changes arenʼt being reflected on my website.
Cause
The following could be the possible cause:
- You have more than one Widget and you are not making changes to the right one.
- The changes you made were not saved.
- The webpage was not refreshed or reloaded after saving the changes.
Solution
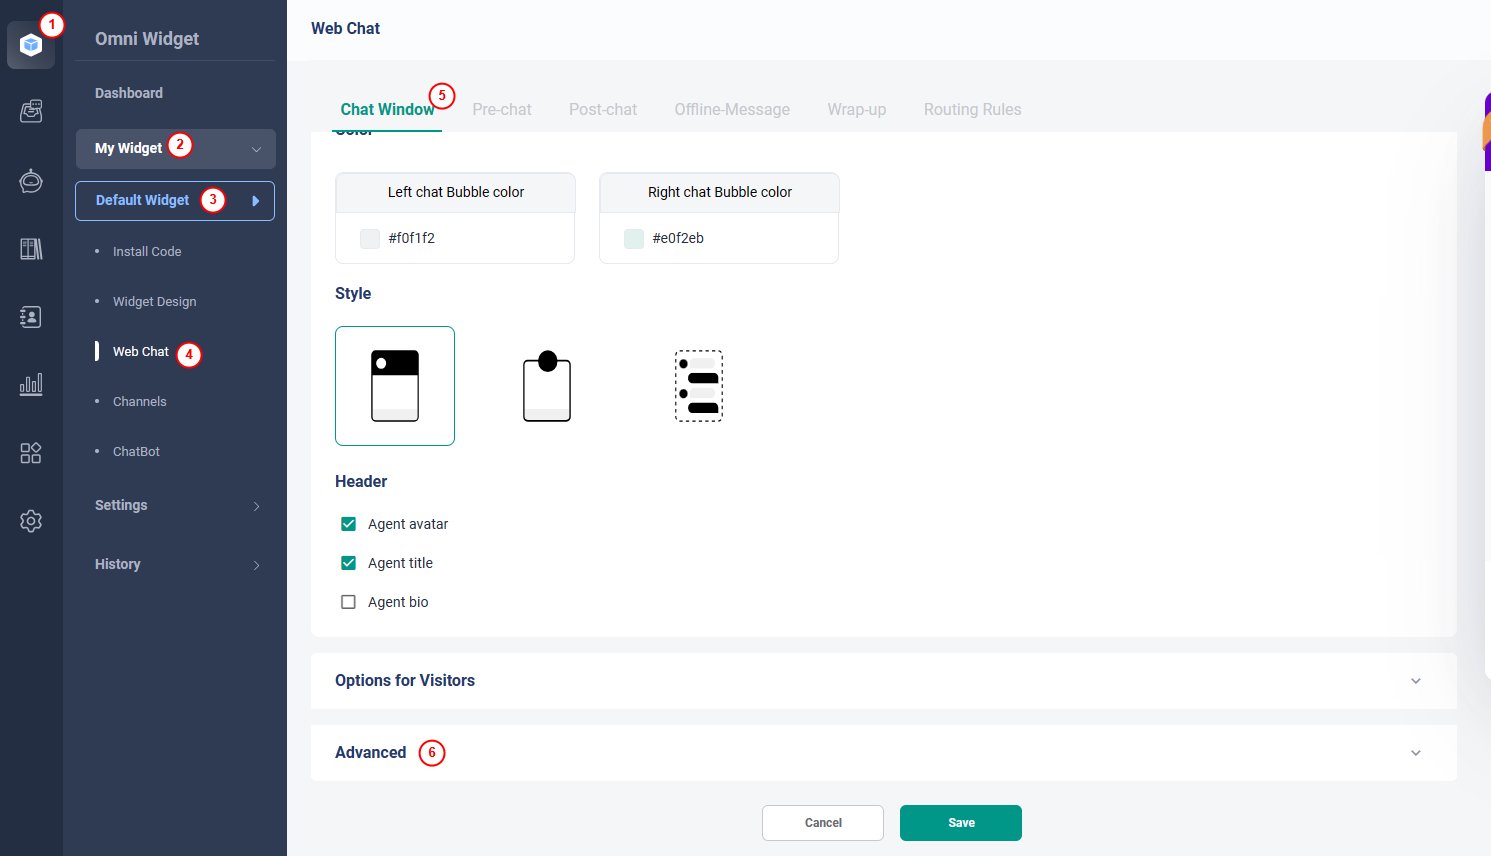
- Any changes or customization you make (to the Chat button, Chat window, Invitation, Pre-chat, Post Chat, Offline Message, Agent Wrap-Up, Routing Rules) happens at the Widget level. Changes made for one Widget wonʼt take effect on other Widgets. Thatʼs why whenever you are customizing your visitor side interface, be sure to select the right Widget from the Widget menu.
- After customizing any Widget, click Save and then refresh your webpage.
Why Canʼt My Visitors See the Chat Button on My Website
Problem
- All my website visitors cannot see the chat button on my website.
- A portion of website visitors cannot see the chat button on my website.
Cause
The following could be the possible cause:
- There is an issue with how your Widget Java Script Installation has been pasted into your website code.
- The visitor reporting this error has been banned.
- Chat Button is set to be visible only on certain Domain/URL in My Widget > Widget Design> Button > Advanced.
- The chat button is hidden by some rules implemented on your website.
Solution
- Make sure your Widget code is pasted in-full to the webpage. You can find the correct installation code from the Control Panel My Widget > Installation.
- Check your Ban List under Widget > Settings > Ban List. If the visitor reporting the issue has their IP address listed there, they will be unable to see the chat button. You can lift the ban by deleting their IP from the ban list. If their IP is not there, ask the visitor to clear their browser cookies.
- Clear the Display chat button on specified domains/URLs only check box from My Widget > Widget Design> Button > Advanced.
- Ensure that there are no rules on your website that are overriding the visibility of the Chat Button.
- Ensure that there are no rules on your website that are overriding the visibility of the Chat Button.
Why Are Chat Transcripts Not Being Delivered to My Email Inbox
Problem
The chat transcripts are not being delivered in my email inbox even if I have the Automatically email chat transcripts for archiving or follow-up check box selected.
Cause
- The email address specified in Axx Omni is different from the email inbox you are checking.
- You are trying to have transcripts sent to multiple email addresses but the format you have used to set this up is incorrect.
- You have not enabled transcripts to be sent for the right Widget.
- You have required agents to complete the wrap-up fields and the chats you are looking for havenʼt been wrapped up by your agents.
Solution
- Log in to your Axx Omni Control Panel.
- Navigate to My Widget.
- Select your Widget from the Widget drop-down list.
- Navigate to Web Chat>Chat Window> Advanced.
- Make sure the email address is correct. Check for typos if any.
Why Is My Chat Button Offline When My Agents Are Online
Problem
The chat button on my website appears offline even though my agents are logged in.
Cause
The following could be the possible cause:
- The routing rules you have enabled are trying to route chats to an agent who is currently offline.
- Chats are being routed to a queue, and agents that are online are not members of that queue.
Solution
- From My Widget > Web Chat > Routing Rules, verify which queue the chat is being routed to.
- If the chat is being routed to a queue, the online agents need to be a member of that queue for the chat button to appear online. Under People > Queues, you can verify which queues agents are members of and make changes as needed.
Why Isnʼt My Pre-chat Survey Displaying to My Site Visitors
Problem
I want my site visitors to fill in a pre-chat survey before starting a chat. However, on my website, the chat starts immediately after visitors click on the chat button. How can I change that?
Cause
The following could be the possible cause:
- Your pre-chat form is not enabled for the campaign you are using on your website.
- Pre-Chat is enabled for a different campaign.
Solution
- Log in to the Axx Omni account.
- From the left navigation menu, go to My Widget > Web Chat, and go to Pre- Chat.
- Turn on the Pre-chat toggle key.
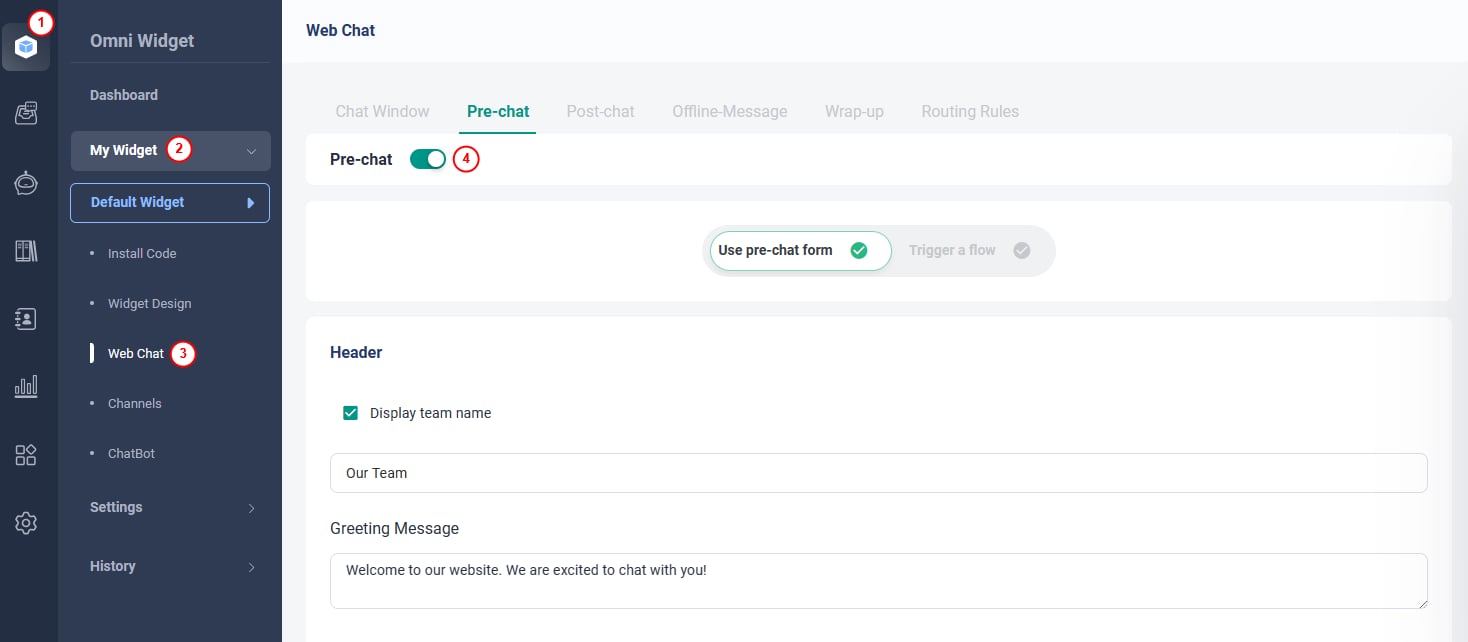
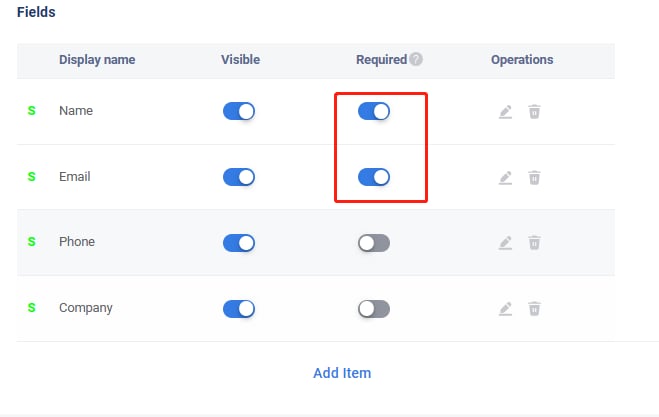
- Select the fields you want your visitors to fill in and mark them visible. Mark the mandatory fields as Required.
If you need further assistance, contact the Axxess Support team.
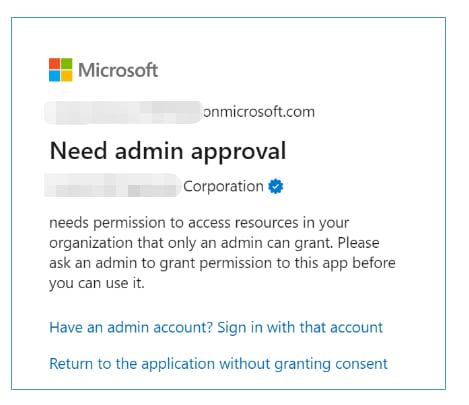
Why am I Receiving a "Need admin approval" Error Message in Inbox
Problem
When integrating or reauthorizing the Office 365 and Gmail emails type email accounts with Axx Omni Inbox, I receive a "Need admin approval" error message.
Cause
The potential cause could be incorrect user/admin consent settings or permissions in the Azure portal.
Solution
You can review user/admin consent settings in the Azure portal based on the correct user/admin consent settings and permissions. It includes the following scenarios:
- Restricted resource access to allow app integration (MS Recommended)
- No user consent; requires admin consent for apps.
- No user consent; requires admin consent for apps, but admin consent request disabled.
Restricted Resource Access to Allow App Integration (MS Recommended)
On the All services > Enterprise applications > Consent and permissions > User consent settings page, if you have selected the Allow user consent for apps from verified publishers, for selected permission (Recommended) option.

On the All services > Enterprise applications > Consent and permissions > Permission classifications page, create permissions set to allow limited permissions for user consent.
| API used | Permissions | Description |
| Microsoft Graph | Mail.Send.Shared | Send mail on behalf of others. |
| Microsoft Graph | Mail.Read.Shared | Read user and shared mail. |
| Microsoft Graph | openid | Sign users in. |
| Microsoft Graph | offline_access | Maintain access to data you have given it access to. |
| Microsoft Graph | Mail.Send | Send mail as a user. |
| Microsoft Graph | Mail.Send | Read user mail. |
| Microsoft Graph | profile | View users' basic profile. |
| Microsoft Graph | View users' email address. |

Follow the app integration flow, which prompts the user for consent and allows them to integrate the app with the permissions.
No User Consent; Requires Admin Consent for Apps
On the All services > Enterprise applications > Consent and permissions > User consent settings page, an administrator will be required for all apps if you have selected the Do not allow user consent option.

On the All services > Enterprise applications > Consent and permissions > Admin consent settings page, turn the Users can request admin consent to apps they are unable to consent to toggle key to Yes.

On the Home > Enterprise applicationss > Admin Consent request page, the administrator can see and approve the pending request.

Restart the integration flow after you receive the approval. Now the app will not prompt for consent and allow integration.
No User Consent; Requires Admin Consent for Apps, but Admin Consent Request is Disabled
On the All services > Enterprise applications > Consent and permissions > User consent settings page, if you have selected the Do not allow user consent option, then an admin consent for apps will be required for all apps but is set as disabled.

On the All services > Enterprise applications > Consent and permissions > Admin consent settings page, turn the Users can request admin consent to apps they are unable to consent to toggle key to No.
.png)
Here, when you try to integrate the app, an option displays to allow the admin to log in.
The admin logs in, provides consent on behalf of the organization, and marks acceptance of the consent.
After giving consent on behalf of the organization, subsequent integrations will be without any consent prompt or approval.
Why Am I Seeing IP Addresses Instead of Visitor Names
in the Agent Console
Problem
When I chat with site visitors, I do not see their names; instead, I see IP addresses.
Cause
The following could be the possible cause:
- The pre-chat window is not enabled, so visitors have no way of inputting their names.
- Pre-chat is enabled, but the Name field is either Invisible or not set as Required. If your customer does not specify their Name, the chat system shows the visitor IP address as Name instead.
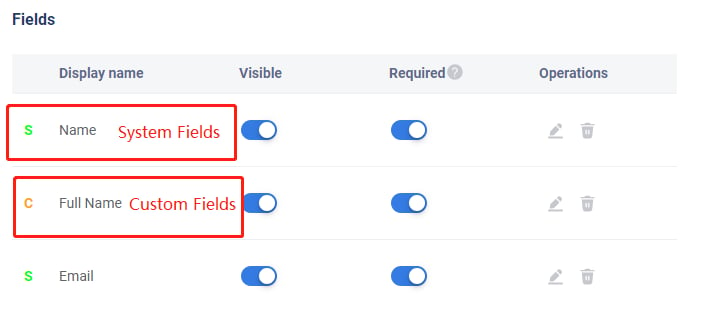
- Instead of using the system default Name field, you are using a custom pre- chat field.
- You are using a custom variable to automatically get the name data, but the configuration has not been properly done.
Solution
- Log in to the Axx Omni Control Panel.
- From the left navigation menu, go to Omnichannel Widget > My Widget.
- Select the correct widget from the drop-down list.
- Go to Pre-chat and turn on the toggle key.
- Select the fields you want your visitors to fill in and mark them visible. Make sure to mark mandatory fields as Required.
- Set the name field as both Visible and Required.
- If you are using custom variables to automatically get information using data from your website, make sure this has been configured correctly.
Unexpected Logout from Axx Omni Agent Console
Problem
I am logged into the Axx Omni Agent Console, but suddenly I am logged out and see a message saying "You have logged out."
Cause
The following could be the possible causes:
- You have logged in from another location, such as another device or browser tab.
- Someone with your login credentials has forced a login to the agent console.
- You lost connection with our server due to an unstable internet connection.
- Your Admin or a co-worker with 'Log Agents Off' permission clicked the Kick- Off button in the Agent tab.
Solutions
- Reconnect to the internet and ensure the connection is stable.
- Have the person using your login credentials log out of your account, or log in and kick them out if required.
- Change your password if you suspect your account may have been compromised.
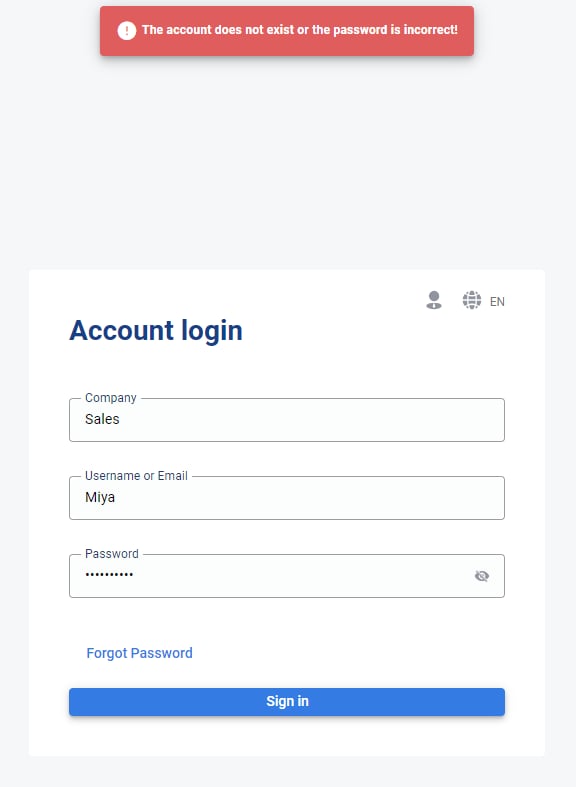
I Canʼt Log into My Axx Omni Account
Problem
I receive an The account does not exist or the password is incorrect! error message while trying to log in to my Axx Omni Control Panel.
Cause
The following could be the possible cause:
- The Email or Password entered does not match with the Email or Password set for your account.
- The Email or Password entered does not match with the Email or Password set for your account.
- You are trying to log in from the wrong login URL. For on-premise clients, if you are getting this error, it can also mean that you are trying to get access using the wrong login URL.
Why Online Visitors Do Not Show in the Agent Console Window
Problem
In the Agent Panel, agents are unable to see any online visitors.
Possible Causes
- The Axx Omni Widget code is not added to the webpage the visitor is on.
- Only a chat link is being used instead of the full Java Script installation code.
- The widget code pasted onto the website is incorrect or incomplete.
- If All Chats is selected, you will only see visitors who are actively chatting or waiting in the queue.
- If My Chats is selected, you will only see visitors currently chatting with you (not with other agents).
Solution
- Ensure the Widget code is correctly pasted onto the webpage.
- Remove any modified or revised code from your site. Instead, copy and paste the original widget code exactly as provided.
- Be aware: Some website builders do not fully support Java Script. If your builder automatically alters the code when pasted, you may need to use the HTML- only version of the widget instead.
Some website building tools donot support Java scripting. When you paste the Widget code with Javascript onto your website, the JS codes will be automatically changed by the website builder. In this case, only the HTML code without Javascripts available for your web page.